Checking In Borrowing Items
When that package from another library arrives at your desk, checking it in properly sets the stage for everything that follows. Let's walk through how to receive items efficiently in the Staff Web Client, making sure nothing slips through the cracks.
Getting to the Check-In Screen
There are a few ways to reach the check-in function, depending on your workflow preferences.
The Direct Route
The most straightforward path is through the main menu. Click Borrowing in your sidebar, then select Check In From Lending Library. This takes you straight to the check-in interface where you can start searching for requests.
Starting from Your Queue
If you're already working in your queues, you might notice items in Awaiting Post Receipt Processing. These are requests where the system knows something's on the way. You can check items in directly from this queue.
Quick Scan Entry
Here's a time-saver: if you have a barcode scanner handy, you can often scan the ILL number or transaction number directly into the search box. The system will find the matching request automatically.
The check-in interface works beautifully on tablets. Set one up at your receiving station and you can process items right where you unpack them. No more walking back and forth to your desk!
Understanding the Check-In Interface
When you first open the check-in screen, you'll see a clean, organized layout designed to guide you through the process step by step.
Finding the Right Request
The search area at the top is your starting point. You have three ways to find requests:
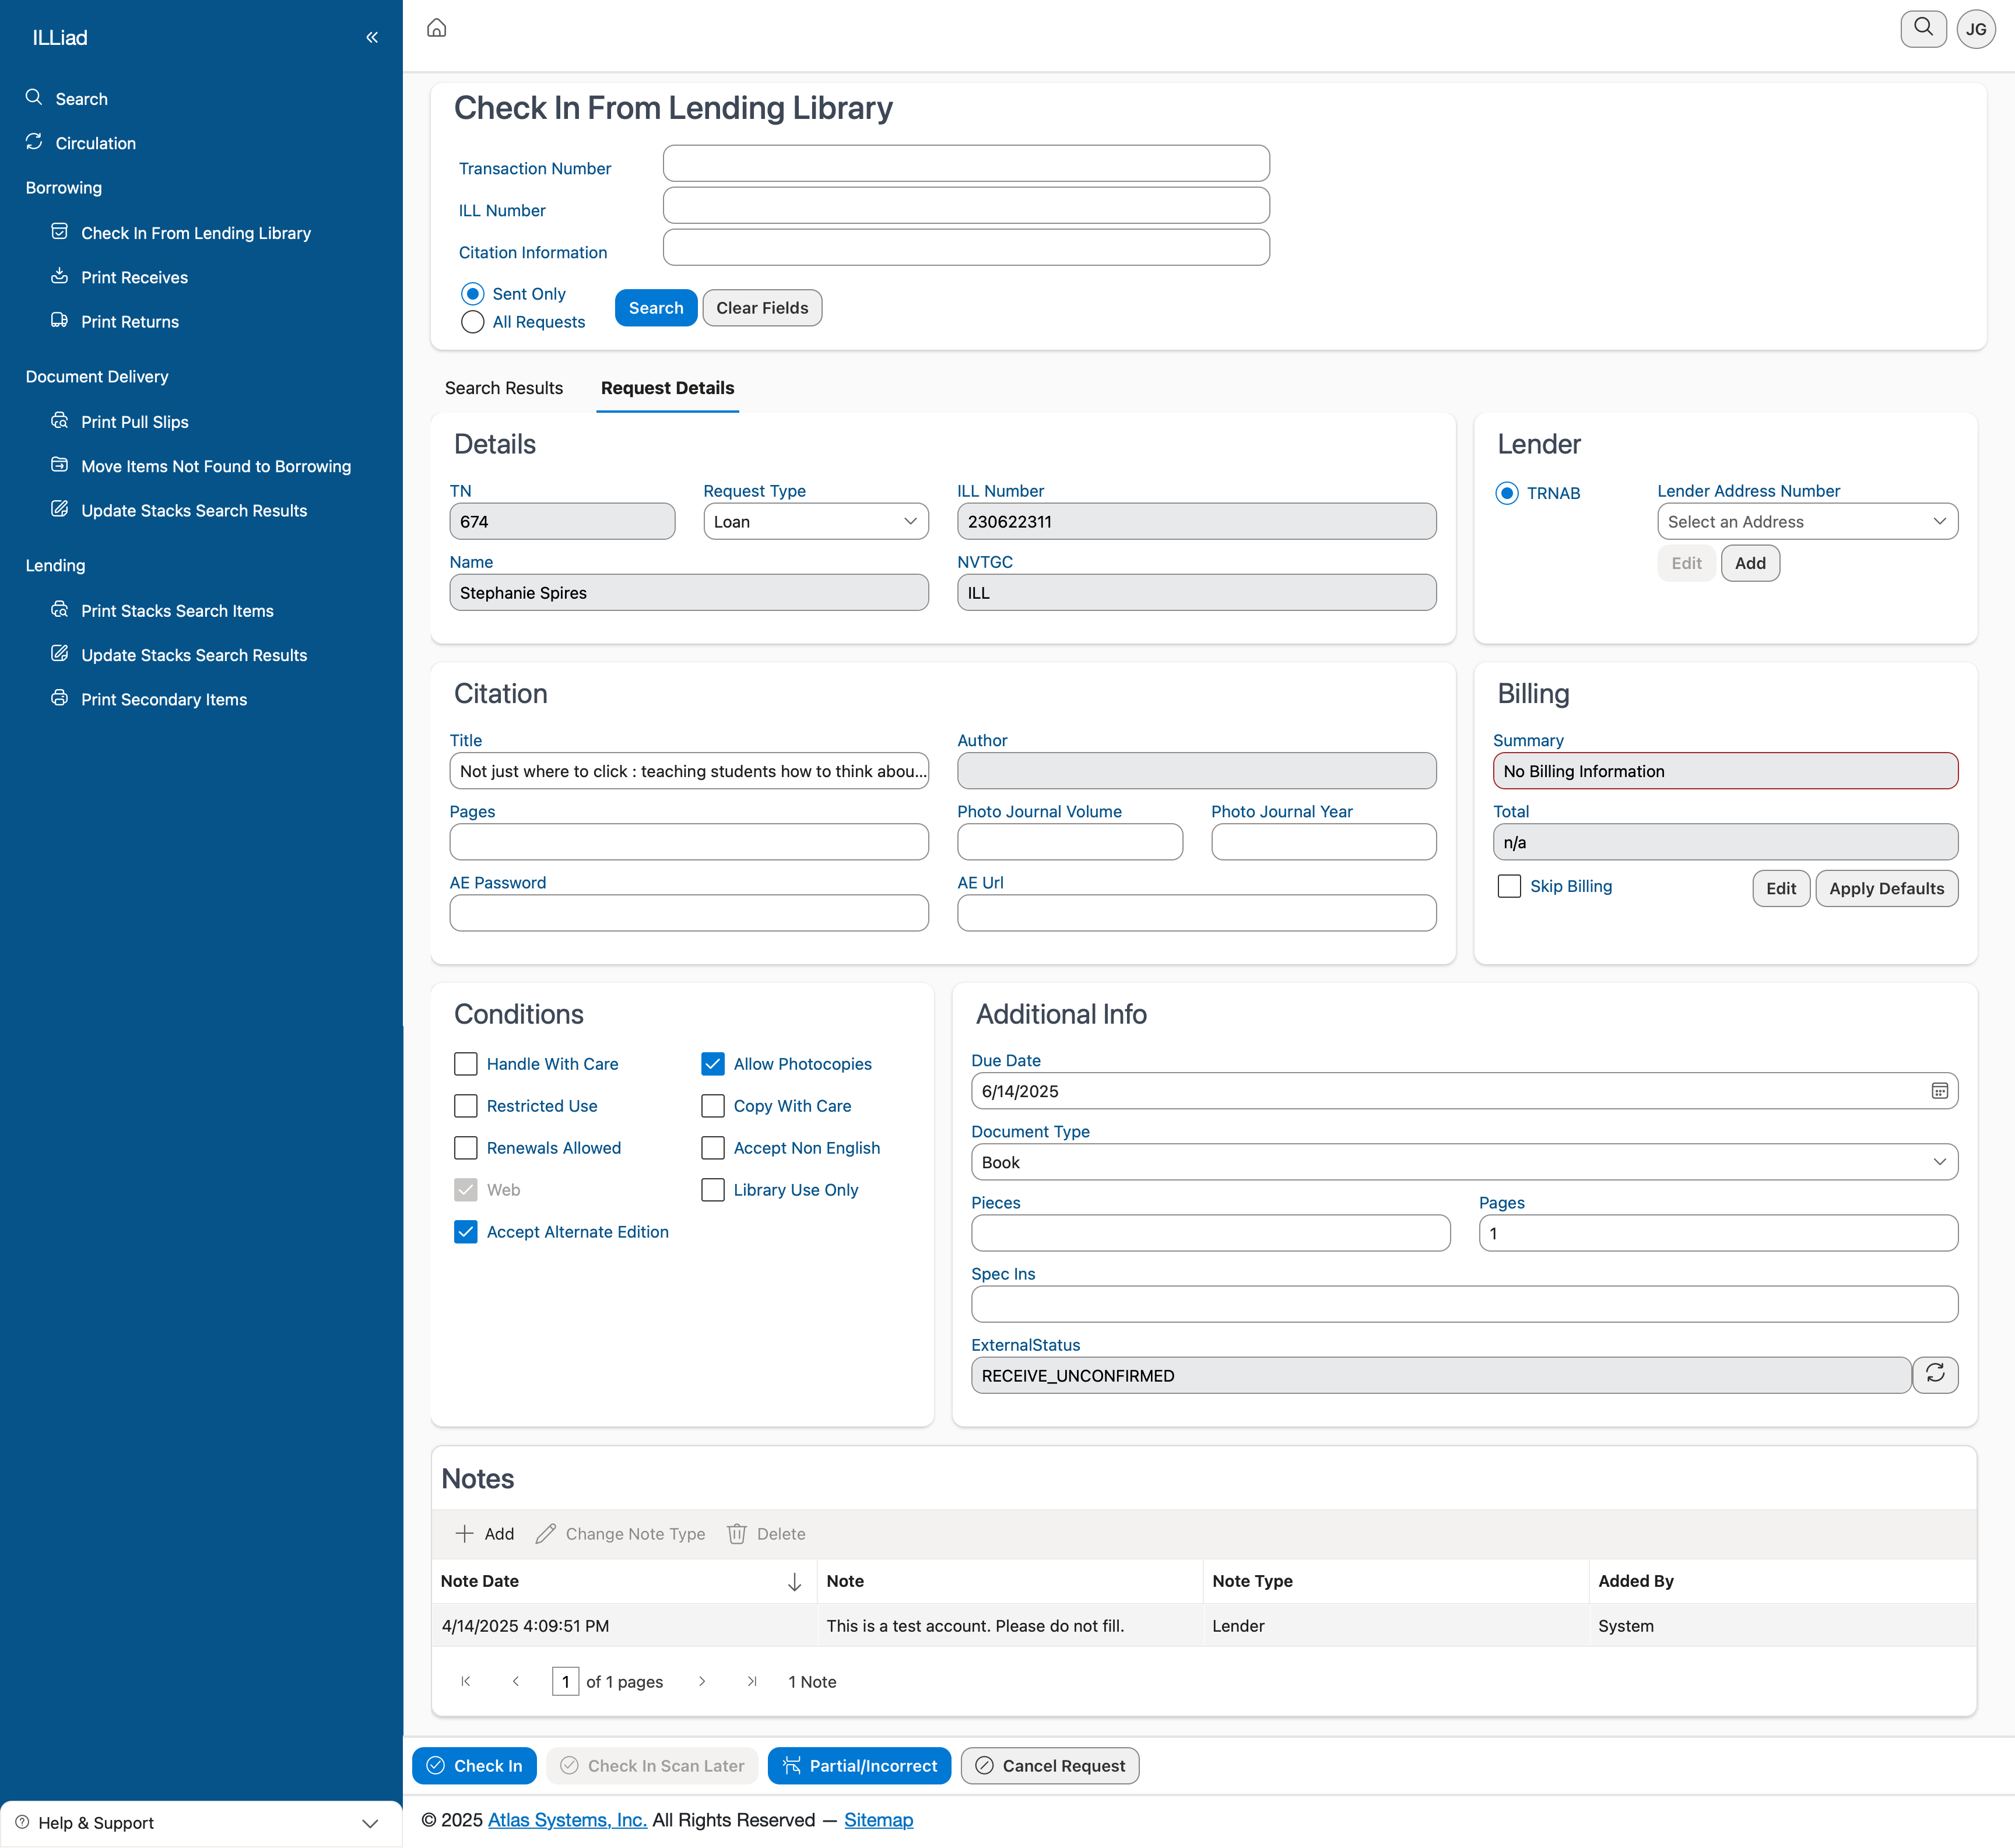 The complete Check In From Lending Library interface showing search options, request details, and processing controls
Transaction Number is ILLiad's internal ID – it's that number you see everywhere in the system (like TN 674 in the screenshot). ILL Number is what the lending library uses – you'll usually find this on their paperwork (like 230822311 shown). Citation Information lets you search by title, author, or other details when you don't have the exact numbers.
Below the search fields, you'll see two radio buttons. Sent Only is usually your best bet – it filters results to show only requests where we've actually sent the request to a lender. This cuts down on false matches. All Requests searches everything, which is helpful if something seems missing.
Start with "Sent Only" selected. You'll get cleaner results and find what you need faster. Only switch to "All Requests" if you can't find an item you know should be there.
Reading the Request Details
Once you find and select a request, the interface displays everything you need to know, organized logically.
Who Wants What
The top section shows the basics at a glance. You'll see the transaction number, what type of request it is (loan or copy), the ILL number for reference, and most importantly, who requested it. In our example, Stephanie Spires from NVTGC is waiting for this item.
The Item Itself
The citation details tell you exactly what you should have received. Check the title, author, and for articles, the specific pages requested. Sometimes you'll see special fields like AE Password or AE URL – these are for electronic access when provided by the lender.
Where It Came From
The lender information section shows who sent the item. The lender symbol (like TENAB) is their official identifier. You can view their full address, and if something's wrong, use the Edit or Add buttons to fix it. Accurate addresses matter when it's time to return items!
Setting Processing Conditions
The middle section of the screen has all those checkboxes for special conditions. These aren't just bureaucratic checkboxes – they control how patrons can use the item.
Handle With Care means exactly what it says – maybe it's a rare book or fragile item. Library Use Only restricts the item to in-house use. Renewals Allowed tells you whether the patron can keep it longer. Allow Photocopies controls whether the patron can make copies.
These conditions usually come from the lender's paperwork. If their slip says "Library Use Only," make sure to check that box. It protects both you and your patron from violating lending agreements.
Additional Details That Matter
The right side of the interface handles the nitty-gritty details.
The Due Date is crucial – this is when the item must be returned to the lender. Always double-check this against the lender's paperwork. Document Type helps the system route the item correctly. Pieces tracks how many physical items you received (important for multi-volume sets).
If there are charges, you'll see billing information here too. You can skip billing if needed or apply your default rates.
The Step-by-Step Check-In Process
Now let's walk through actually checking in an item.
Step 1: Find Your Request
Start at the check-in screen. Enter whatever identifier you have – the ILL number from the lender's paperwork is usually easiest. Make sure "Sent Only" is selected, then click Search.
Step 2: Pick the Right One
If you get multiple results, look carefully at the titles and patron names. Click on the correct request to load its details. Take a moment to verify this matches what you physically received.
Step 3: Verify Everything Matches
This is your quality control moment. Does the title on the book match what's on screen? Is it the right edition? The right patron? If something seems off, stop and investigate before proceeding.
Before you check anything in, give it a quick inspection. Note any existing damage, missing pages, or broken cases. Document these issues in the notes – it saves headaches when returning items.
Step 4: Set Your Options
Now configure how this item should be handled:
First, check any applicable condition boxes. If the lender marked it "Library Use Only," check that box. If it needs special handling, check that too.
Next, verify the lender information looks correct. If this is a new lender or their address has changed, take a moment to update it.
Finally, fill in the item details. Set the due date from the lender's documentation. Note how many pieces you received. Choose the right document type.
Step 5: Choose Your Processing Path
Here's where you decide what happens next. The buttons at the bottom give you several options:
For Standard Items
Check In is your go-to for most loans and articles that arrived in paper format. Click it, and the item is marked as received, moving to the next processing queue. The patron gets notified automatically.
Check In Scan Later is perfect for paper articles you'll scan eventually but not right now. Maybe you're processing a morning delivery and will scan everything after lunch. This option marks it received but routes it to the scanning queue.
Check In Scan Now takes you straight to the scanning interface. Use this when you want to scan and deliver an article immediately.
When Things Go Wrong
Partial/Incorrect is for when what you received doesn't match what was requested. Maybe they sent volume 2 instead of volume 1, or only pages 1-10 of a 20-page article. This routes the item for special handling.
Cancel Request stops everything. Use this carefully – it notifies the patron that their request won't be filled.
Step 6: Finish Up
After check-in, don't forget the physical processing:
- Print any routing slips or labels
- Put the item in the right pickup location
- Apply any straps or flags your library uses
- File any special paperwork
Making the Most of Notes
The notes feature is more powerful than it might seem. Use it liberally to document anything unusual.
Click Add to create a new note. Choose whether it's a staff note (internal only) or patron note (they'll see it). The system timestamps everything and tracks who added what.
Good things to document:
- Damage noticed during check-in
- Conversations with lenders about conditions
- Why you made certain decisions
- Special pickup arrangements
That note about "small tear on page 47" could save a billing dispute six weeks from now. When in doubt, document it.
Handling Volume
When you're facing a cart full of incoming items, efficiency matters.
Batch Processing Tips
Group similar items together before you start. Process all the books, then all the articles. Items from the same lender often have similar conditions, so you can move through them quickly.
Have your supplies ready: labels, routing slips, book straps. Nothing slows you down like running out of labels mid-batch.
Sort by urgency first. Faculty research? Dissertation materials? Process these before the regular holds.
Staying Organized
Create a physical workflow that matches the system workflow. Have a "to process" area, a "processing" spot, and a "completed" section. This prevents double-processing or missed items.
Working on Different Devices
The check-in interface adapts beautifully to different screen sizes.
On Your Desktop
You get the full experience with everything visible at once. Search results appear in a grid, and all options are immediately accessible.
On a Tablet
The interface remains touch-friendly with larger buttons and smart spacing. Perfect for a receiving station setup. The system even optimizes for portrait or landscape orientation.
On Your Phone
In a pinch, you can check items in from your phone. The interface stacks vertically, and buttons resize for easy tapping. Great for that rush item that needs processing immediately.
Keyboard Shortcuts
Power users, take note: Tab moves between fields, Enter submits searches, arrow keys navigate dropdowns, and Escape clears or cancels. You can process items without touching the mouse.
When Things Don't Go as Planned
Can't Find the Item?
First, double-check your search terms. Typos happen. Try searching different ways – by ILL number, title keywords, or patron name. Check if someone already processed it. If you still can't find it, search "All Requests" instead of "Sent Only."
Missing Lender Info?
No problem. Click Add to create a new lender entry. You'll need their address from the paperwork. Check the OCLC directory if you need standard addressing. Document everything for next time.
Conflicting Instructions?
Sometimes the lender's paperwork contradicts their system conditions. When in doubt, follow the most restrictive option and document your decision. A quick email to the lender can clarify for future requests.
Making Excellence a Habit
Great check-in practices make everything downstream work better:
✓ Always verify condition – A quick flip through pages takes seconds but prevents problems
✓ Document everything unusual – Your notes are a lifesaver for colleagues and future you
✓ Rush means rush – Process urgent items immediately
✓ Keep lender info current – Updated addresses prevent return delays
✓ Match physical to digital – Make sure conditions in the system match the lender's requirements
✓ Think ahead to returns – Good check-in documentation makes returns smooth
How This Fits Your Workflow
If you're coming from the Windows client, you'll find all the familiar functions here, just reorganized for web efficiency. The search works the same way, conditions match what you're used to, and the processing options are identical. What's new is the improved interface, better notes system, and ability to work from any device.
What's Next?
Once you've mastered checking in items, you're ready to explore:
- Processing Requests – Managing the full request workflow
- Managing Returns – Sending items back efficiently
- Print Management – Setting up your labels and slips
| Previous | Current | Next |
|---|---|---|
| Borrowing Overview | Checking In Items | Processing Requests |