Setting up an ArchivesSpace ODBC Connection in MySQL Workbench in Windows
Atlas Systems is happy to offer read-only ODBC connections to your ArchivesSpace database, which is the raw data that lives behind the scenes of the two Aspace interfaces you may be familiar with: the staff side and the Public User Interface. This article is meant to be read after receiving the username, password, and hostname (IP address) for your connection from Atlas during the setup process. Please email support@atlas-sys.com to get started on that setup process if you have not already.
One Time Set-up: Download and Install the MySQL Installer
Please note: This set of instructions is for the Windows operating system.
Advanced users will recognize that the download below is for the MySQL Installer, which includes all MySQL products for all Windows platforms in one package. More advanced users may wish to choose a discrete driver instead.
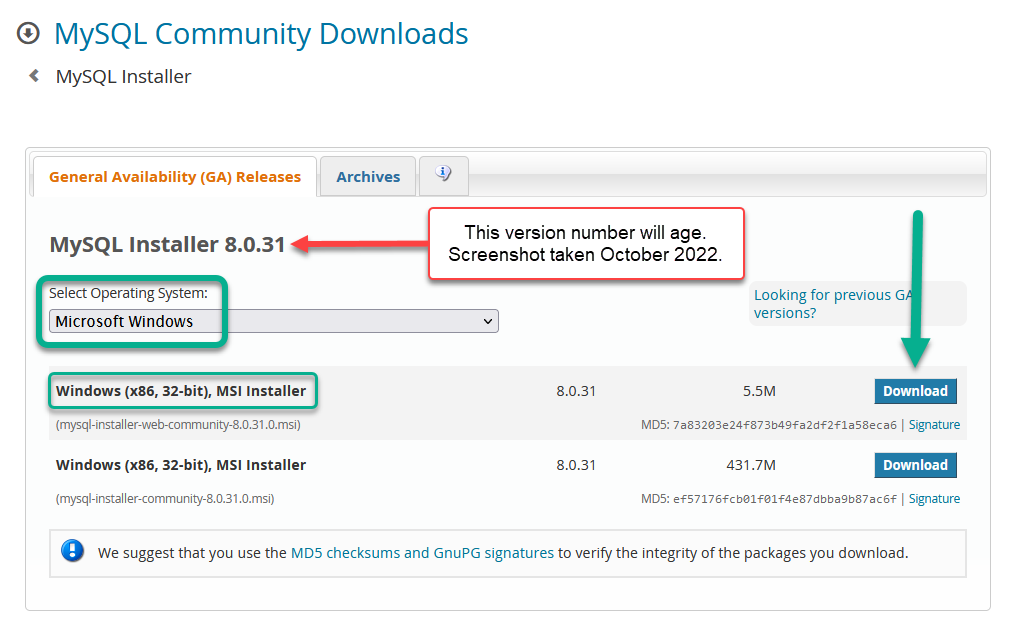
1. Download the MySQL Installer from: https://dev.mysql.com/downloads/windows/installer/
Please note that the version number in the below screenshot will age. As long as the link above remains active, simply follow that link to whatever the current version is as of the moment you read these instructions.
2. Click on the top Download link for the Windows (x86, 32-bit), MSI Installer
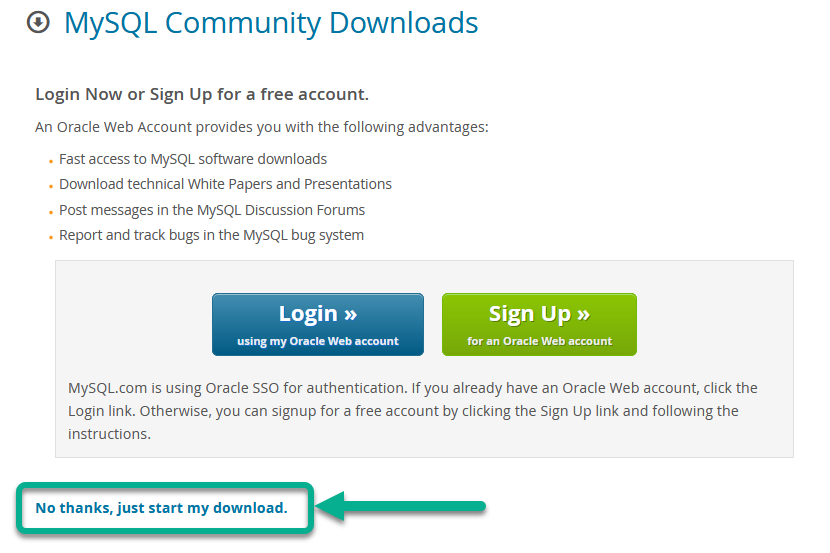
3. On the next screen, you will be prompted to login or sign up for a free Oracle Web account. If you would like to skip this process, click on the 'No Thanks, just start my download' link.
4. Save the file to your Downloads folder or wherever your browser saves downloaded files. Navigate to the download location and double-click the recently downloaded file.
5. Follow the prompts for a typical download and installation. If you already have MySQL products installed on your computer, this process will offer to update them.
With the download and installation complete, it is now time to try connecting to your read-only ODBC connection.
One Time Set-up: Connecting to ArchivesSpace via MySQL Workbench
Before beginning this section, please locate the following:
- The IP address, username, and password for the ODBC connection as provided to you by Atlas Systems. If you have not yet received this information, please contact us at support@atlas-sys.com.
- The MySQL Workbench application, which should have been installed on your computer as part of the download in the first section. The quickest way to find it is to start typing "mysql workbench" into the Windows start menu search box, and it should come up.
With those above in hand, setting up an ODBC connection is very easy! Here are some sample pieces of information for the following examples:
Sample IP address of server: 123.45.67.89
Sample username (case-sensitive): person1
Sample password: 1$2$3$4
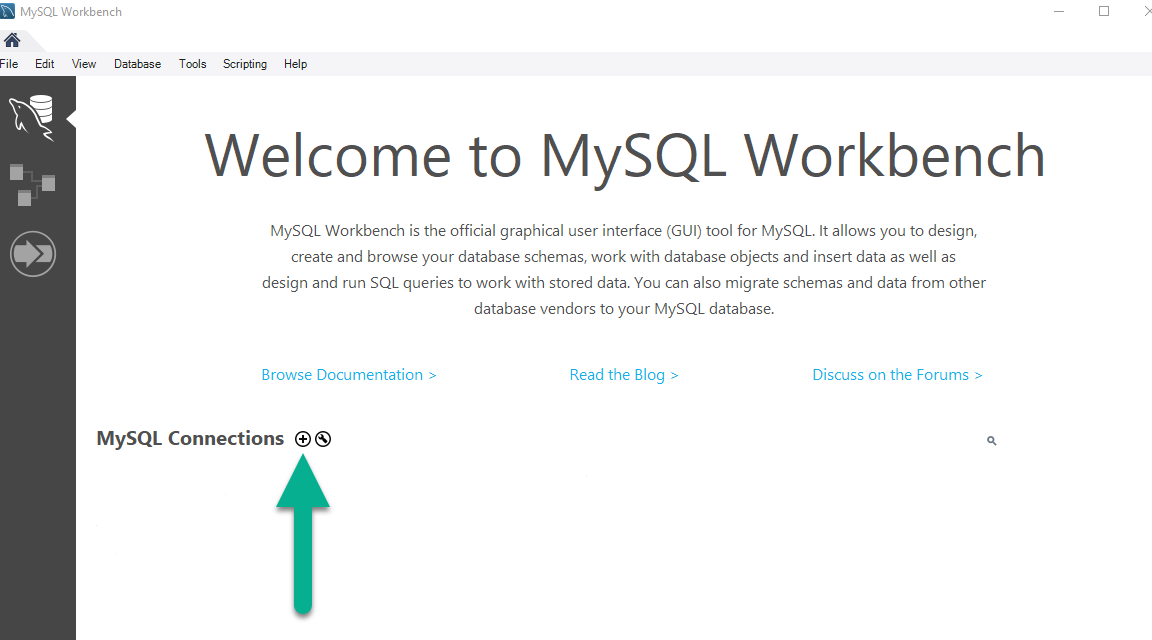
- Open MySQL Workbench. You will see the follow blank screen. Look for the + sign:
- You will see the following screen. The first screenshot should be exactly what you see when you click on the + for the first time; some fields are populated by default:
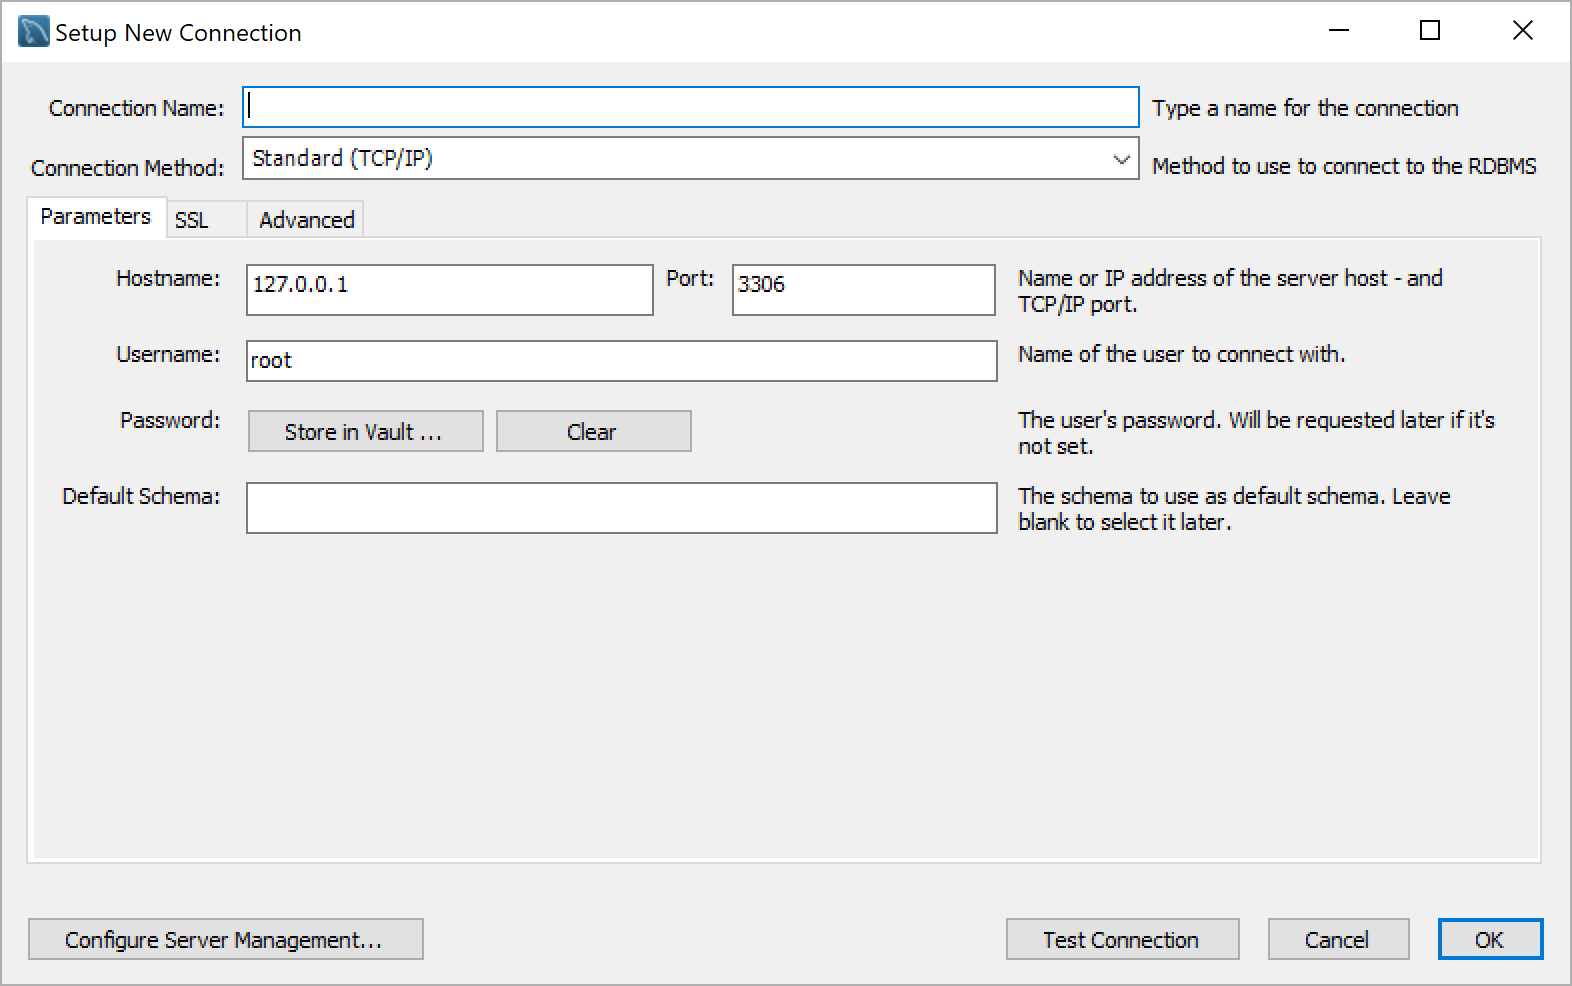
- Note the following fields and refer to the screenshot below:
Connection Name: Call it whatever you want! ODBC Connection to ASpace is a good option.
Connection Method: Leave the default
Hostname: This is where you put the IP address you received from Atlas Systems
Port: Leave the default
Username: This is where you put the username agreed upon with Atlas. Note that this is not an ASpace user account, it's a separate user name and password created in cooperation with Atlas during the ODBC setup process.
Password: Click Store in Vault... and then submit the password given to you by Atlas
Default Schema: This value will be archivesspace, lower-case, all one word. This is not required, but will save you time and confusion later.
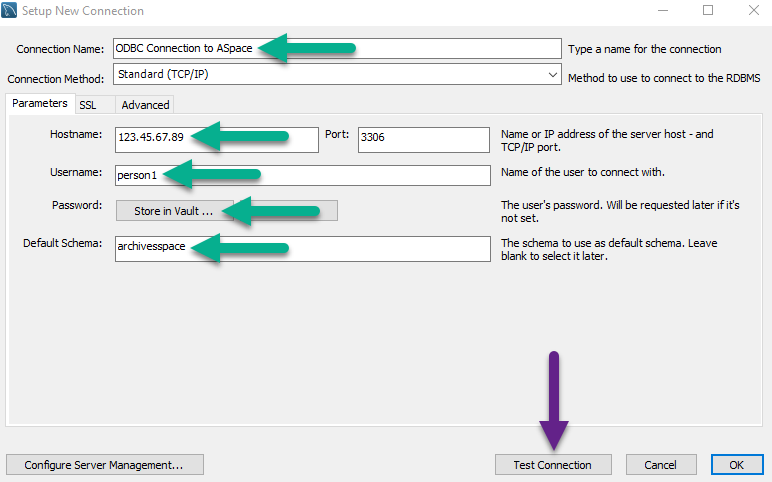
*Remember that the Username and Hostname above are dummy data used for the screenshot
- Click the Test Connection button seen above and you should see the following message:
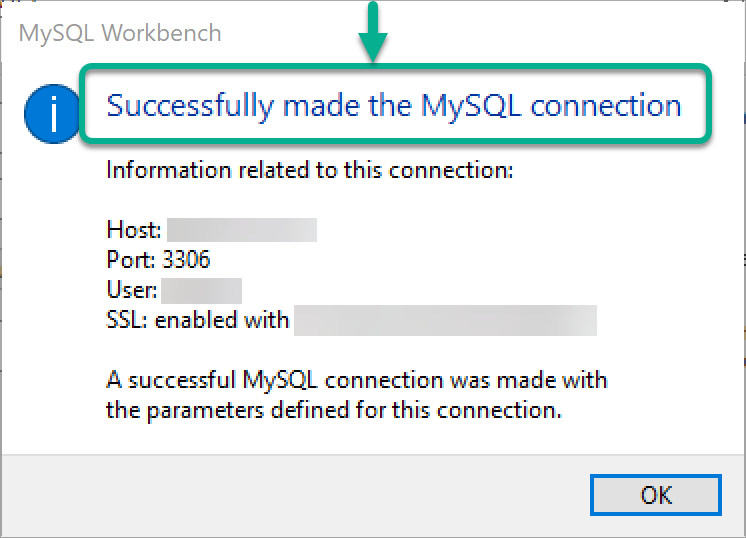
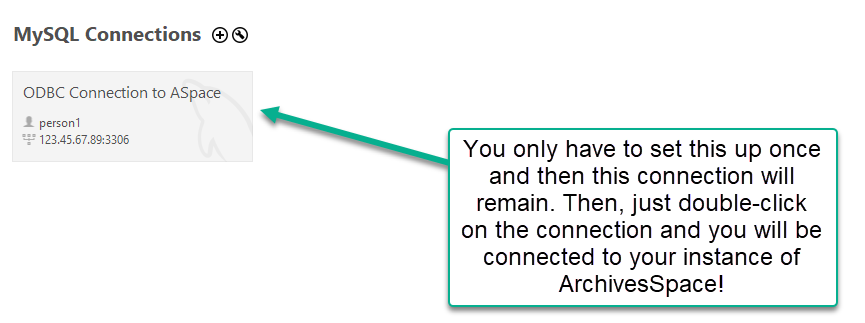
You are now connected to ArchivesSpace! You will not have to repeat this process. Following a successful connection, the connection will remain on the home-screen of MySQL Workbench:
Orienting Yourself in Workbench
The scope of this article is the setup process itself. Once you double-click your successful connection, you may be confused by the next steps. Using an ODBC connection in MySQL Workbench does require basic knowledge of SQL, but even beginner users can try the following.
Orient yourself to a few key areas of the Workbench application. Note that the following screenshots may not reflect your screen when you open a connection for the first time. One of the first things you can do is simplify your display by trying to make it look like the following:
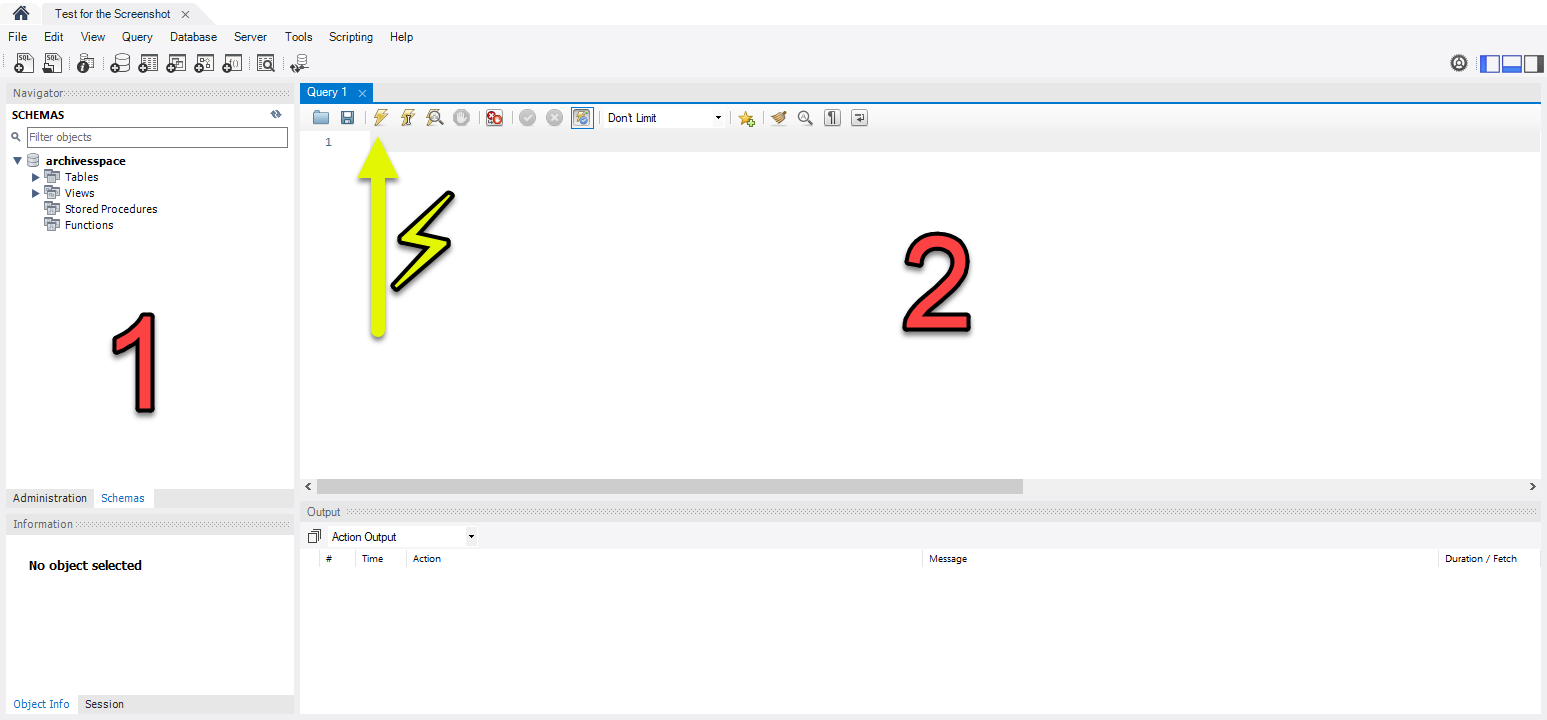
Area 1 - Schemas
- Expand the schema titled archivesspace
- Expand Tables
- You will see a long list of tables. These are the tables that make up the ArchivesSpace database
Area 2 - Query Window
This is where you can type SQL queries to retrieve data from the database.
Area 3 - Results
This is where query results will appear when you run SQL commands.
Sample Queries
Here are some beginner-friendly queries to get you started:
View All Tables
SHOW TABLES;
View Resource Records
SELECT * FROM resource LIMIT 10;
View Archival Objects
SELECT * FROM archival_object LIMIT 10;
Important Notes
- This is a read-only connection - you cannot modify data
- Always use
LIMITin your queries to avoid overwhelming results - Contact Atlas Systems support if you experience connection issues
- Your connection credentials are specific to your institution