Managing Appointments in the Web Client
This article provides an overview of the different controls and options for managing appointments and reading room calendars in the Aeon Web Client.
This article covers the Web Client. For desktop-based appointment management, see Managing Appointments in the Desktop Client.
Note: If you had been using a custom staff template prior to updating to v5.1, you will need to edit your template in the Aeon Desktop Client after updating to manually add the Appointments group tab to the Home form and to add the appointment fields to the relevant forms.
The Appointment Calendar | The Appointment Form | Rescheduling an Appointment | Managing Appointments from the User Record
The Appointment Calendar
The Aeon Web Client will display an appointment calendar for each reading room defined in the Aeon Customization Manager's Appointment Scheduling tab for your site. Double-clicking on an existing appointment in the reading room calendar will open the Appointment form, where you can view the complete appointment details and edit or cancel the appointment. Appointments can also be moved, extended, or shortened directly within the calendar by dragging and dropping. New appointments can be created by double-clicking on an empty space in the reading room calendar or by using the New Appointment button present at the top of each client's calendar interface.
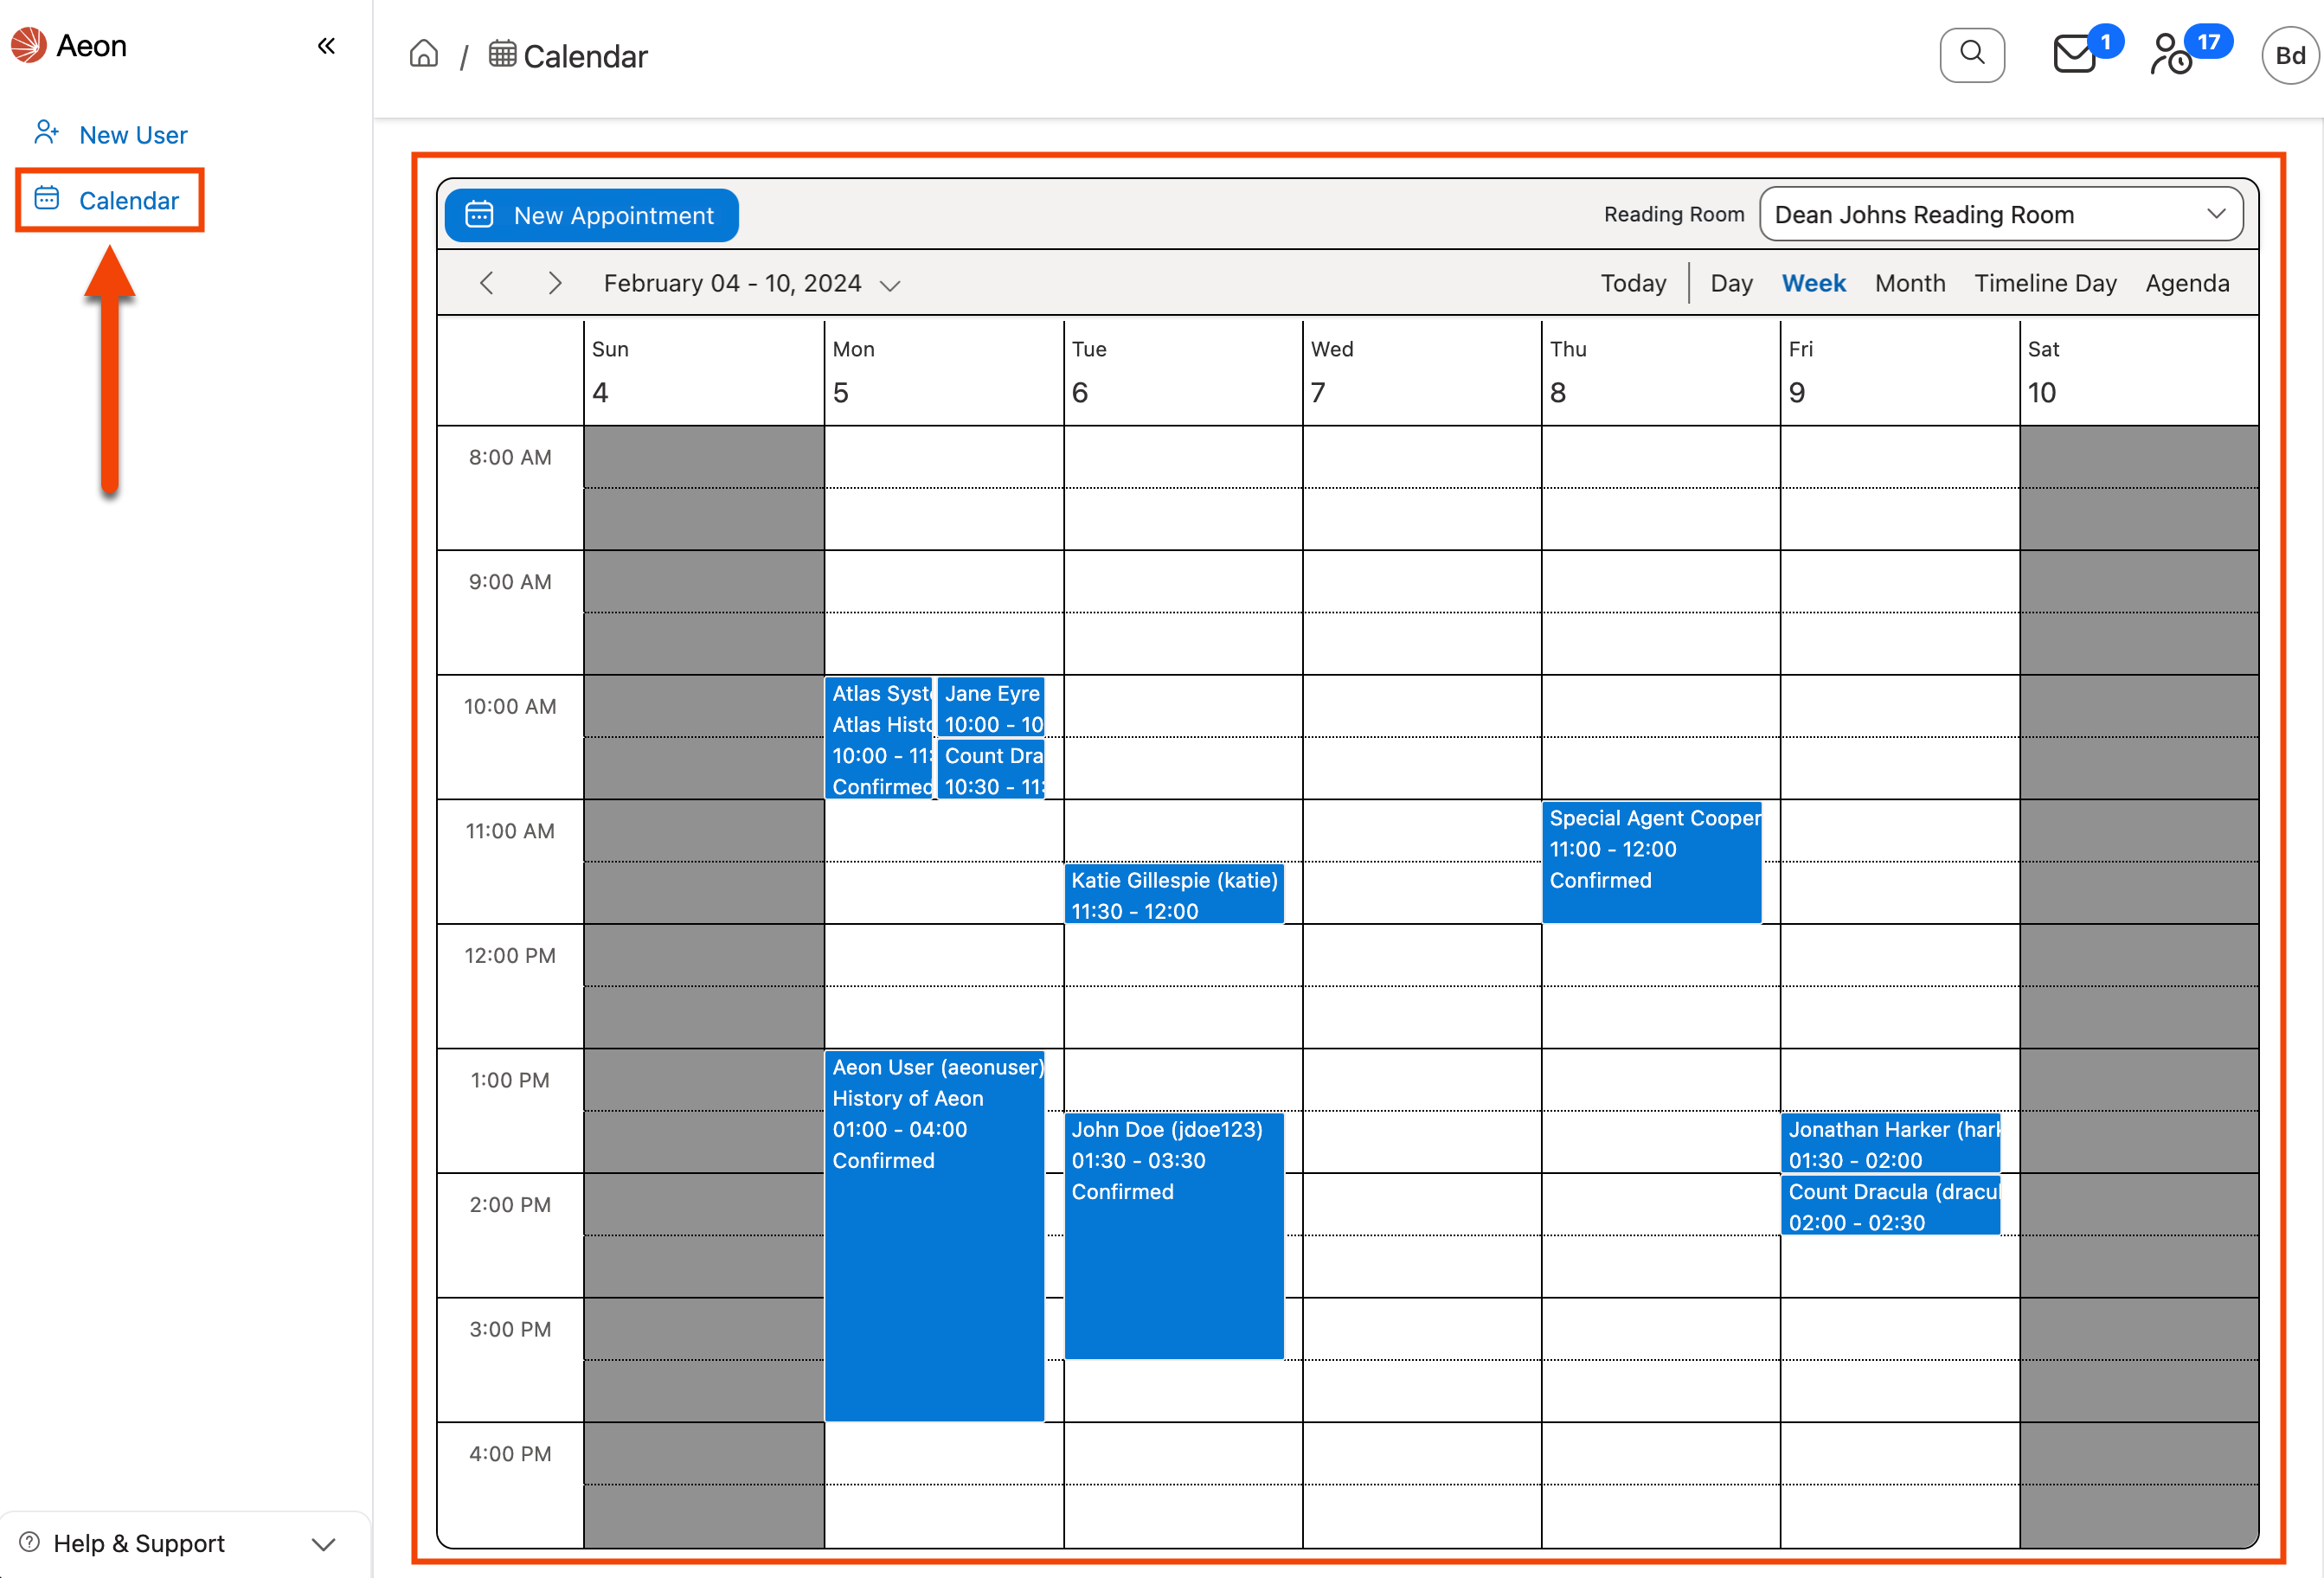
In the Aeon Web Client, the full appointment calendar is accessed by clicking the Calendar button ( ) in the navigation menu located on the left side of any web client page. This button opens the Calendar page, which contains a calendar interface displaying the appointment calendar for the selected reading room. In addition to the full appointment calendar on the Calendar page, the web client also displays a mini-appointment calendar within the Appointments section on the Dashboard, which contains several additional user management options for individual appointments.
The Calendar Page
The Calendar page can be accessed from any web client page by clicking the Calendar button () in the navigation menu on the left side of the screen. This page provides a full calendar interface displaying an overview of all scheduled appointments for the selected reading room. The reading room dropdown in the top-right corner of the calendar can be used to change the reading room calendar displayed on the page. Each option in the reading room dropdown corresponds to a reading room defined in the Aeon Customization Manager's Appointment Scheduling tab for your site.
Closures
Full closures wherein no appointments can be scheduled are displayed on the appointment calendar with dark shading in the relevant time periods. Closures are only displayed on the calendar's Day, Week, and Timeline Day views, where each time block is shown as either open or closed (dark shading). The Agenda and Month views will not display closures.
Reduced availability exception dates configured for a reading room in the Aeon Customization Manager will only be displayed on the appointment calendar in the Aeon Desktop Client.
Using the Appointment Calendar
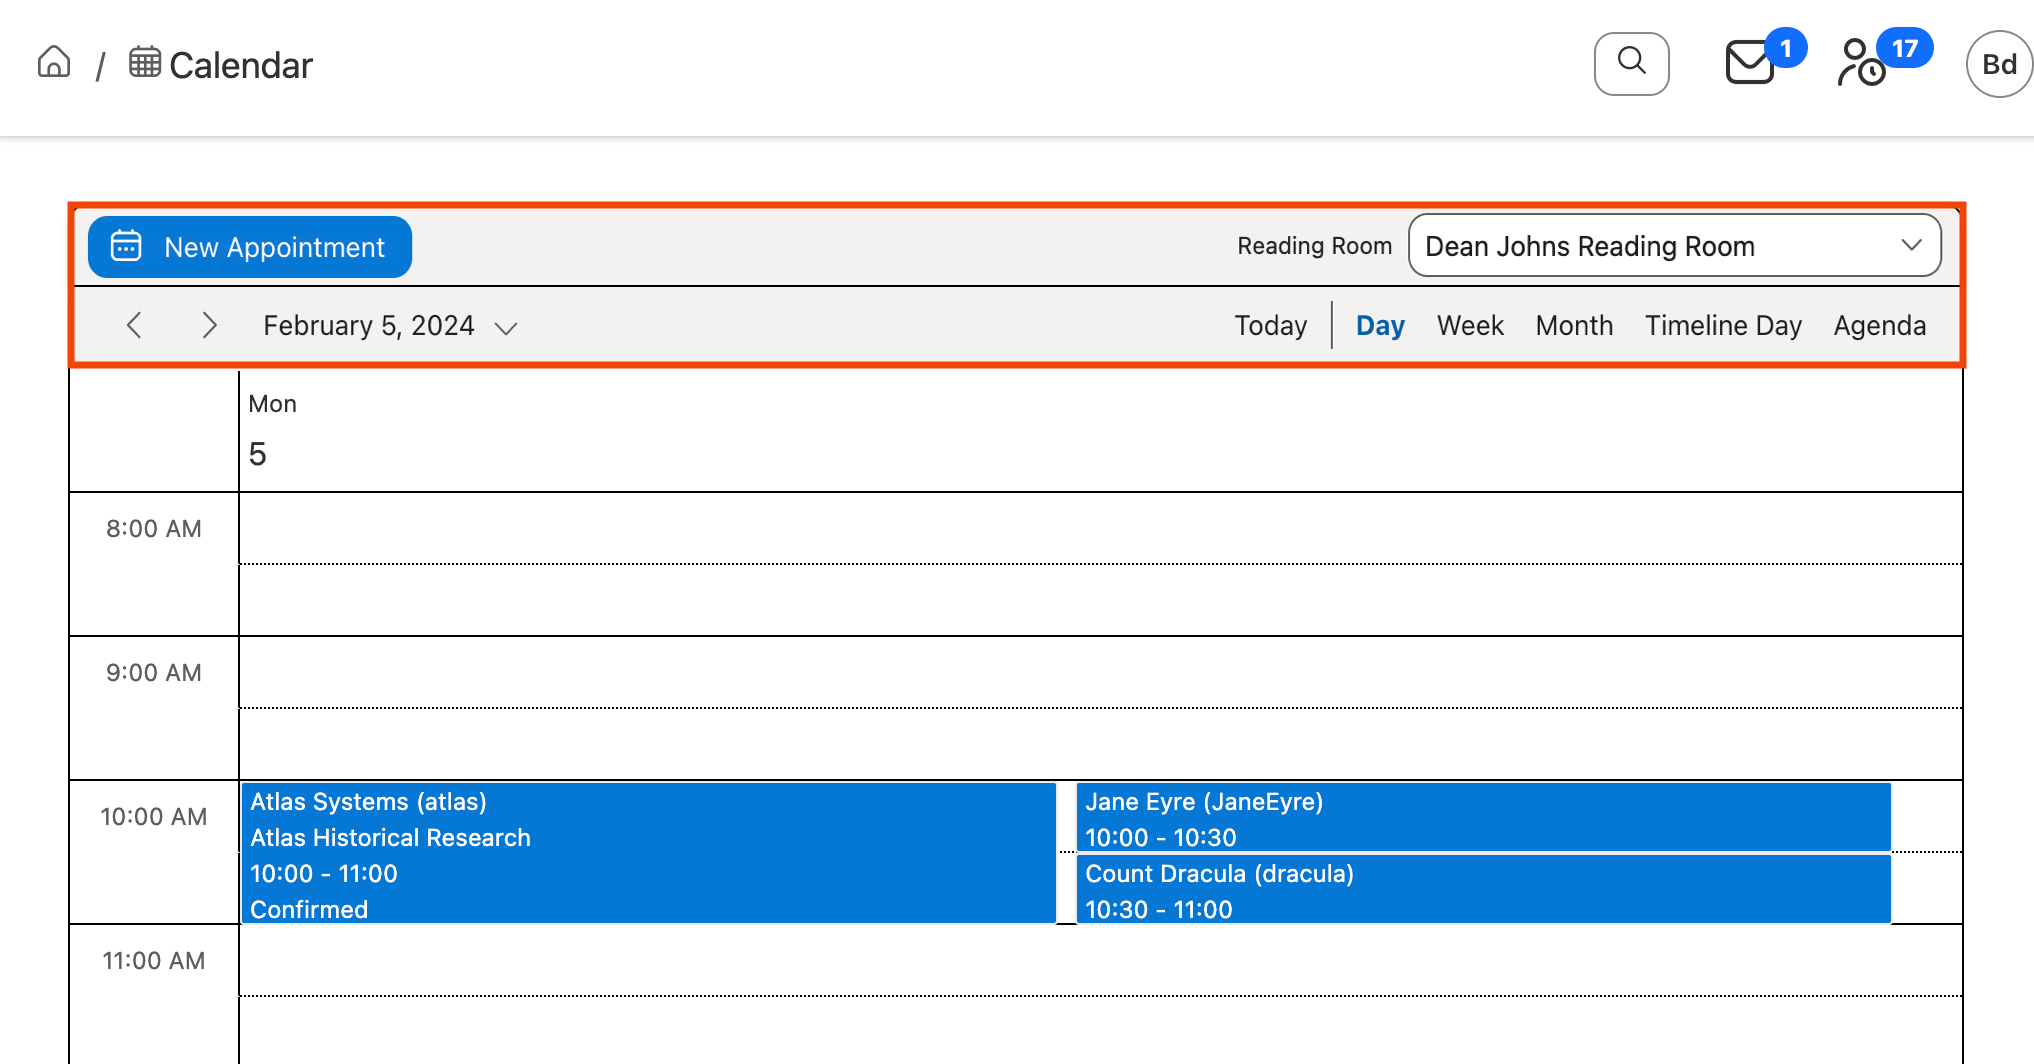
The appointment calendar interface displays two toolbars at the top of the calendar view containing the following options to manage appointments and change the calendar display:
For information on the keyboard controls used with the appointment calendar, see Additional Keyboard Controls for Navigating and Using the Aeon Web Client.
New Appointment : Click to create a new appointment for the selected reading room. See The Appointment Form section below for more information on using the Appointment form to create a new appointment.
Reading Room Dropdown : Use this dropdown to change the reading room calendar that is displayed on the page. The options in this dropdown correspond to each reading room defined in the Aeon Customization Manager's Appointment Scheduling tab for your site.
Backward and Forward Arrows
: Navigate Backward ( ) or Forward (
 ) through the displayed calendar according to the currently selected view. For example, while in Day view, the Backward and Forward arrow buttons will navigate to the previous and following day, respectively.
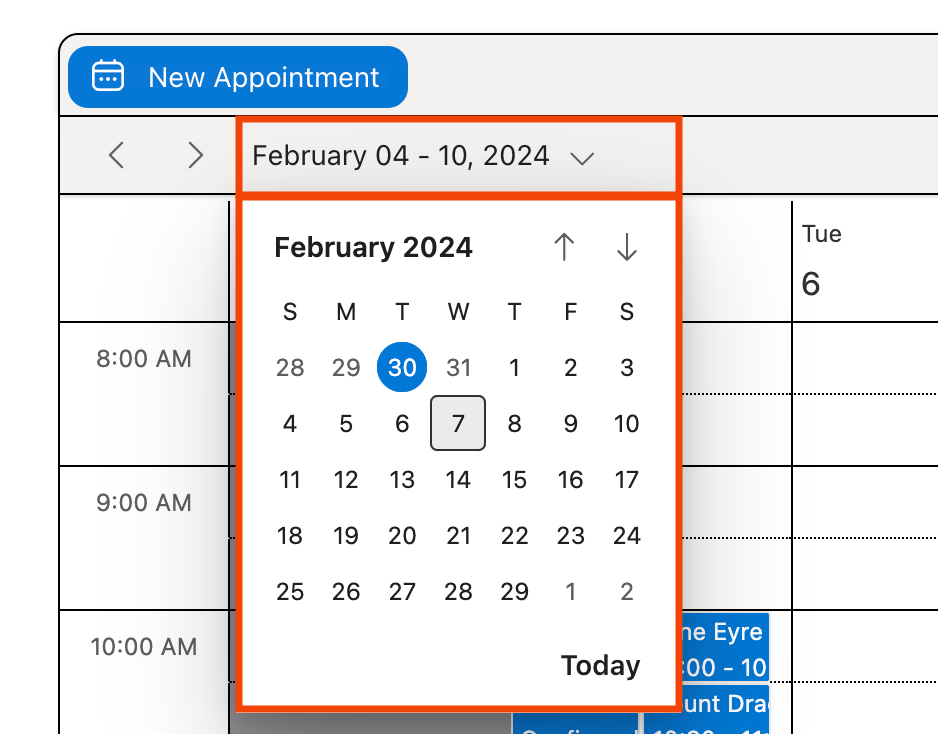
Date Dropdown : Use this dropdown to display a mini-calendar tool that can be used to quickly jump to a certain date within the selected calendar view:
Calendar View Options : Switch the calendar display between the available Day, Week, Month, Timeline Day, and Agenda views. Clicking Today will change the date displayed in the current view to the current date.
The time block increments used in the Day, Week, and Timeline Day views are controlled by the value configured in the Appointment Time Increment setting for the selected reading room in the Aeon Customization Manager. Reading rooms with Appointment Time Increment settings greater than 30 minutes will use time blocks of one hour.
Appointments Section on the Dashboard
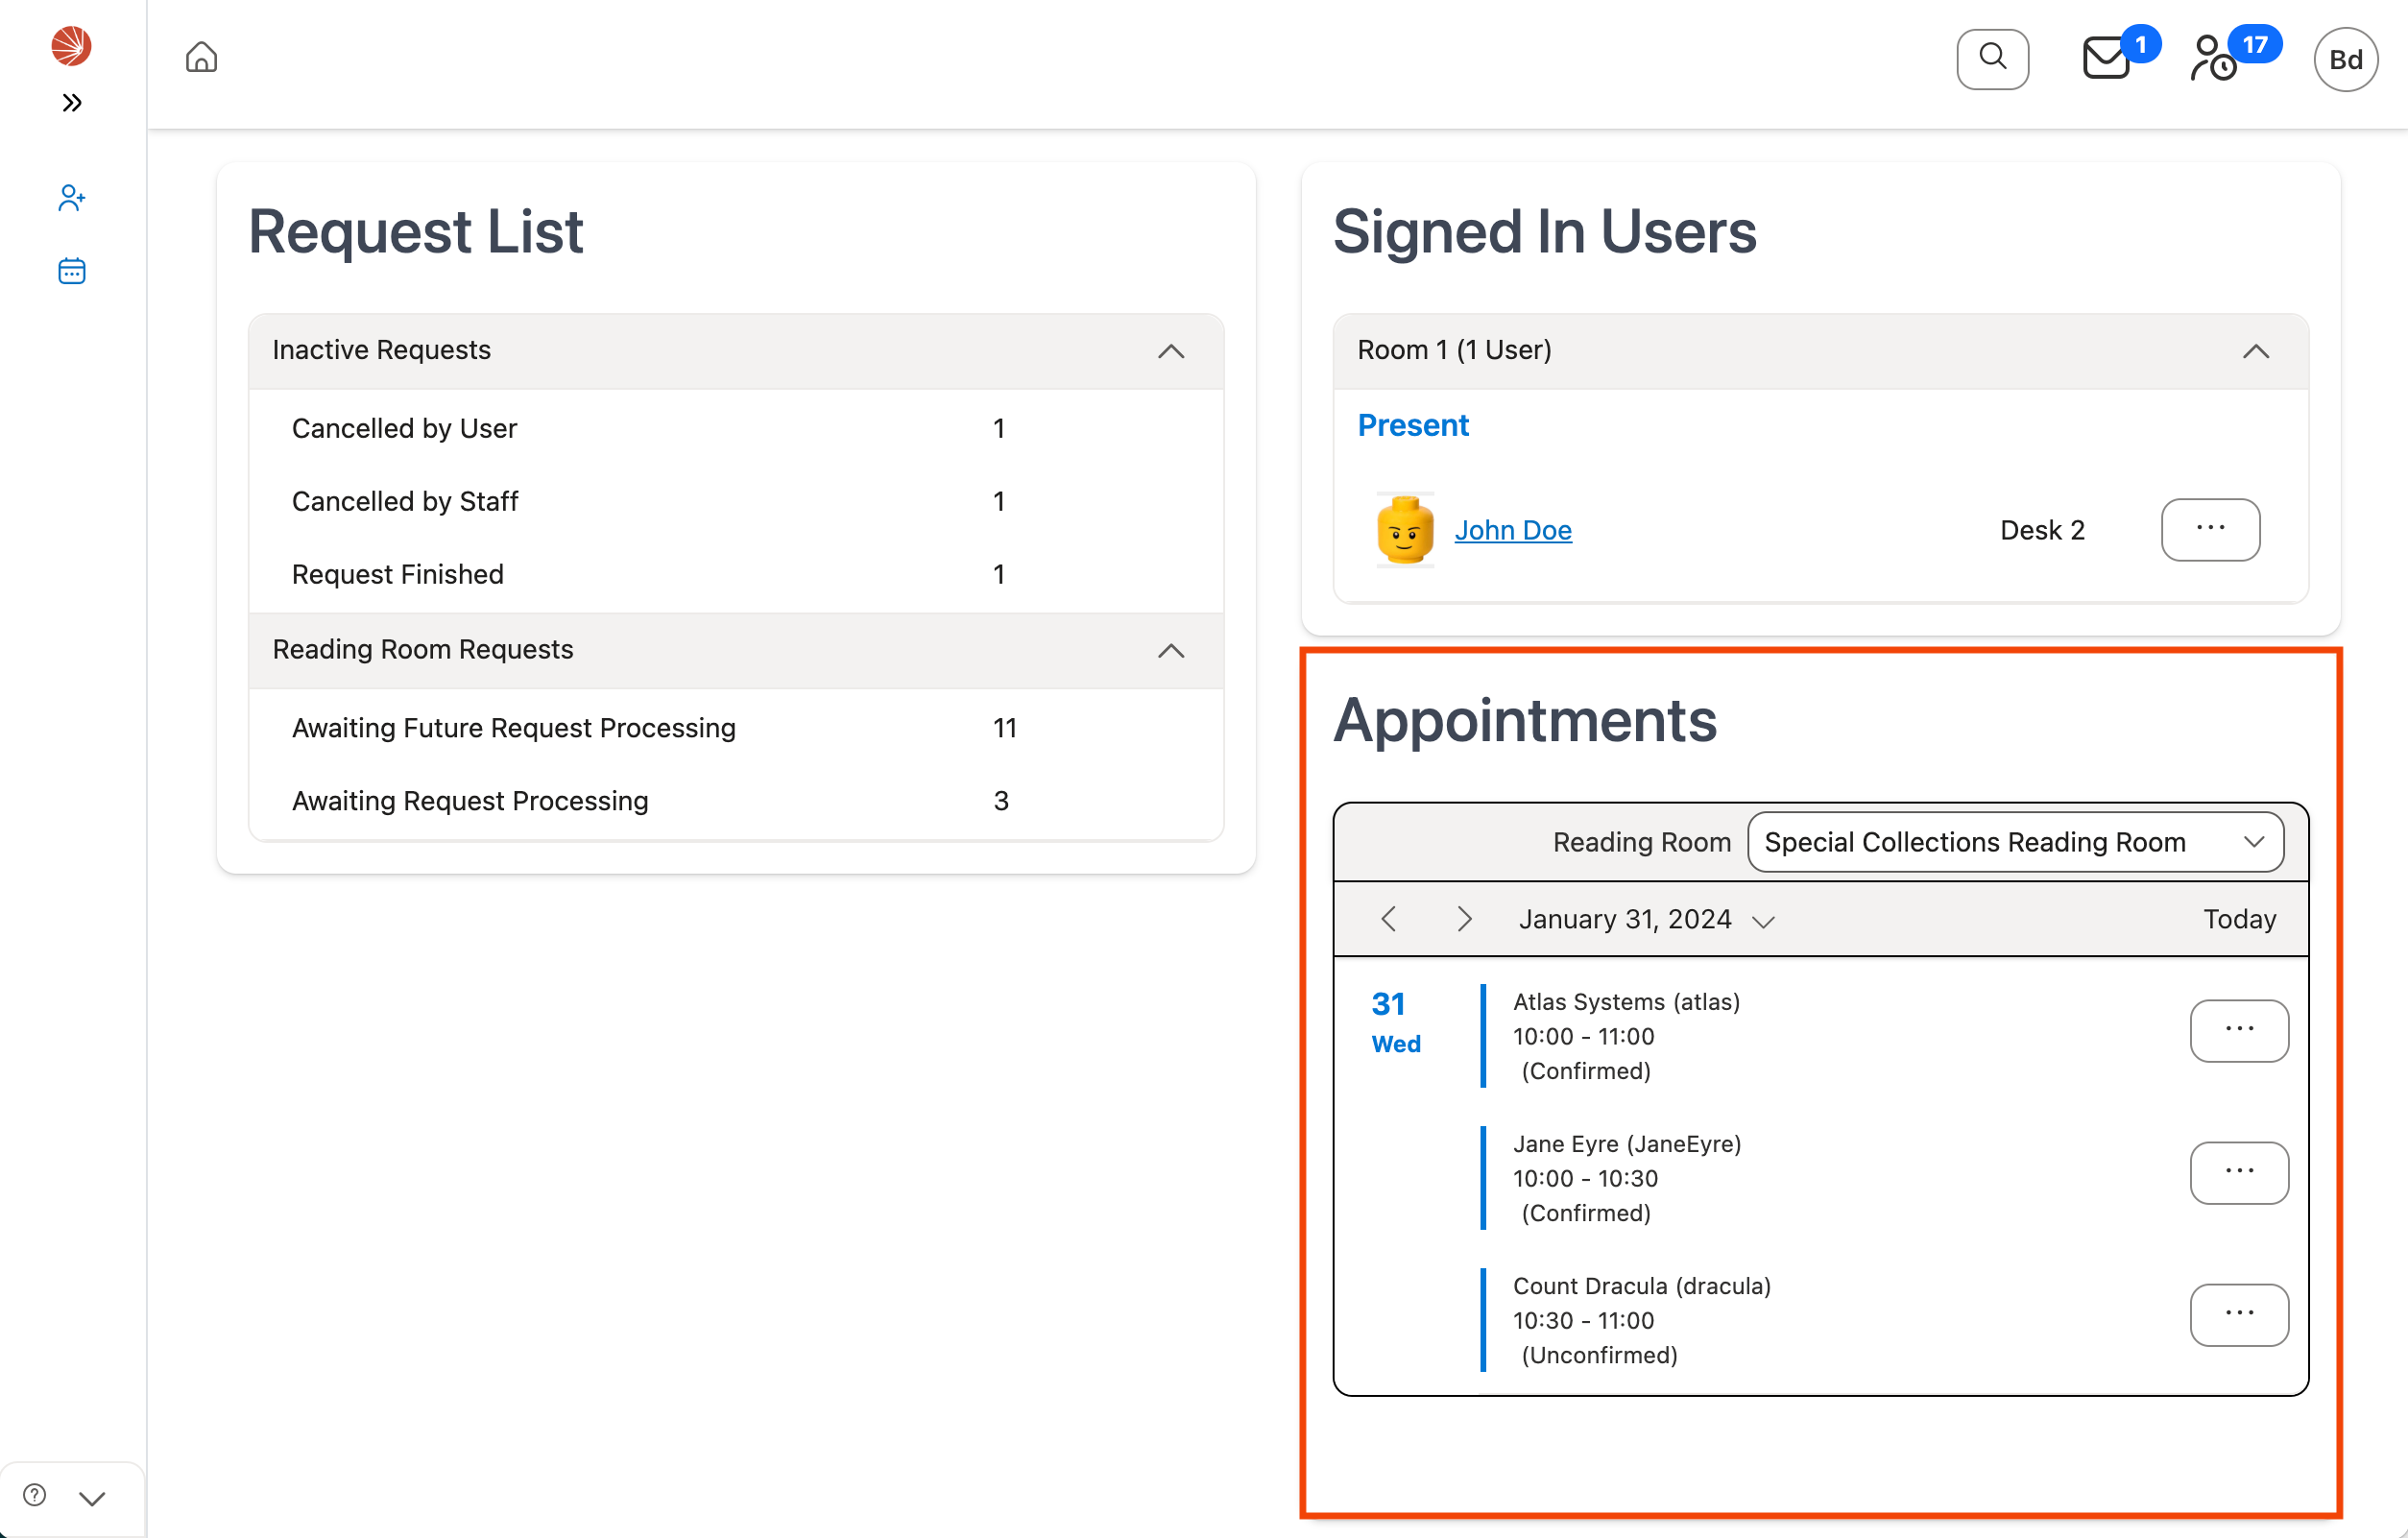
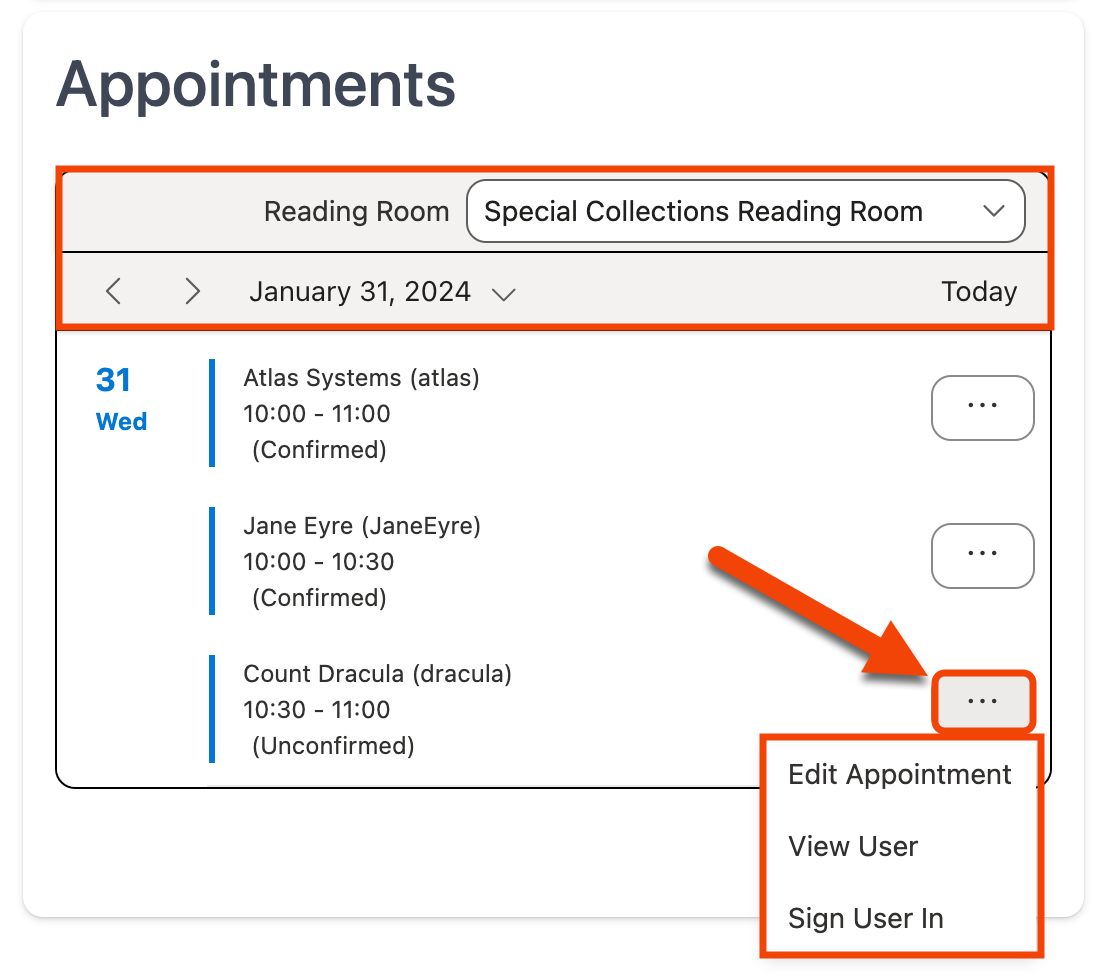
The Appointments section of the web client Dashboard displays a mini-calendar agenda tool from which you can view a list of the appointments booked for the selected reading room on a particular date. Next to each appointment in the list is the Action menu icon ( ), which can be clicked to expand a dropdown menu containing several user and appointment management options for that appointment.
Using the Dashboard Calendar Agenda
The Dashboard calendar displays two toolbars at the top of the agenda tool with several options for changing the reading room and date displayed by the calendar. You can also click the Action menu icon () next to an individual appointment to expand a dropdown menu containing additional user and appointment management options for the appointment.
In addition to standard keyboard controls, several additional controls are supported for use with the mini-appointment calendar. For more information, see Additional Keyboard Controls for Navigating and Using the Aeon Web Client.
Reading Room Dropdown : Use this dropdown to change the reading room calendar that is displayed by the agenda tool. The options in this dropdown correspond to each reading room defined in the Aeon Customization Manager's Appointment Scheduling tab for your site.
Backward and Forward Arrows
: Navigate Backward () or Forward () through the calendar to the previous and following day for the currently displayed date.
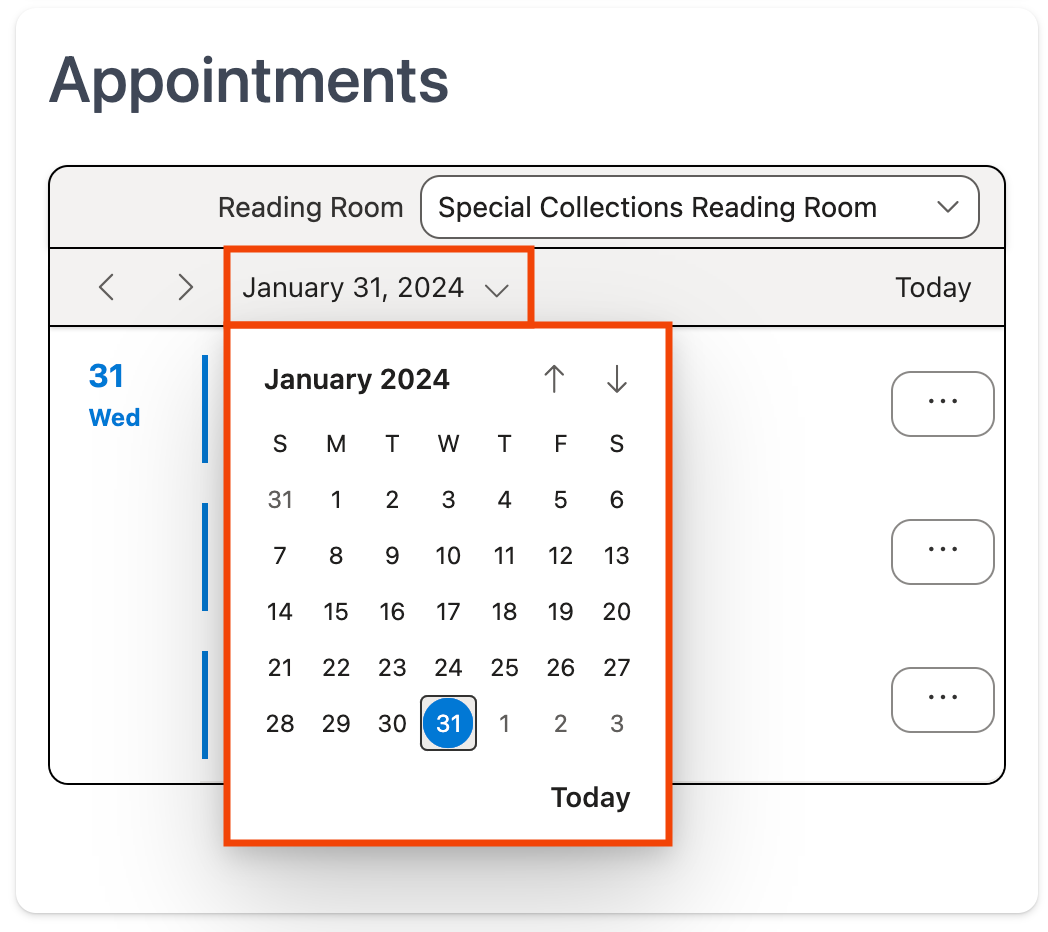
Date Dropdown : Use this dropdown to display a mini-calendar tool that can be used to quickly jump to a certain date on the calendar agenda:
Today : Change the date displayed by the calendar agenda to the current date.
Action Menu Options
: Clicking the Action menu icon () next to an appointment in the agenda tool will expand the Action menu containing the following options for the appointment:
- Edit Appointment: Opens the Appointment form from which the full appointment information can be viewed and modified.
- View User: Opens the User Information page for the user associated with the appointment.
- Sign User In: Opens the Sign In User window from which the user can be signed into a reading room. This option only displays for appointments scheduled for the current date.
- Set to Away: Sets the user's status within the Signed In Users section of the Dashboard from Present to Away. This option only displays for appointments scheduled for the current date when the associated user is currently signed into a reading room and marked Present.
- Set to Present: Sets the user's status within the Signed In Users section of the Dashboard from Away to Present. This option only displays for appointments scheduled for the current date when the associated user is currently signed into a reading room and marked Away.
- Sign User Out: Signs the user out of the reading room. This option only displays for appointments scheduled for the current date when the associated user is currently signed into a reading room.
- Change Location: Opens the Change Location window from which you can assign a currently signed-in user a seating location within the reading room. This option only displays for appointments scheduled for the current date when the associated user is currently signed into a reading room and has not been assigned a seating location. Seating locations must be configured in the Aeon Customization Manager for this option to appear.
Back to top of The Appointment Calendar section
The Appointment Form
The Appointment form is used to create, edit, or cancel appointments in the Aeon Web Client.
The Appointment form in the Aeon Web Client contains different fields and controls for managing the selected appointment.
Accessing the Appointment Form
In the Aeon Web Client, the Appointment form can be accessed in any of the following ways:
- By double-clicking on an existing appointment or open space in the appointment calendar, or by clicking the New Appointment button at the top of the calendar.
- By editing or creating a new appointment from the Appointments grid on the User Information page.
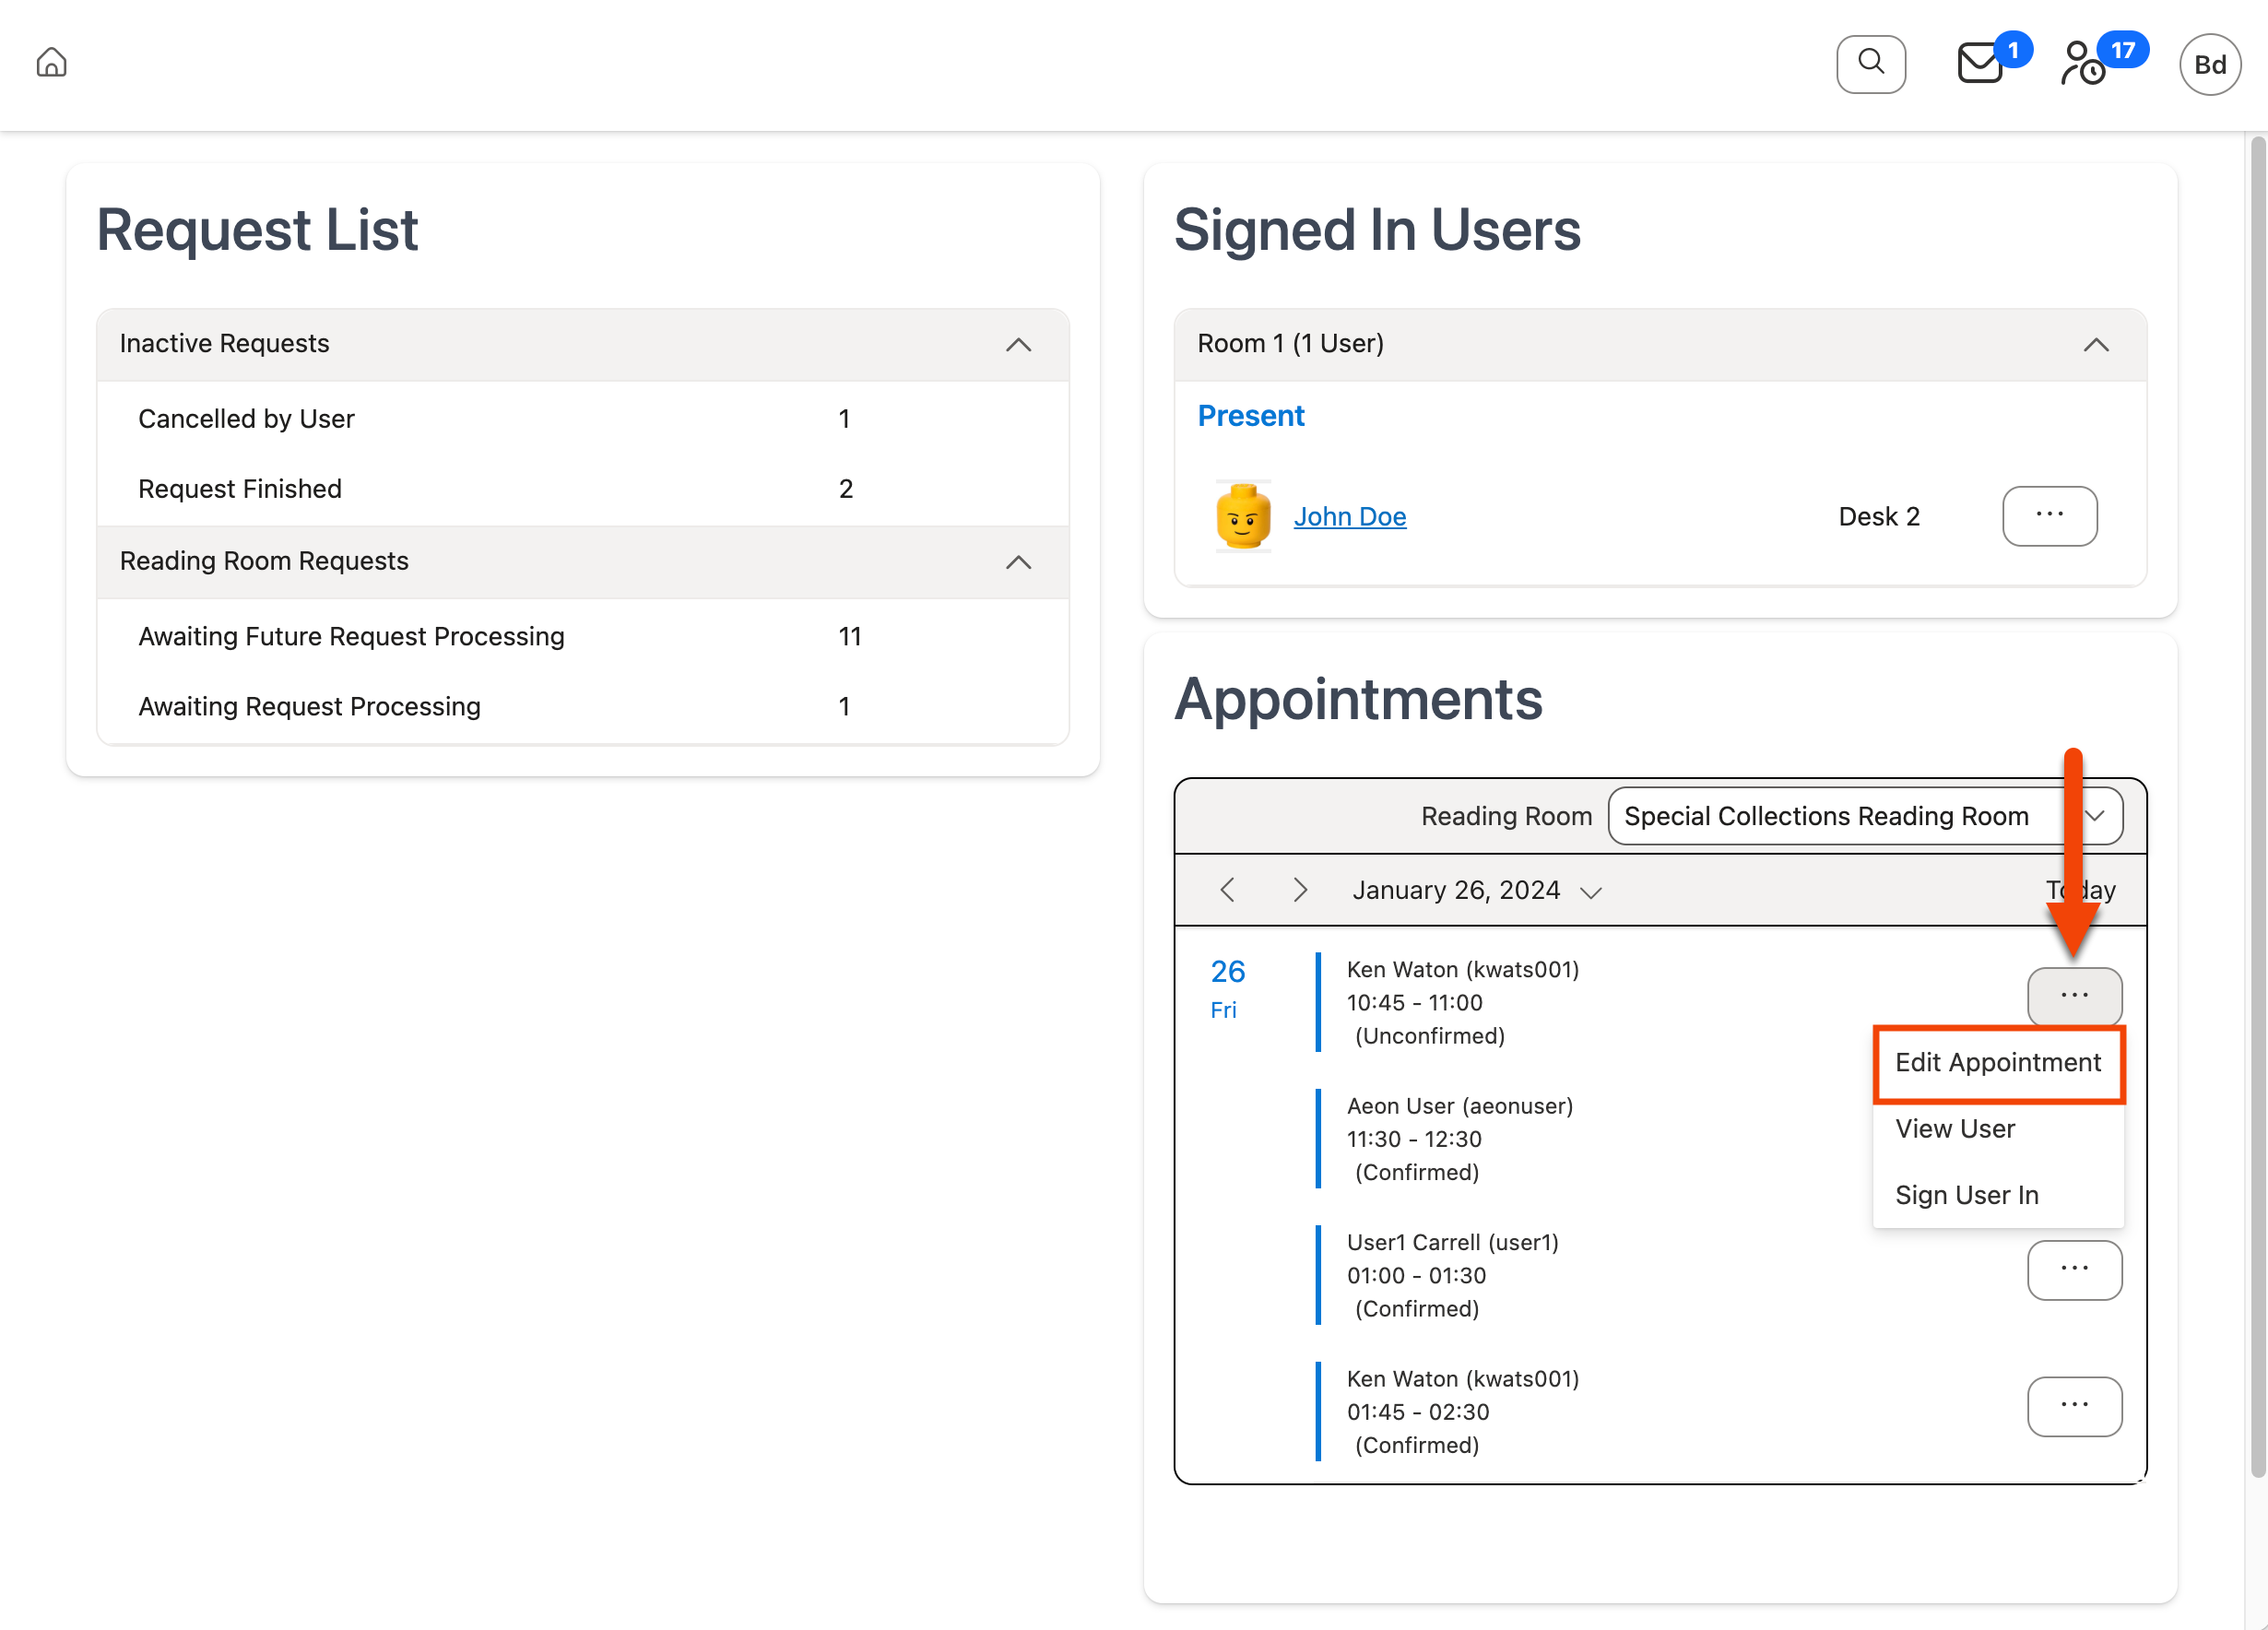
- By clicking the Edit Appointment option from the Action menu () next to an appointment displayed in the Appointments section on the Dashboard:
Using the Appointment Form
Saving Changes and Cancelling Appointments
When the Appointment form is opened, a footer with several options will be displayed at the bottom of the form for saving changes to the selected appointment or for cancelling the appointment, if you are editing an existing appointment.
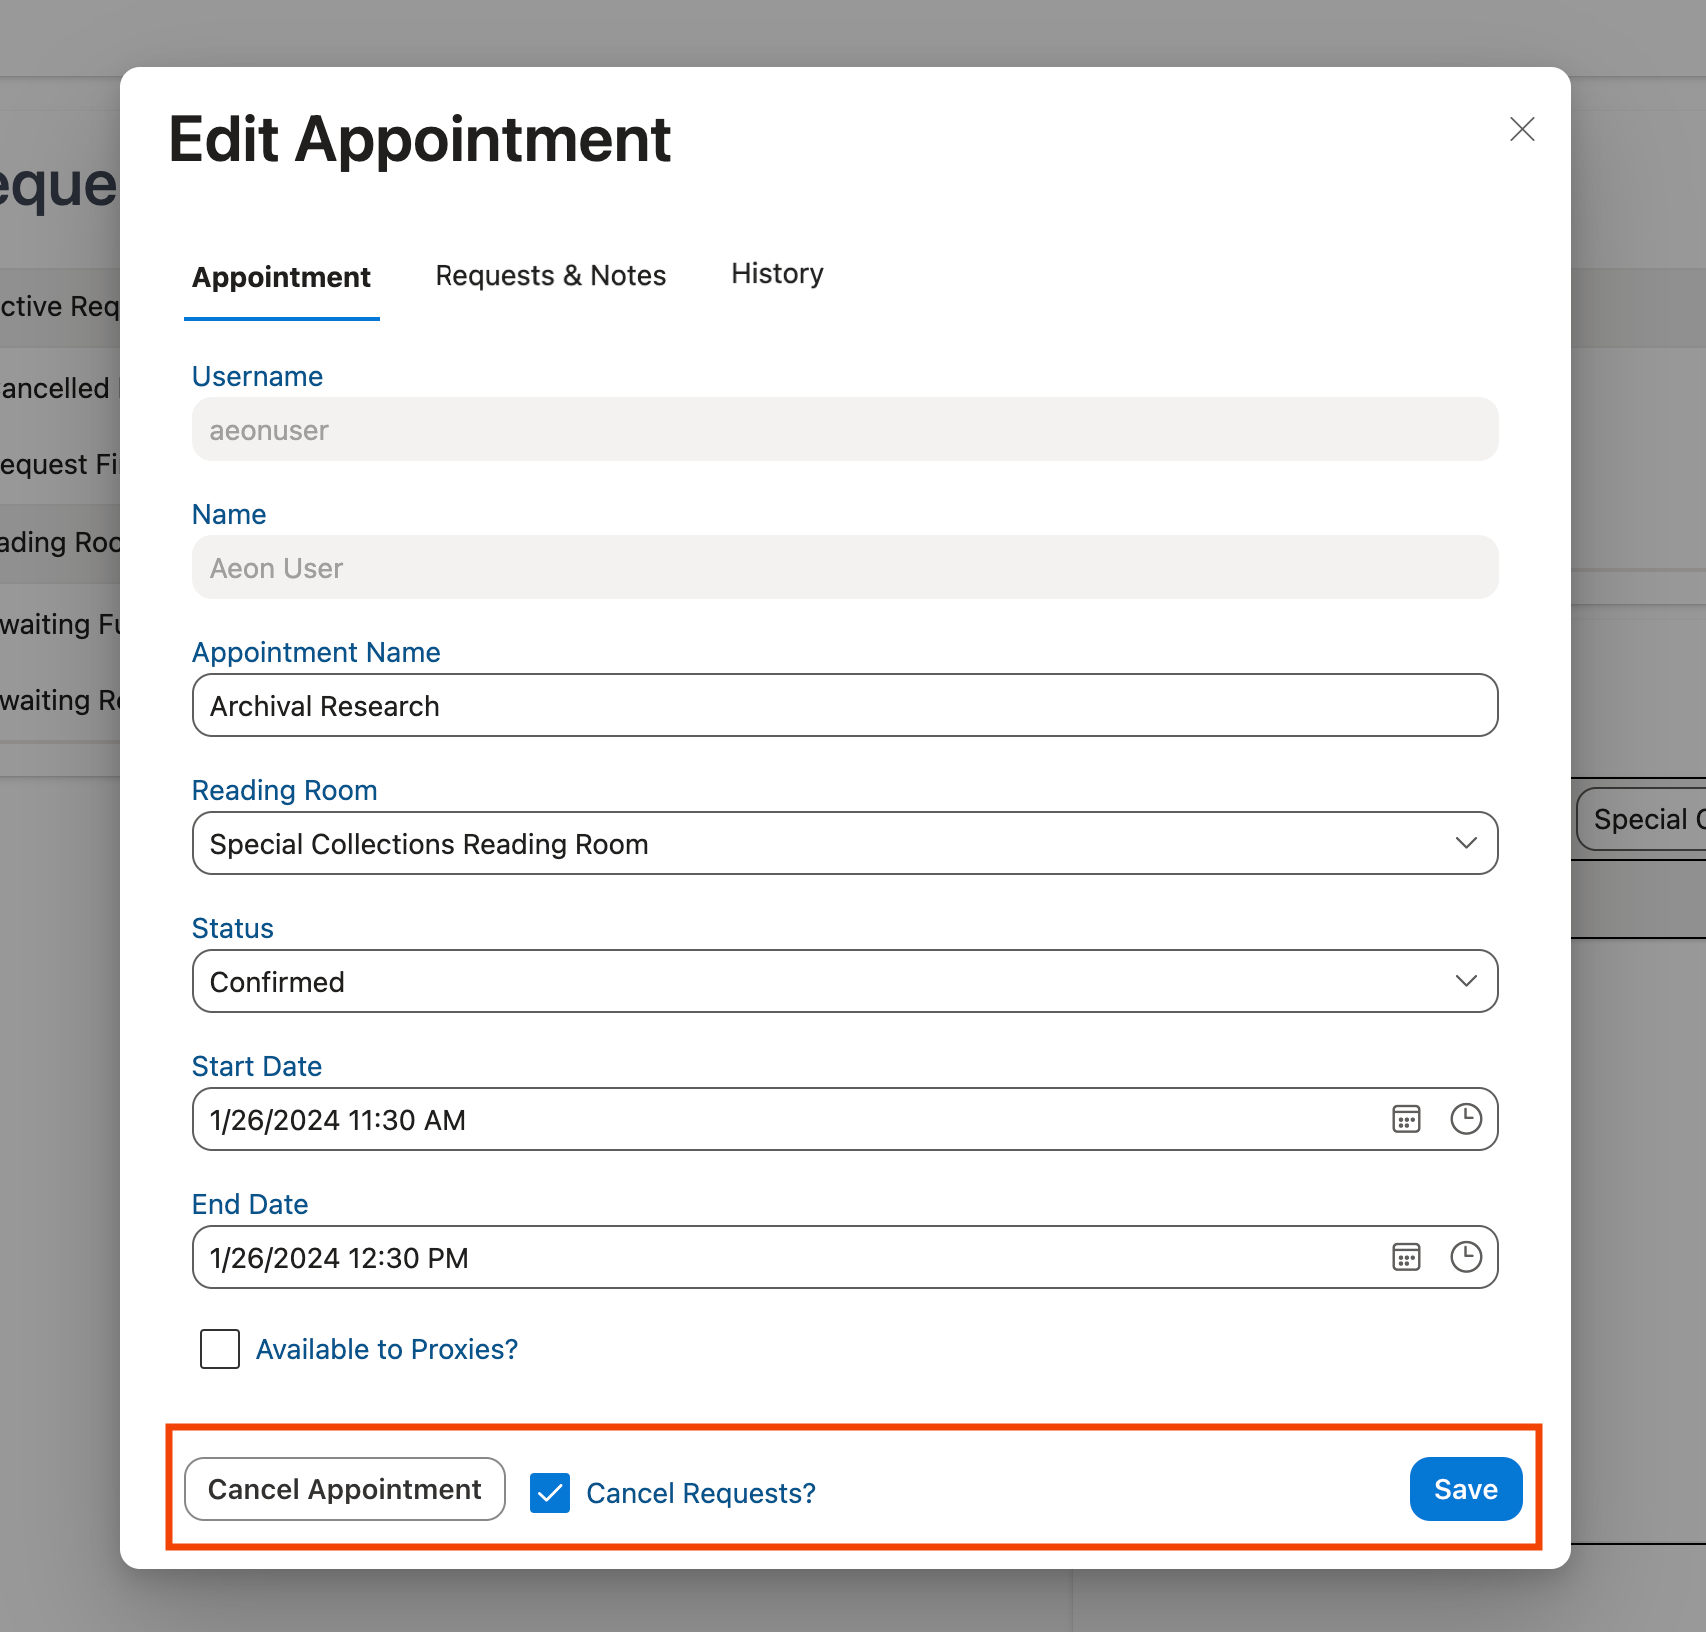
Save : Clicking Save will either create the appointment when the Appointment form is used to create a new appointment for a user or will save any changes made to an existing appointment.
Cancel Appointment/Cancel Requests : These options only appear when editing an existing appointment.
Click the Cancel Appointment button to cancel the appointment with the following options:
You can also change the status of an appointment to Cancelled using the Status dropdown, then click Save to cancel the appointment.
- Cancel Requests?: If this option is checked, then all requests associated with the appointment will also be canceled after clicking the Cancel Appointment button.
If appointments are required in the selected reading room for the appointment, then the Cancel Requests? option will be removed and replaced by text stating All requests associated with this appointment will be cancelled.
After clicking Cancel Appointment, the Send Email? prompt will appear, from which you can choose to optionally send the Appointment Cancelled email to the user:
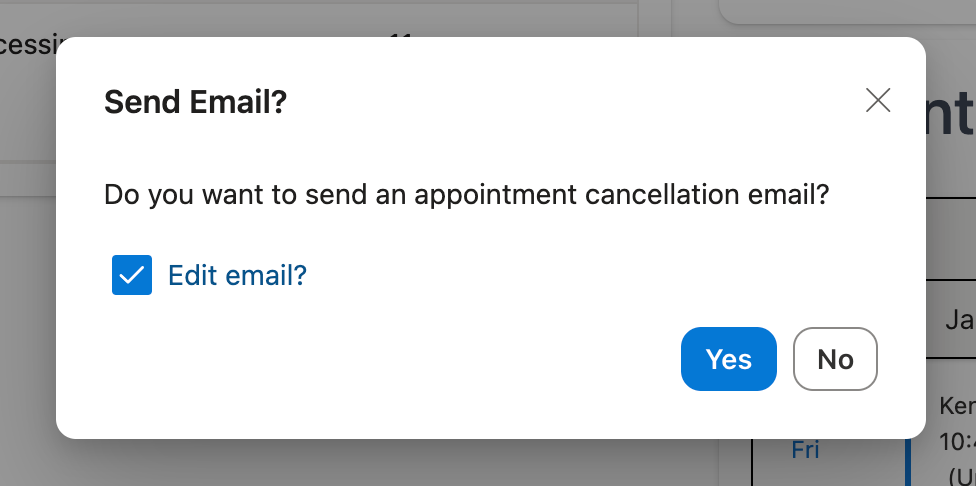
- Click Yes to send the user the Appointment Cancelled email. If the Edit Email toggle option is enabled (checked), the Appointment Cancelled email will open in a new window when the Yes button is clicked, allowing you to edit the email before sending.
The option for editing the Appointment Cancelled email (checked or unchecked) will be remembered and applied in the future whenever an appointment is cancelled.
- Click No to cancel the appointment without sending the Appointment Cancelled email to the user.
You can also click the X at the top of the Send Email prompt, use the ESC key on your keyboard, or click anywhere outside of the Send Email prompt to exit the prompt and cancel the appointment without sending the user an email.
Appointment Tab
The Appointment tab of the Appointment form houses several fields containing information about the appointment.
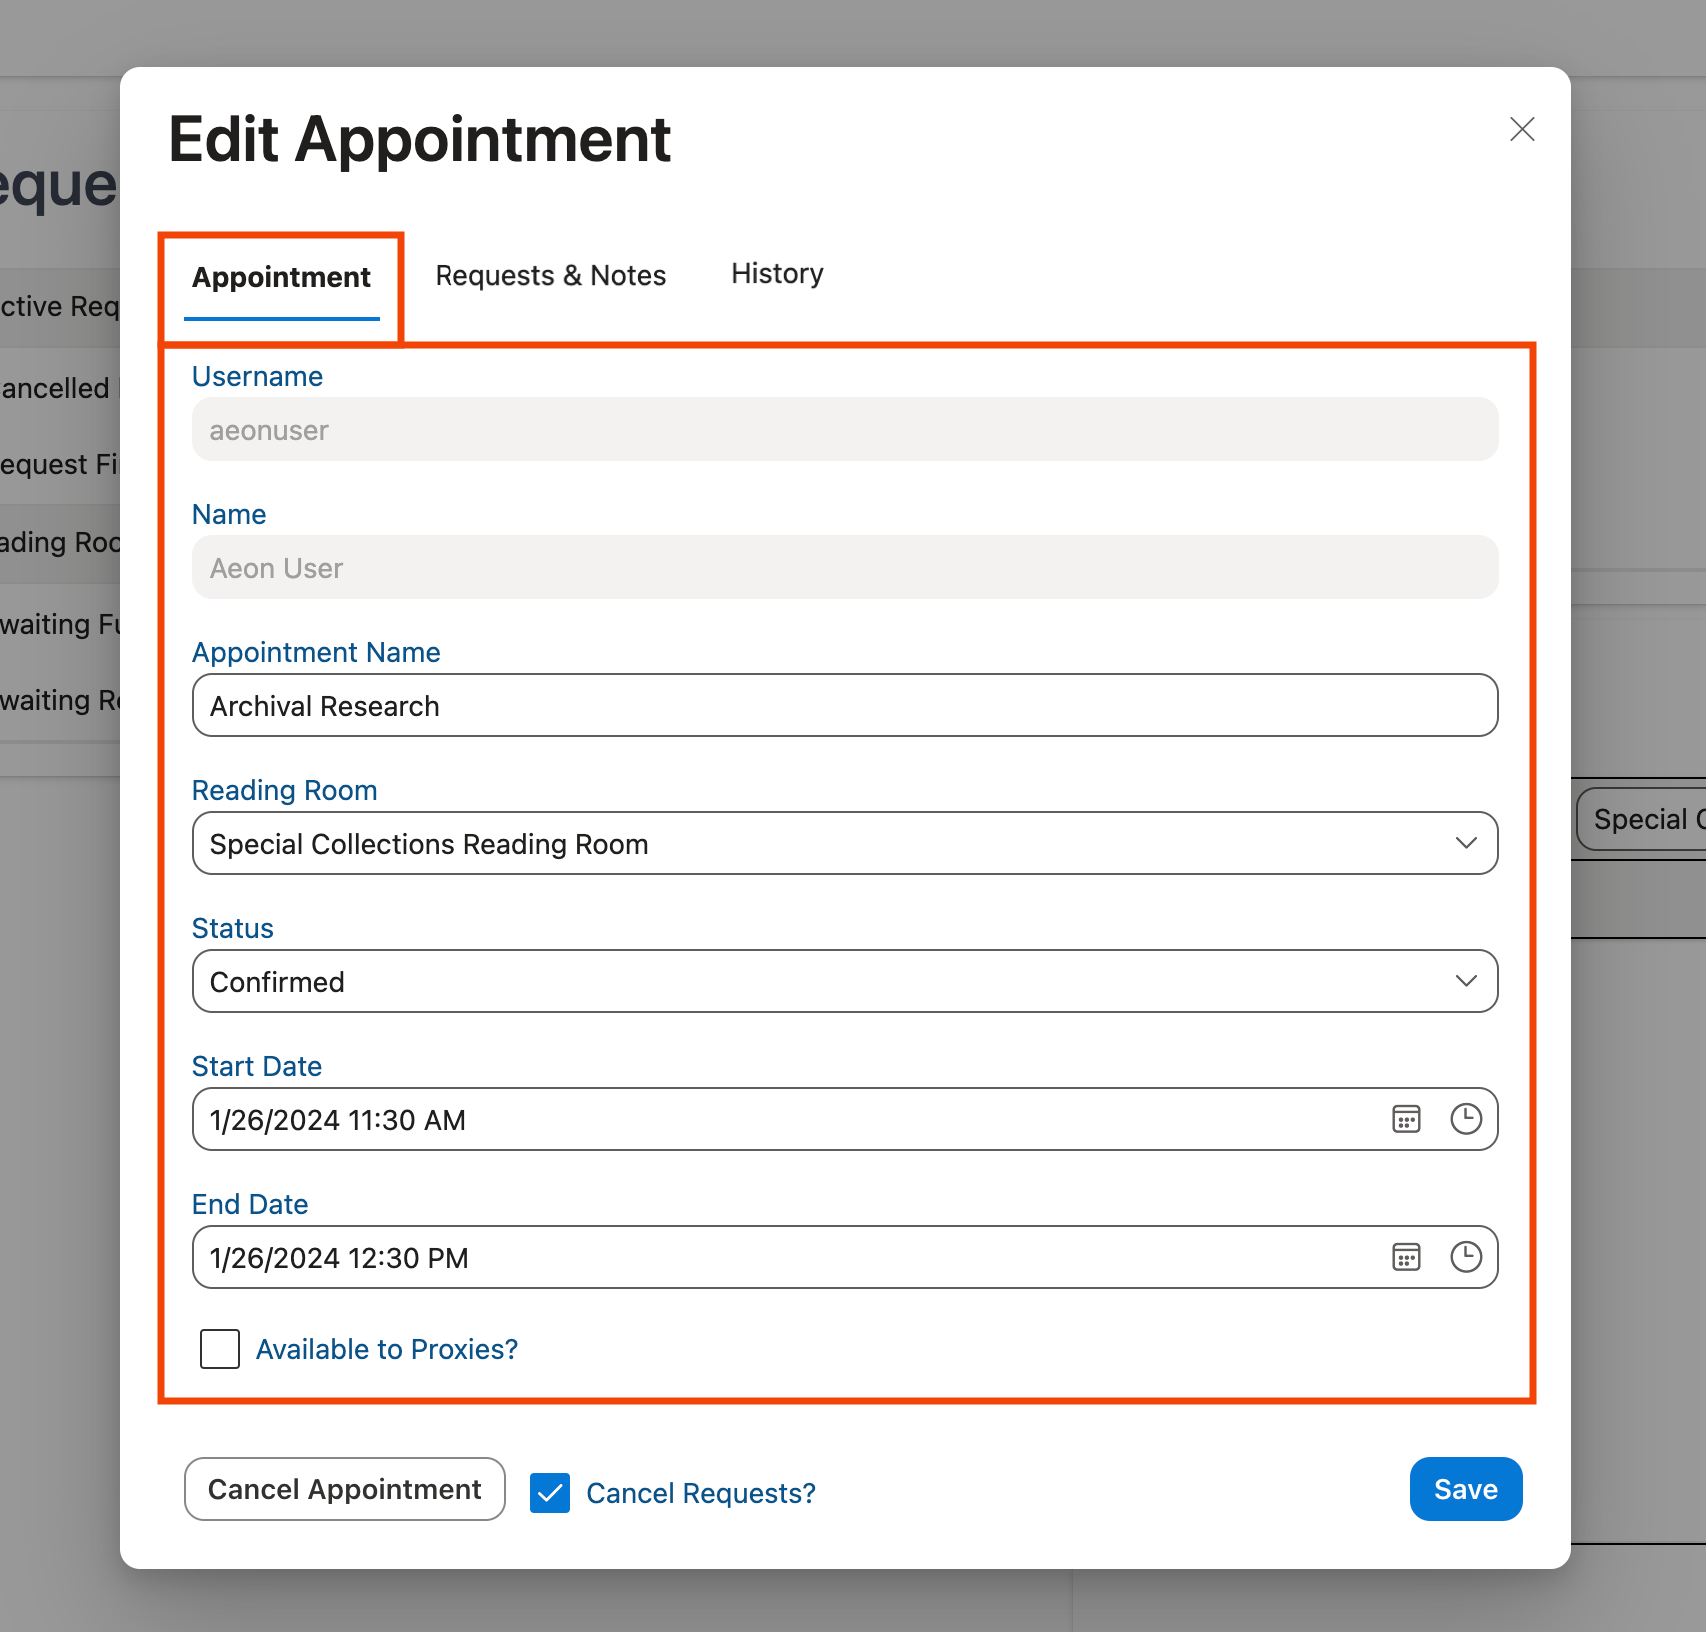
Username : The username of the user associated with the appointment. The value of this field can be typed in manually or selected from a dropdown list. The droplist list will refine its results based on the text typed into this field:
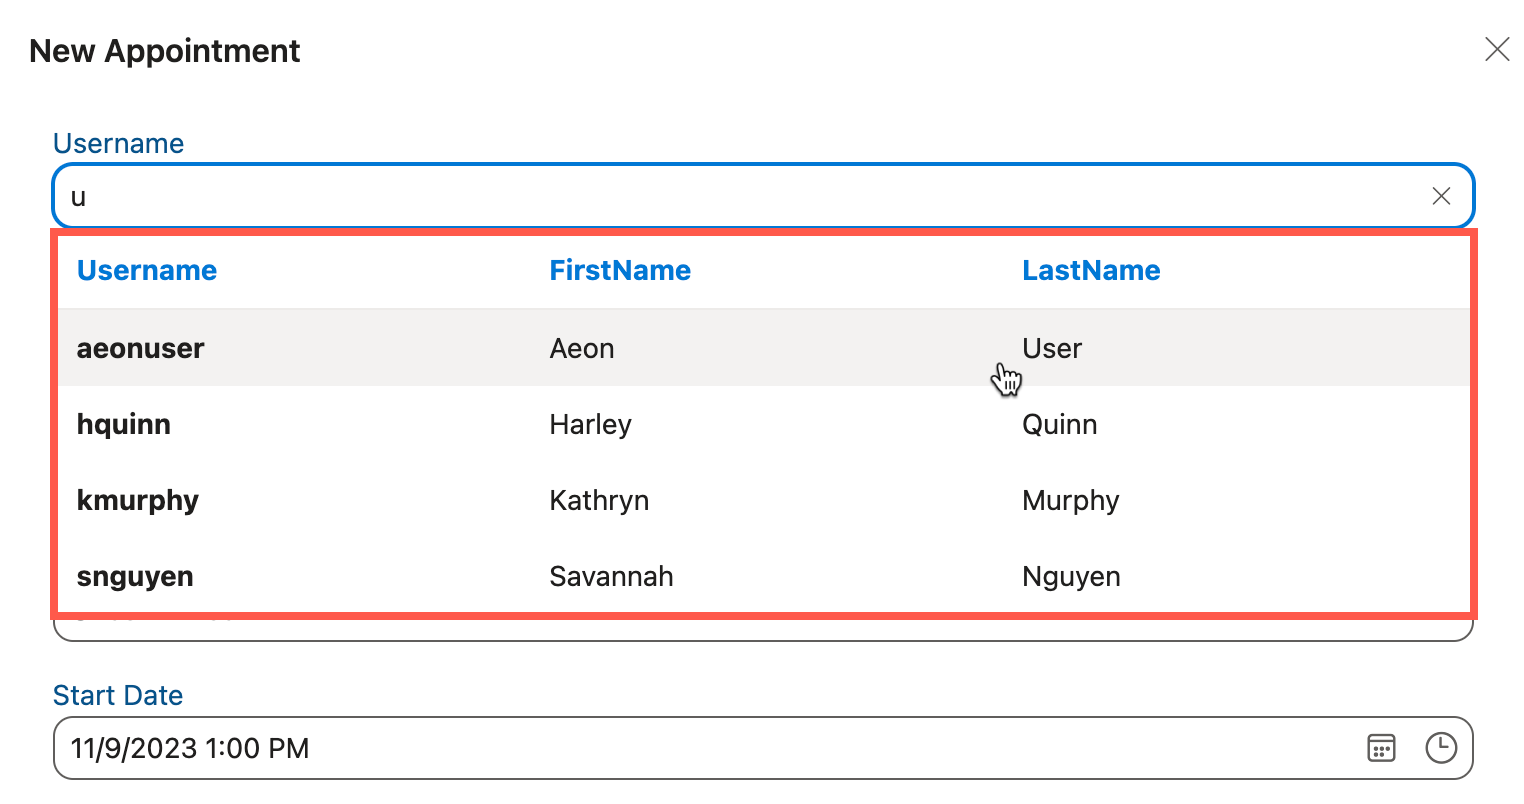
The text entered will be used to search for the username only, however, the associated first and last name for that username will be shown in the search results grid.
An appointment's assigned user cannot be changed after the appointment is created.
Name : The name of the user associated with the appointment. This field fills in automatically according to the selection in the Username field.
Appointment Name : An optional field containing a descriptive name for the appointment. This field can be used by patrons to help them identify and keep track of their appointments, e.g. an appointment for history research might be named "Appointment for History Research." This name will also display if the user chooses to download and import the iCalendar file for the appointment into a calendar application.
Reading Room : The reading room in which the appointment is scheduled. The value of this field is selected from a dropdown list.
Status : The current status of the appointment: Confirmed, Unconfirmed, or Cancelled. See Saving Changes and Cancelling Appointments above for more information on cancelling an appointment.
For more information on appointment status and confirmation workflows, including how to change the status of an appointment, see Appointment Confirmation and Notification Settings.
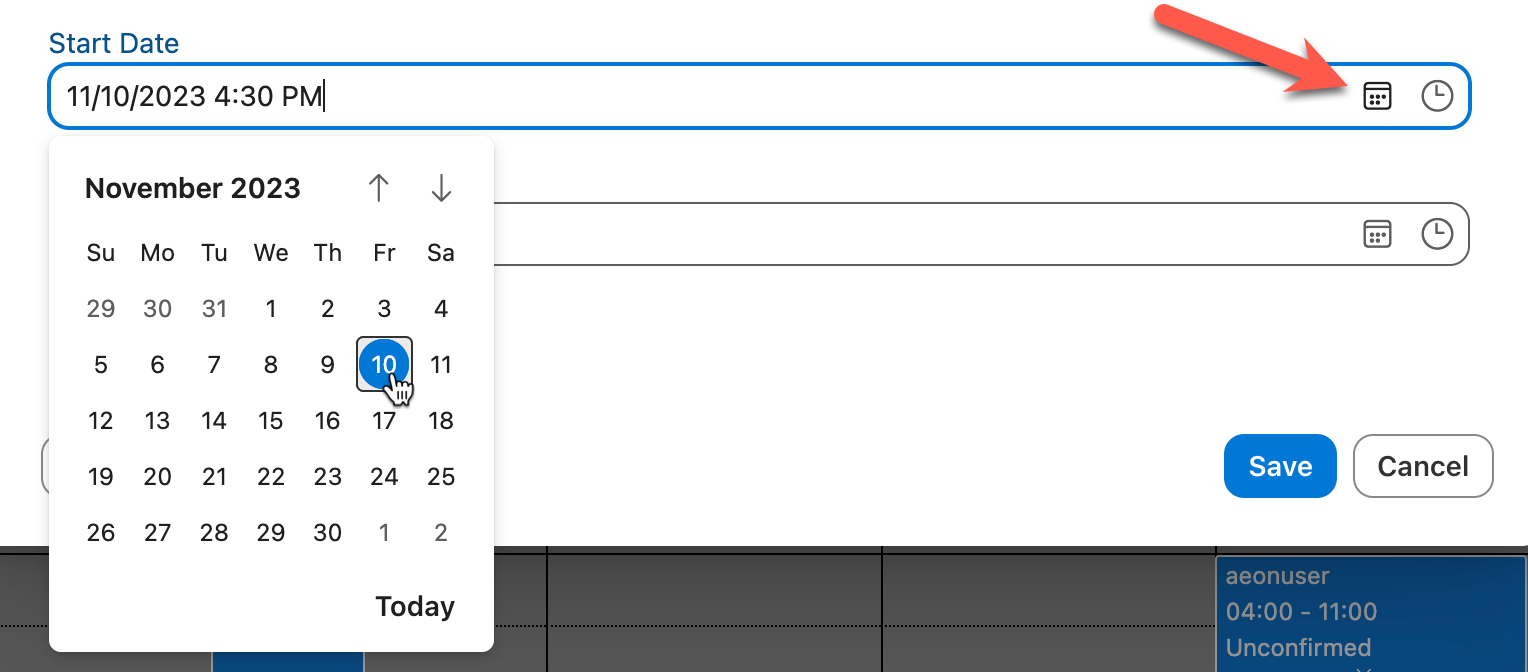
Start/End Date : The starting/ending date and time for the appointment. These values can be typed in manually or selected from the date and time dropdowns:
Keyboard users can use Alt + Down Arrow (Windows) or Option + Down Arrow (Mac) to toggle between the calendar and time dropdowns on these fields.
- Setting the date: Click the calendar icon to open the calendar dropdown for selecting the date:
- Setting the time: Click the clock icon to open up the time dropdown to select the time. The available options will be based on the Appointment Time Increment setting defined for the reading room in the Aeon Customization Manager. You can override these options by typing a time manually into the Start/End Date fields:

The Start and End Dates entered must begin and end on the same calendar date. If you would like to create an appointment for a patron on multiple dates, you must create a separate appointment for each individual date.
Initial Start Time Behavior for New Appointments
When creating new appointments, the initial start time for the appointment will vary based on where the new appointment is created from in the Aeon Web Client:
- When creating an appointment from the Calendar page:
- When in the appointment calendar's Day, Week and Timeline views, the initial start time will default to the time selected on the calendar interface, if a particular block of time is double-clicked to create the appointment.
- In any calendar view, clicking the New Appointment button at the top of the calendar will set the initial start time to the current date and hour if the current date is visible in the selected view.
- If the current date is not visible in the selected view, the initial start time will default to the start of open hours for the reading room on the next available date with open hours present in the selected view. If no dates/times with open hours are present in the selected view, the initial start time will default to the current date.
- When creating a new appointment from the Appointments grid on the User Information page:
- The initial start time will default to the beginning of the open hours defined for the default reading room selection on the Appointment form for the current date.
- If no open hours are defined for that reading room on the current date, the start time will default to midnight on the current date.
Additional Notes
Adjusting the start date/time will automatically update the end date/time according to the value configured in the Minimum Appointment Length setting for the reading room in the Aeon Customization Manager. The date of the end time will also be updated according to any changes to the date in the start time. Changing the reading room selected in the Reading Room dropdown will automatically adjust the end time to the minimum appointment length for the new reading rooms selected if the current appointment length is shorter than the minimum length configured for that reading room.
Available to Proxies? : If checked, any proxies of the user associated with the appointment will be able to submit requests for that appointment through the web request form.
Requests & Notes Tab
The Requests & Notes tab of the Appointment form houses two grids displaying the appointment's associated requests and any staff notes added to the appointment. This tab only appears on the Appointment form when editing an existing appointment.
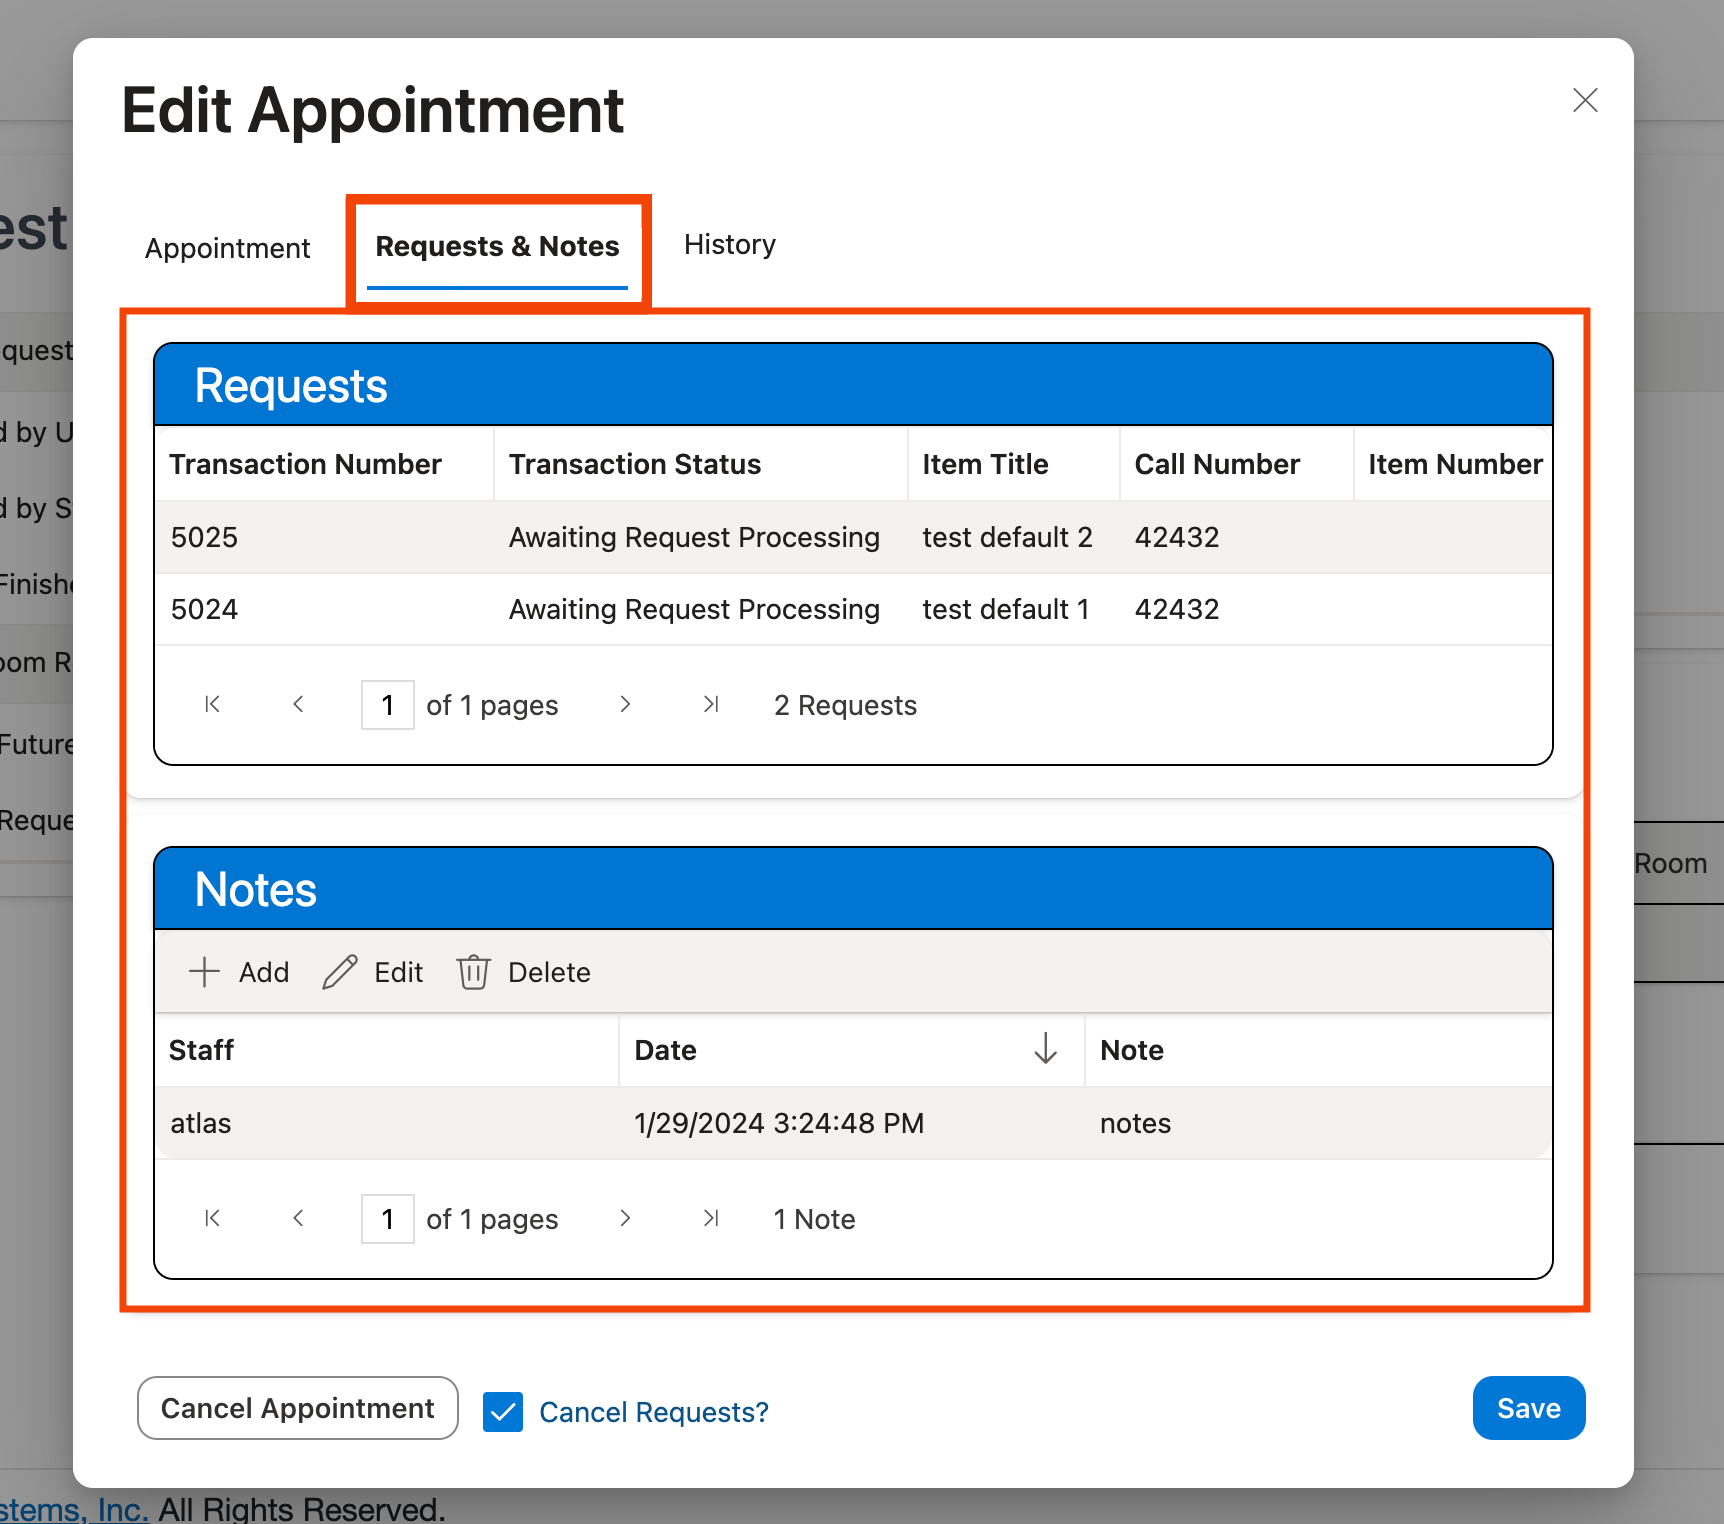
Requests : A grid displaying all requests associated with the appointment.
Requests cannot be added or removed from an appointment directly through the Appointment form. The Aeon Desktop Client must be used to manage the requests associated with an appointment.
Aeon administrators can customize the fields that are displayed in the Requests grid using the profile and layout customization options available on the Staff Administration page.
Notes : A grid displaying all notes associated with the appointment. Notes can be manually added by staff using the Add button at the top of the grid. Existing notes can be modified by double-clicking on the note in the grid or by selecting a grid entry and clicking the Edit button to open the Edit Note window. To delete a note from the user record, select the entry for the note in the grid and click the Delete button.
Appointment notes can only be added and viewed by staff users in the Aeon Desktop Client or Aeon Web Client and are not viewable by patrons on the web interface.
History Tab
The History tab of the Appointment form houses the History grid which tracks any changes made to the appointment's information and the Emails grid which tracks all appointment-type emails sent to the user for the appointment. This tab only appears on the Appointment form when editing an existing appointment.
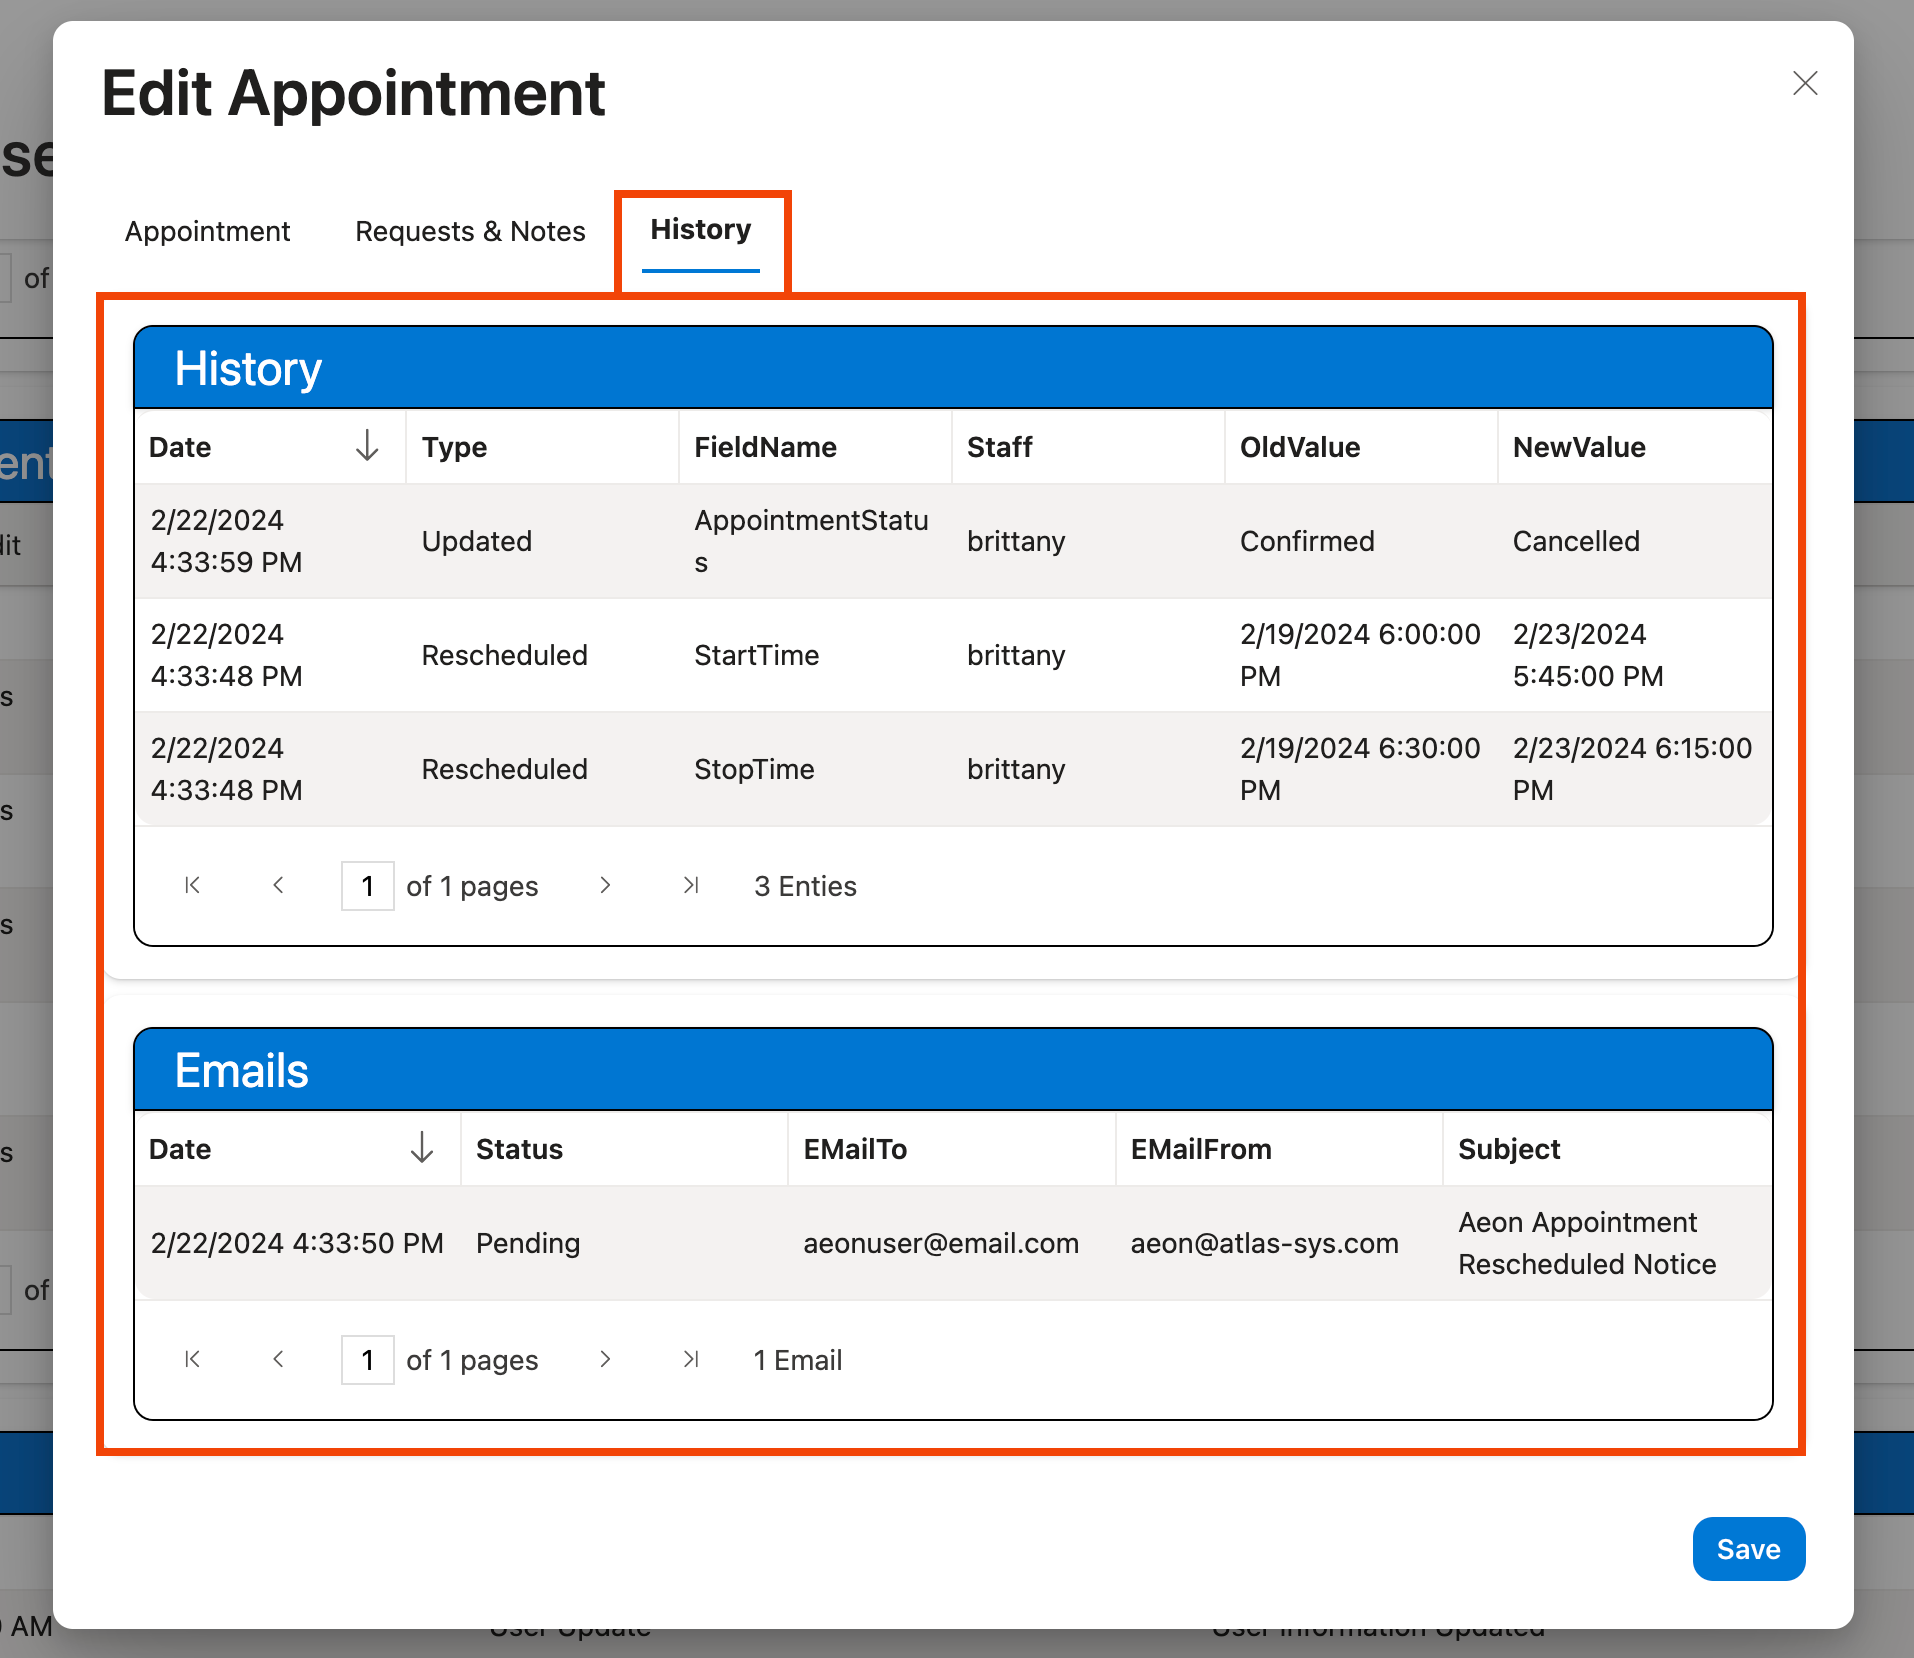
History : The History grid shows the date the change was made, the name of the field that was changed, the staff or user performing the action, the old value in the field before the change was made, and the new value in the field after the change.
Emails : The Emails grid contains a list of all appointment-type emails sent to the user for that appointment. Double-clicking on an email in this grid will open up the full text of the email in a new window.
Deleting or anonymizing a user record will delete all of the user's appointment-type emails from the Aeon database.
Back to top of The Appointment Form section
Rescheduling an Appointment
Rescheduling an appointment by either adjusting the Start/End Date or Reading Room fields in the Appointment form or by using the cursor to drag and drop or adjust the size of an appointment directly on the reading room calendar will open a window with some options for sending the Appointment Rescheduled email to the patron:
In the Aeon Web Client, rescheduling the appointment will open the Send Email? prompt with the following options:
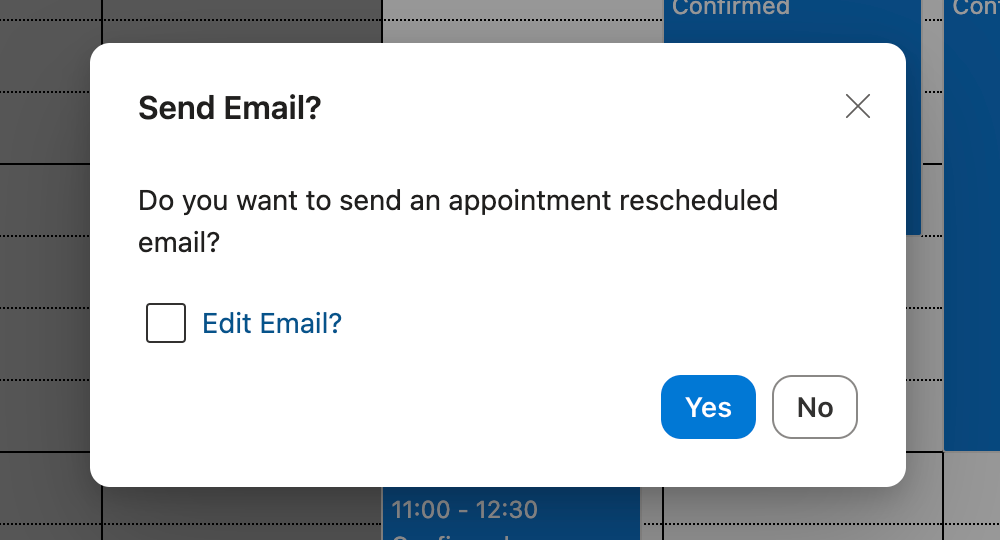
- Click Yes to send the user the Appointment Rescheduled email. If the Edit Email toggle option is enabled (checked), the Appointment Rescheduled email will open in a new window when the Yes button is clicked, allowing you to edit the email before sending.
The option for editing the Appointment Rescheduled email (checked or unchecked) will be remembered and applied in the future whenever an appointment is rescheduled.
- Click No to reschedule the appointment without sending the Appointment Rescheduled email to the user.
You can also click the X at the top of the Send Email prompt, use the ESC key on your keyboard, or click anywhere outside of the Send Email prompt to exit the prompt and reschedule the appointment without sending the user an email.
Back to top of Rescheduling an Appointment section
Validation Exceptions
When creating or editing an appointment in the Aeon Desktop Client or Aeon Web Client, validation will only apply to ensure that a user is assigned to the appointment and that the end date is later than the start date. However, a single appointment should not be created to span multiple dates, i.e., the start date and end date should be entered for the same calendar date.
Other settings configured for the reading room in the Aeon Customization Manager, such as the room's Open Hours and Maximum Appointment Length, will not apply when managing appointments in the desktop client or web client. This allows for staff to make exceptions to the regular policies when necessary. It is recommended to make sure all staff members are aware of the reading room's policies before creating or editing appointments in the desktop client or web client.
Managing Appointments from the User Record
The user record displayed in the Aeon Web Client on the User Information page contains several options for viewing and managing an individual user's appointments.
In the Aeon Web Client, a user's appointments can be viewed and managed via the Appointments grid on the User Information page.
Appointments Grid
The Appointments grid is located on the User Information page for each user record. This tab displays a grid of all the user's appointments and associated reading room details in descending order sorted by start time. You can change the sort order of the grid by clicking on the column headings. To quickly jump to this grid on the User Information page, click the Appointments link in the navigation menu on the left side of the screen.
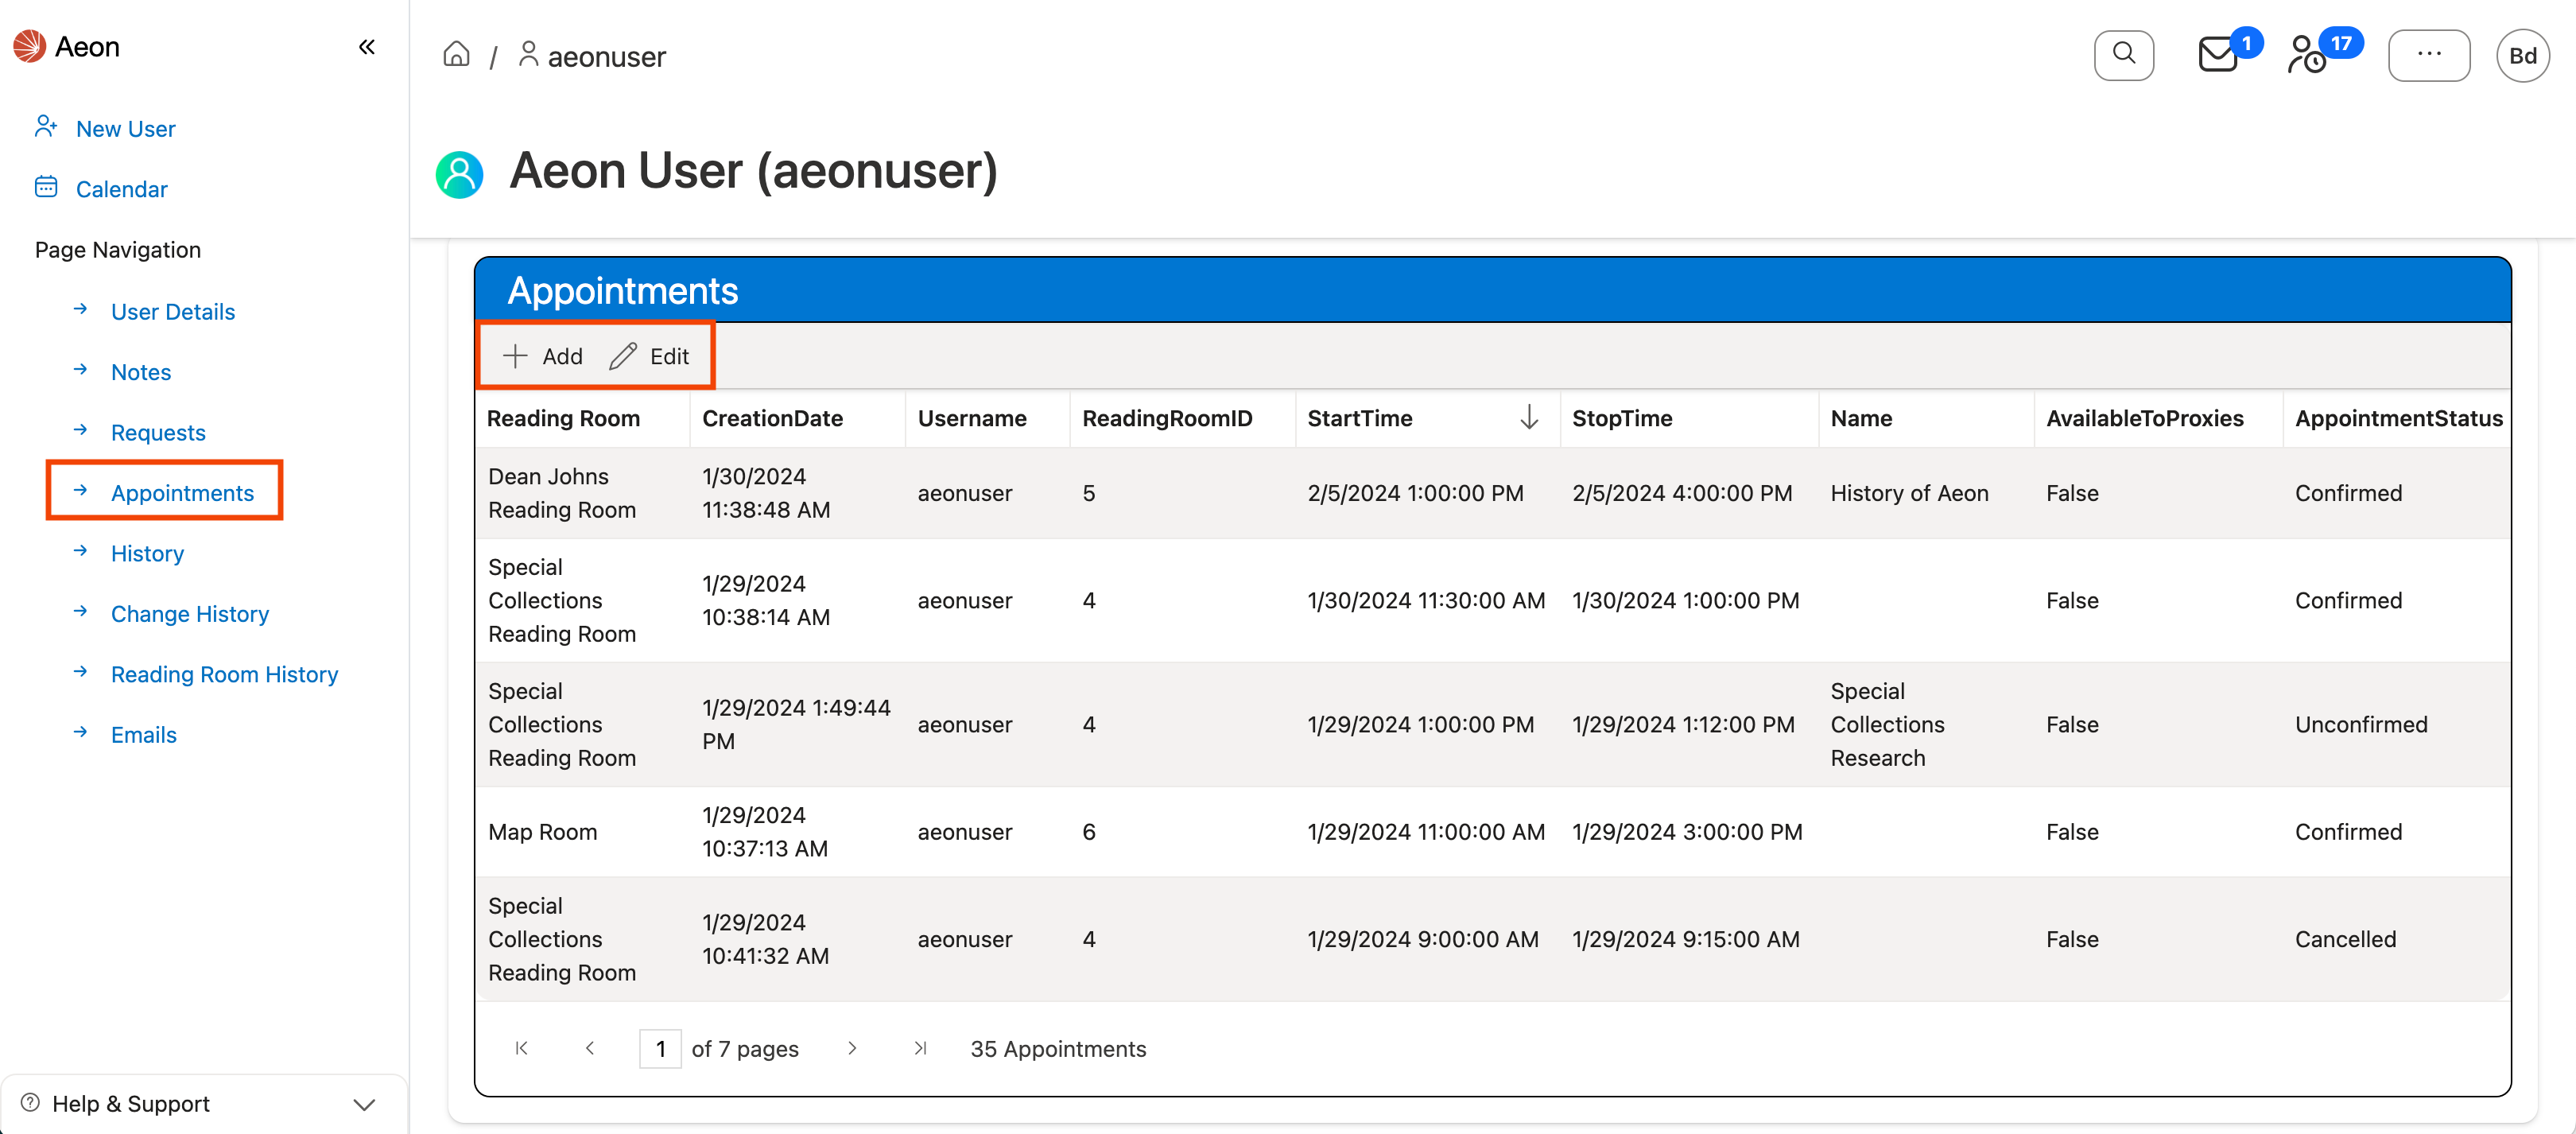
Aeon administrators can customize the fields that are displayed in the Appointments grid using the profile and layout customization options available on the Staff Administration page.
Editing Existing Appointments
Double-clicking on an appointment in the grid or pressing the F2 key when a row in the grid is selected opens the Appointment form for editing. You can also click on an appointment in the grid to select it, then click the Edit button at the top of the grid to open the Appointment form for the selected appointment.
Creating New Appointments
Clicking the Add button on the Appointments grid will open the Appointment form allowing you to create a new appointment for that user. If multiple reading rooms have been configured for appointments in the Aeon Customization Manager, you can use the reading room dropdown on the appointment form to select the room in which to book the appointment for the user.
Back to top of Managing Appointments from the User Record section
Cross-Reference
For desktop-based appointment management with advanced features, see Managing Appointments in the Desktop Client.
For initial appointment setup and configuration, see Appointment Scheduling Overview.