Composing and Sending Email from a Request
Most of the time you email a researcher about a request while you're already looking at it: the item is ready for pickup, you need more detail before you can pull it, the copies are done, or you're cancelling and want to explain why. Aeon handles this from the request itself, so the message is tied to that transaction and recorded in its email history.
You start an email from the Email menu on the request toolbar. From there you can either pick a template — which pre-fills the recipient, subject, and body with the request's details already filled in — or send a blank message you write from scratch. Either way, the message opens in a single Compose Email dialog where you can edit everything before it goes out.
- A request reaches a status the researcher should hear about (item available, on hold, copies ready) — pick the matching template.
- You need to ask the researcher a one-off question — send a blank email and write it yourself.
- You're cancelling or changing a request's status and want the researcher notified at the same time — pick a template that routes the request (see Routing the request when you send).
This page covers email tied to a specific request (transaction). To send a general message to a researcher that isn't about one request — and to browse their full email history — work from the user record instead. See Composing and Sending Email to a User. The compose dialog is the same; only the starting point and the available templates differ.
Starting an email from a request
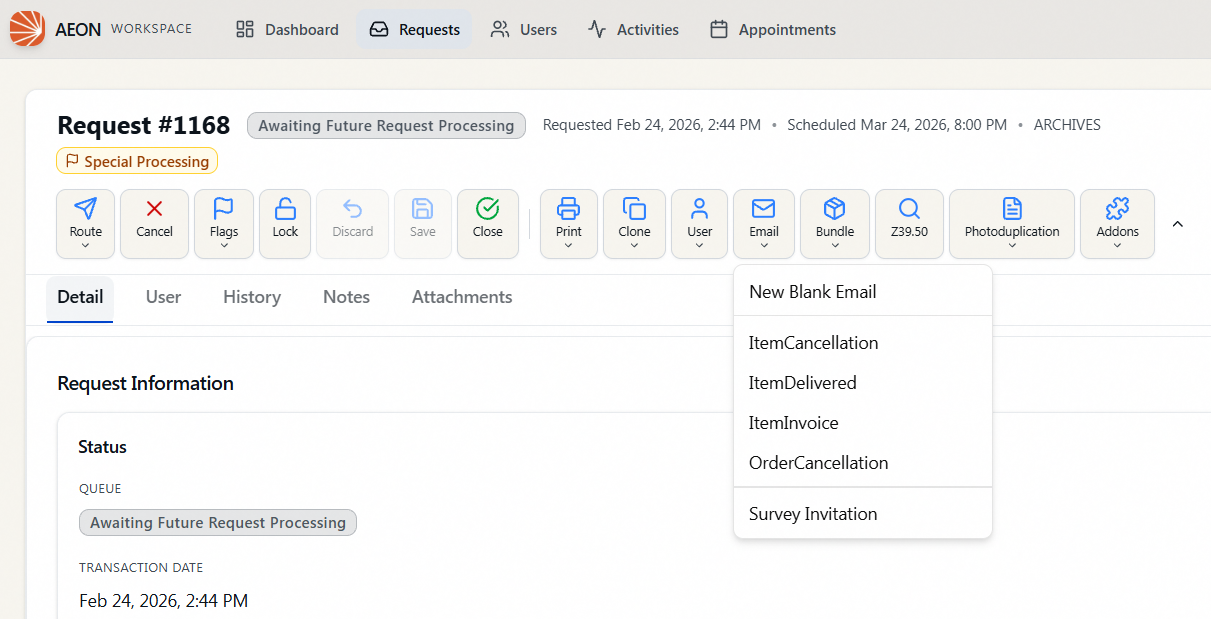
- Open request #12345 and find the Email menu (envelope icon) in the toolbar across the top of the request.
- Click it to open the menu. You'll see:
- New Blank Email — opens an empty message addressed to the researcher.
- A list of email templates below it (system templates first, then any custom templates your site has added), each named for what it does.
- Choose New Blank Email or click the template you want.
The Compose Email dialog opens.
Aeon addresses the email to the researcher on the request automatically. If that researcher has no email address on file, Aeon won't open the dialog — you'll see "Cannot send email: user email address not available." Add an email address to the user record first, then try again.
Using a template
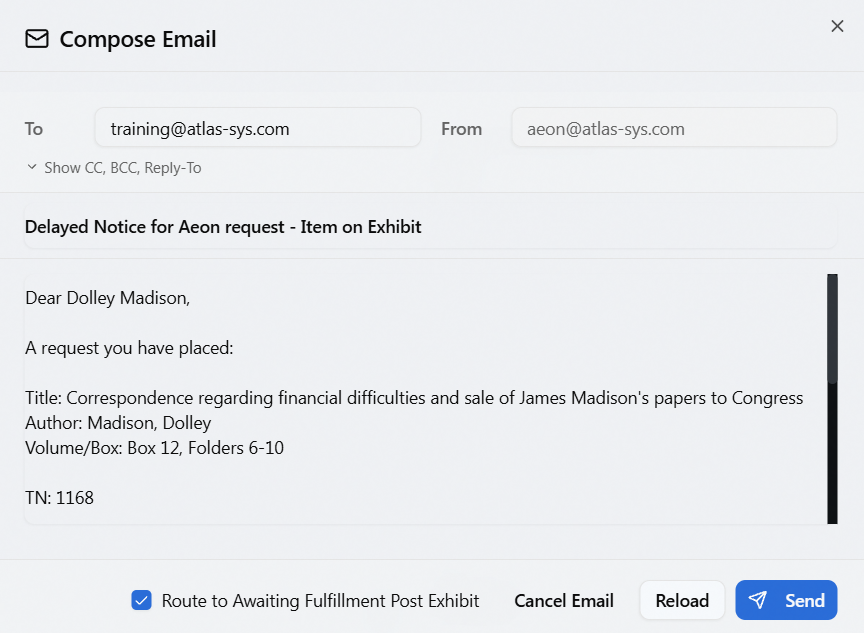
When you pick a template, Aeon loads a preview: it pulls the request's data into the template's tags and fills in the message for you. While it's working you'll see "Loading email preview…"; then the dialog populates with:
- To — the researcher's email address.
- From — the sending address, filled in from your institution's configuration. It's shown for reference but can't be edited (see the note below).
- Subject — the template subject with the request's details merged in.
- Message body — the full template text, with tags like the transaction number, title, and author already replaced by this request's values.
- Reply-To, CC, and BCC, if the template sets any. When the template includes any of these, the dialog expands to show them automatically.
Everything in the preview is editable except the From address — change the wording, fix the subject, add or adjust a recipient, whatever the message needs before it goes out.
Aeon fills in From from your institution's configured sending address and shows it read-only — the field is grayed out and you can't type in it. This keeps mail from going out under a spoofed sender. If there's no configured default, the field shows the placeholder "(library default)." To change the address Aeon sends as, update your email configuration — not this dialog.
If you've edited a templated email and want to start over from the original, click Reload. It re-fetches the preview and discards your edits, putting the message back to exactly what the template produces for this request. (The Reload button only appears when you started from a template — there's nothing to reload for a blank email.)
Writing a blank email
Choose New Blank Email when you just need to send a quick, custom message. The dialog opens empty (no preview), addressed to the researcher, with the From address already set from your configuration (read-only — see the note above). Fill in the Subject and the message body.
To add Reply-To, CC, or BCC, click Show CC, BCC, Reply-To beneath the To/From row to expand those fields (click Hide CC, BCC, Reply-To to collapse them again).
The compose dialog at a glance
| Field / control | What it's for |
|---|---|
| To | Recipient address. Pre-filled with the researcher's email; editable. |
| From | Sending address, set by your institution's configuration. Read-only — shown for reference but not editable. |
| Show CC, BCC, Reply-To | Expands the optional Reply-To, CC, and BCC fields. |
| Subject | The email subject line. |
| Message body | The email text. Required — Send stays unavailable until it has content. |
| Reload | (Templates only) Re-loads the preview, discarding your edits. |
| Cancel Email | Closes the dialog without sending. |
| Send | Queues the email for delivery. |
Routing the request when you send
Some templates are configured to also change the request's status when the email goes out — for example, an "item available" email that moves the request into a waiting-for-pickup queue. When you open such a template, the bottom of the dialog shows one or both of these checkboxes, already checked:
- Route to [queue name] — moves the request to the status queue the template specifies.
- Route to [queue name] (photoduplication) — moves a photoduplication request to its configured status queue. This option only appears on requests that are in photoduplication.
Leave a box checked to route the request as you send; uncheck it to send the email without changing the request's status. Blank emails and templates without routing configured don't show these checkboxes at all.
The status change is applied as part of sending. After you click Send, Aeon tells you how it went:
- "Email queued and request routed successfully" — the email went out and the request moved.
- "Email queued, but routing failed" — the email went out, but the status change didn't apply. Check the request and route it manually if needed.
- "Email queued successfully" — the email went out (no routing was requested).
Sending
- Confirm To, Subject, and the message body are filled in — all three are required, and Send stays unavailable until they are. If one is still empty when you send, Aeon blocks the send and tells you which ("Recipient email is required", "Subject is required", or "Message body is required"). The From address is set for you, so there's nothing to fill in there.
- Click Send.
- The button shows "Sending…", and on success a confirmation toast appears (see the routing messages above). The dialog closes and the email is recorded in the request's email history.
To back out at any point, click Cancel Email — nothing is sent and your draft is discarded.
Outgoing email is placed on Aeon's email queue and delivered by the system shortly after — the confirmation says queued for that reason. If a message later fails to send, it lands in the Failed tab of the outgoing email queue, where you can review and resend it. See The Outgoing Emails Queue: Pending and Failed.
Reviewing what you've sent
Every email you send about a request is saved with that request and visible in its email history, alongside any automated notifications the system sent the researcher. See Email History for a Request.
Sending email requires the Edit level of the Email permission. Without it, the Email menu and the Send button are disabled, and the underlying preview and send actions are refused by the server. Viewing a request's existing email history, though, isn't governed by the Email permission at all — the History → Emails section shows to anyone who can open the request (View on Requests), whether or not they have any Email access.