Setting Up Appointment Status Policies
A reading room's policies are the rules that govern how far in advance patrons can book appointments and attach requests to them, whether those appointments need staff confirmation, and which notification emails go out. You set them on the Policies tab when you configure a reading room in the Customization Manager.
Most rooms run on a single set of rules that apply to everyone — the Default Policy. The reason this tab is a list rather than a single form is that some institutions need different rules for different kinds of patron: faculty might book a year out while undergraduates are capped at thirty days, or visiting researchers might have their appointments auto-confirmed while everyone else waits for staff review. You handle that by adding extra policies, each tied to a specific user status. A status-specific policy overrides the Default for patrons of that status only; everyone else falls back to the Default.
- You're setting up a new reading room and need at least its Default Policy before patrons can book — every room must have one.
- A particular group of patrons (faculty, staff, undergraduates, visiting researchers) needs different booking windows or confirmation rules than the rest. Add a policy for that status.
- You want a room's appointments to be auto-confirmed (or to stop being auto-confirmed) for some or all patrons.
- You're turning reminder or appointment-received emails on or off for a room.
The Default Policy is the catch-all: it applies to every patron except those whose status has its own policy row. You only need to add a status-specific policy for a status that should behave differently from the Default — you do not need one row per status. Proxies inherit the policy that matches the researcher they're acting for, not their own status.
Where these settings live
Reading-room policies are part of the reading room record, not a separate screen. Everything below happens on the Policies tab of the reading room editor.
- Open the Customization Manager.
- Go to Reading Rooms.
- In the list on the left, click the room you want to configure — for example, Main Reading Room (an appointment room). (Or click New at the top of the list to create a new room.)
- In the editor, select the Policies tab.
Policies apply to Appointment reading rooms — rooms that run Aeon's appointment-scheduling feature. Visit (walk-in) rooms have no policies; their editor only carries a name and seat locations. If a room is a Visit room and you need scheduling rules, promote it to an Appointment room first.
The Default Policy
Every appointment reading room must have a Default Policy, so Aeon creates one for you. When you open the Policies tab on a new room, you'll see a single card titled Default Policy, badged Required — its User Status reads Default, which is the no-status choice that makes it the catch-all. You can't delete the last remaining policy (the trash icon is disabled when only one policy is left), and if you ever save a room whose policies somehow lack a default, Aeon re-adds a Default Policy automatically.
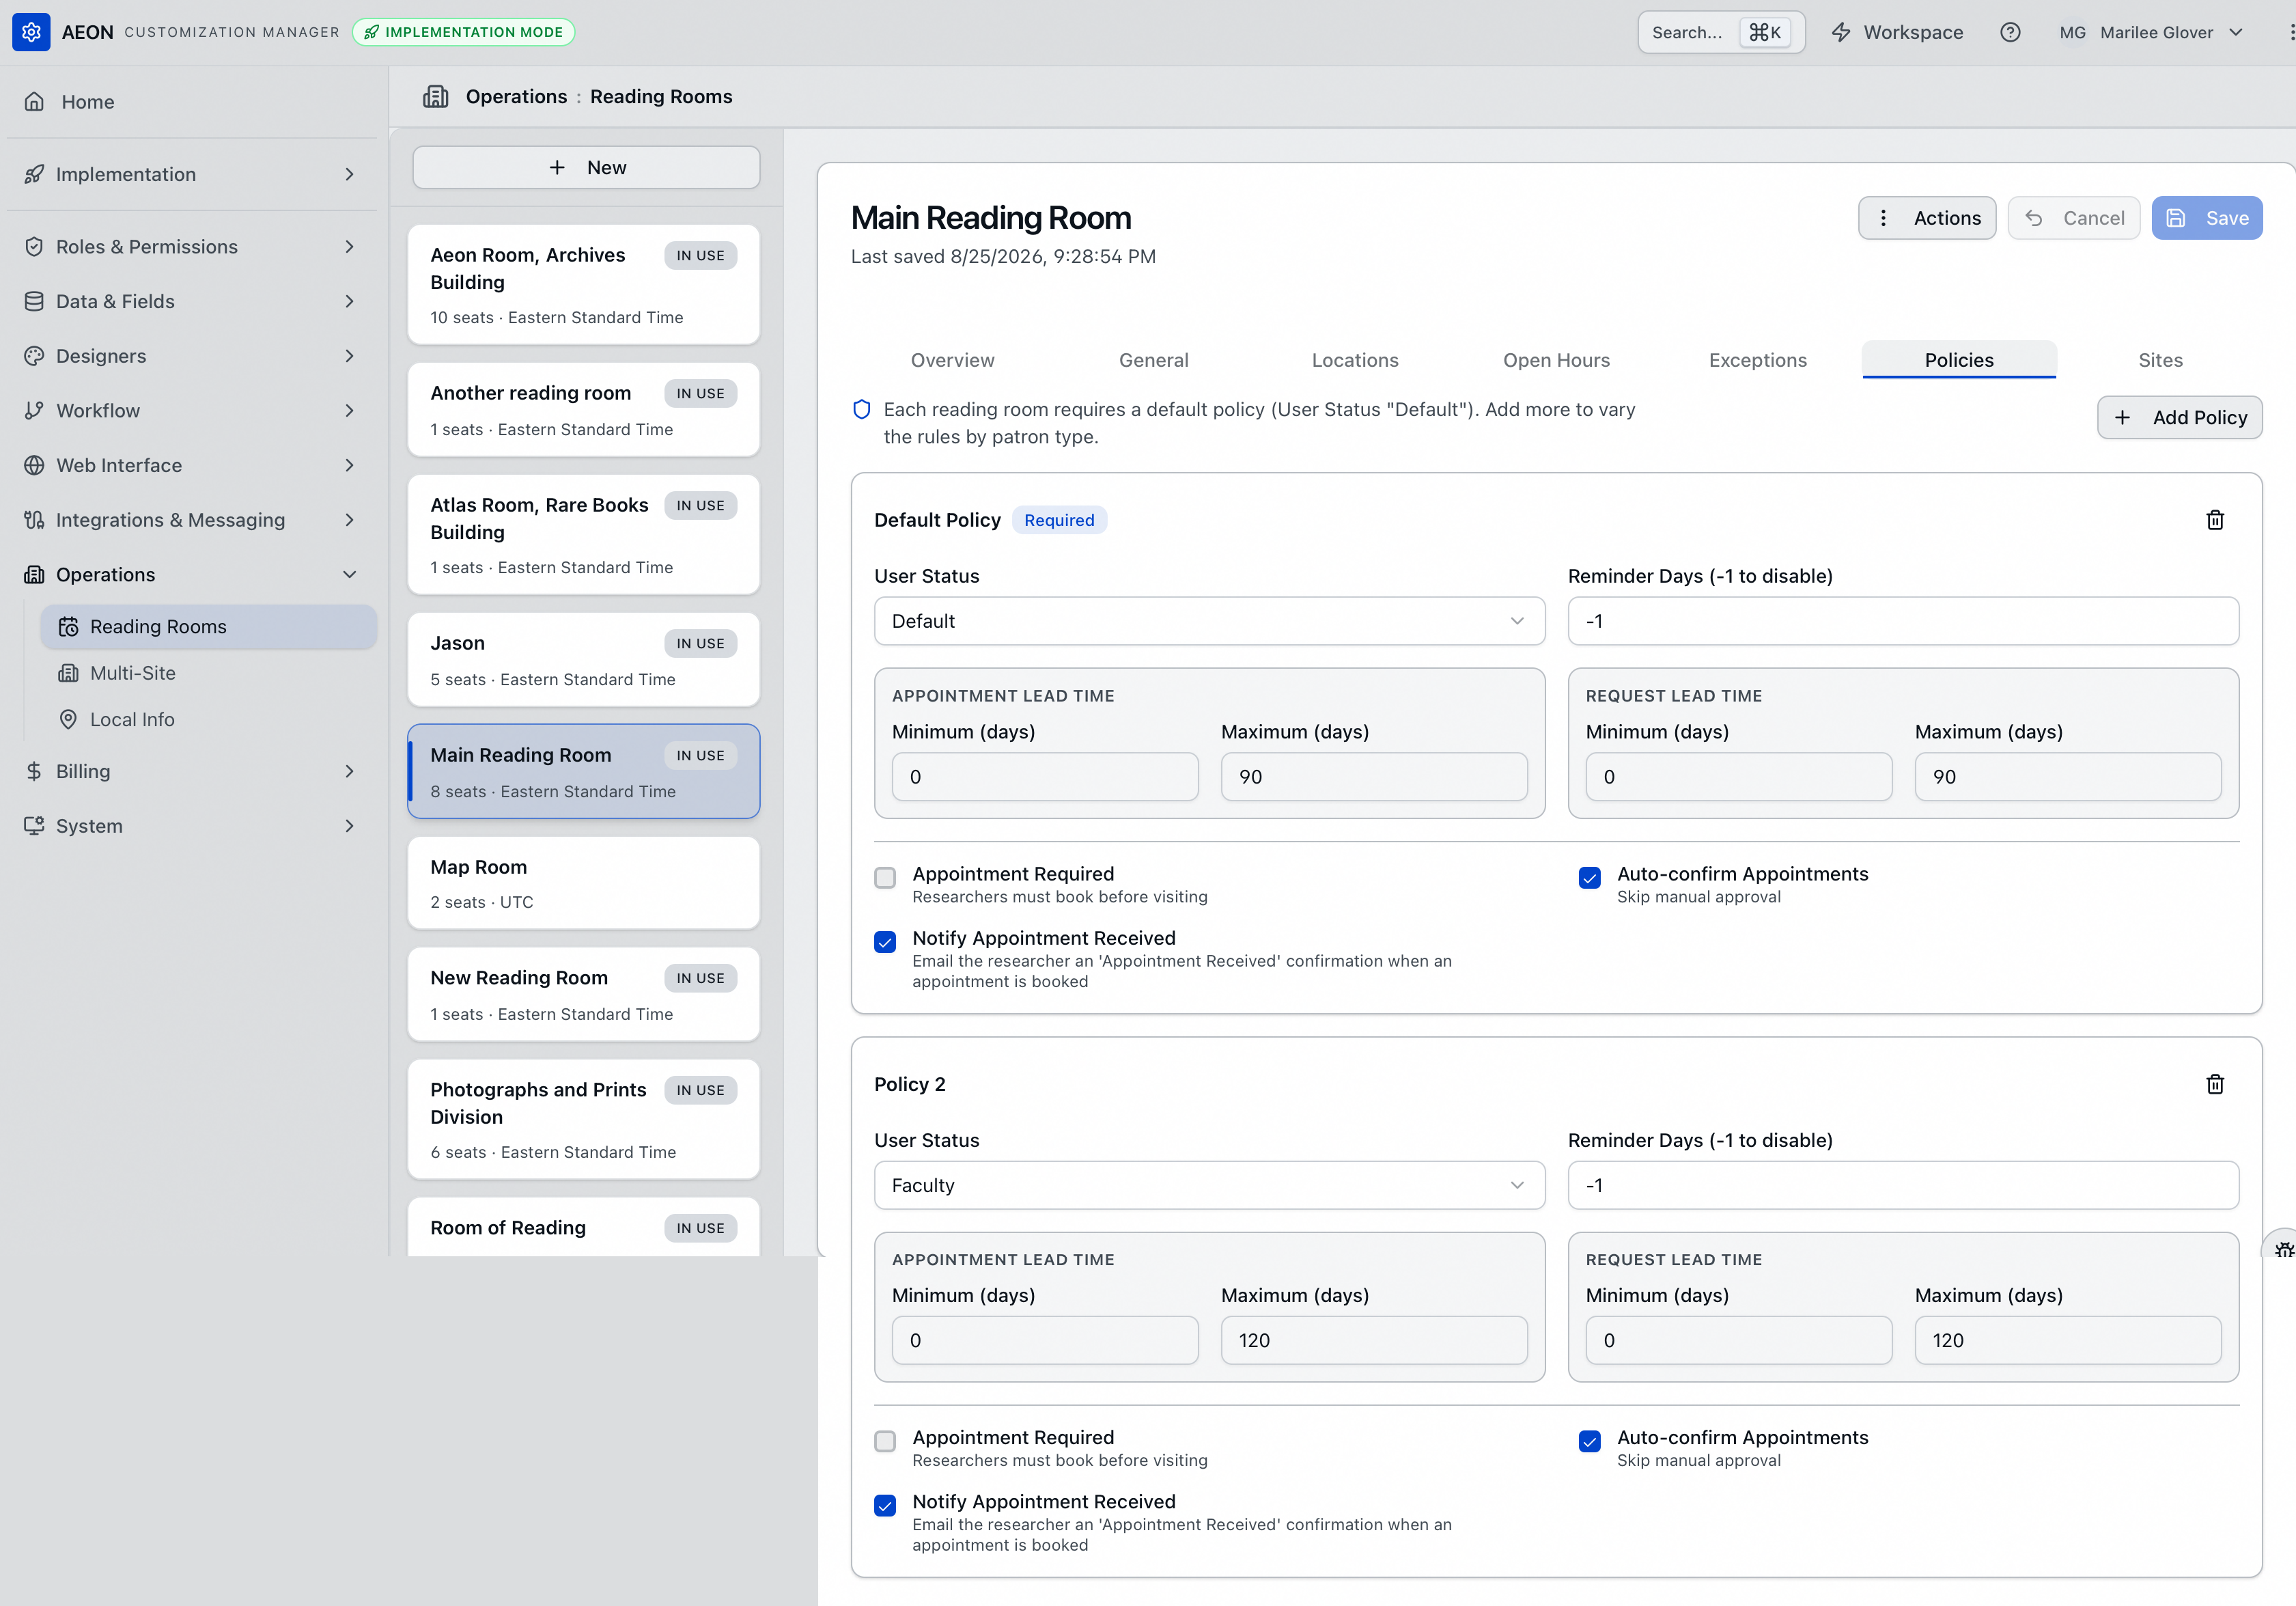
To configure it, fill in the fields described under Policy fields below, then Save.
Adding a status-specific policy
Say faculty at your institution should be able to book up to a year ahead, while the Default caps everyone at 90 days. You'd add a policy for the Faculty status:
-
On the Policies tab, click Add Policy. A new card appears, titled Policy 2 (the next card would be Policy 3, and so on).
-
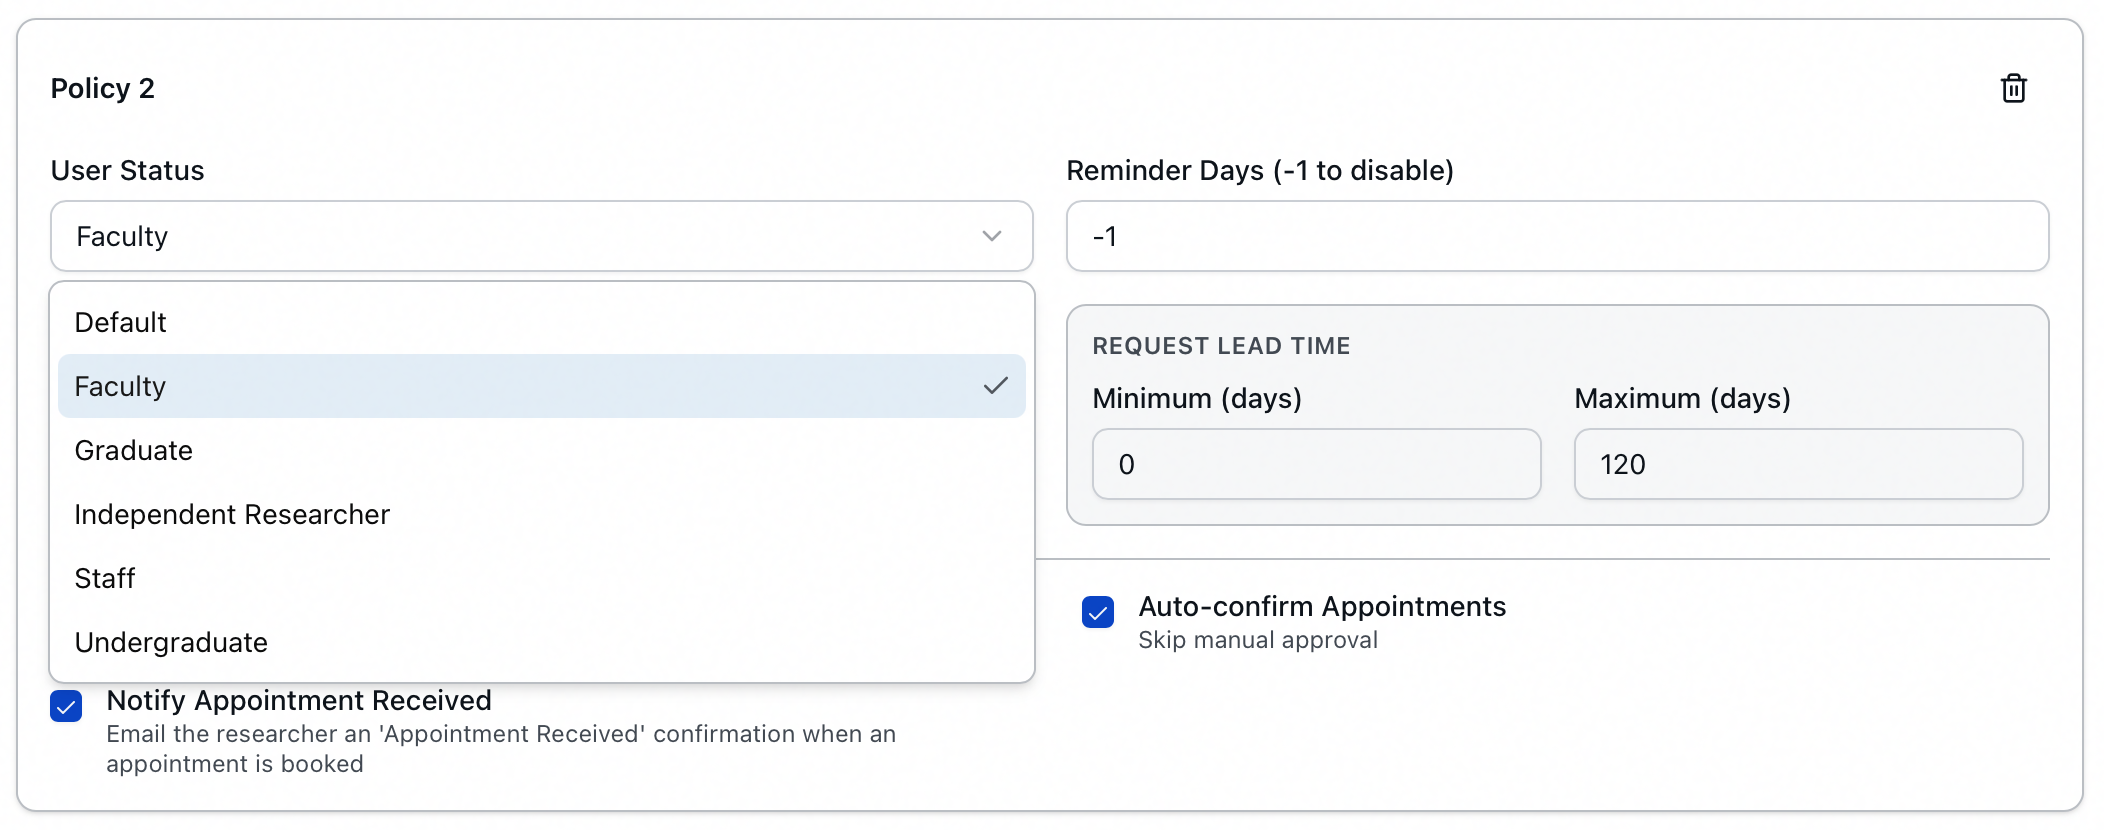
Open the User Status dropdown and choose the status this policy is for — for example, Faculty. The card keeps its Policy 2 heading; only the row whose status is Default is titled Default Policy.
-
Set the fields for this status — for example, under Appointment lead time, set Maximum (days) to
365. -
Click Save.
From then on, Faculty patrons booking this room use the values from their policy, and everyone else uses the Default.
The statuses in the User Status dropdown are your institution's own patron statuses — they're drawn from the Status group in the Custom Dropdowns table (for example, Faculty, Graduate, Undergraduate, Staff). The first option, Default, is the blank/no-status choice that makes a row the Default Policy. If a status you expect is missing, add it to the Status custom dropdown group first.
Policy fields
Each policy card carries the same set of fields. They fall into three groups: how far ahead things can happen (lead days), the on/off switches, and the reminder timing.
Lead-time windows
The lead-time fields sit in two labeled groups — Appointment lead time and Request lead time — each with a Minimum (days) and a Maximum (days).
Appointment lead time — how far ahead an appointment can be booked:
| Field | What it controls |
|---|---|
| Minimum (days) | The fewest days in advance an appointment may be booked. 0 lets patrons book for today. |
| Maximum (days) | The furthest out an appointment may be booked. 90 means appointments can be made up to 90 days ahead. Must be greater than the minimum. |
Request lead time — when requests can be attached to an appointment:
| Field | What it controls |
|---|---|
| Minimum (days) | The cutoff for adding new requests to an appointment, counted back from the appointment date. After this point no new requests can be attached, though requests already on the appointment can still be edited. 0 lets patrons keep adding requests up to the appointment's start time. |
| Maximum (days) | The earliest a request may be attached to an appointment, relative to the appointment date. Must be greater than the minimum. |
Switches
| Field | What it does |
|---|---|
| Appointment Required | When checked, patrons of this status must attach every request to an appointment for this room. This enforces the appointment requirement only for the rooms and statuses where it's checked. It also changes cancellation: in a room that requires appointments, cancelling an appointment always cancels its linked requests too — see Appointment Confirmation and Notification Settings. |
| Auto-confirm Appointments | When checked, appointments booked by this status are confirmed automatically — staff don't have to review them. When unchecked, they stay unconfirmed until a staff member confirms them. |
| Notify Appointment Received | When checked, the patron gets the Appointment Received email as soon as they book. |
Checking Appointment Required enforces the rule on the patron side, but to make web request forms actually require an appointment you must also add a rule validating the Reading Room ID field in the WebValidation table for every request form that exposes the appointment-scheduling fields. Without it, the requirement isn't enforced at the web form.
Reminder timing
Reminder Days (-1 to disable) sets how many days before a confirmed appointment the Appointment Reminder email is sent.
1sends the reminder 24 hours before the appointment's start.0sends it at the appointment's scheduled start time.-1disables the reminder email entirely for this status.
A new Default Policy starts with sensible values you can adjust: Appt and Request lead windows of 0–90 days, Auto-confirm Appointments and Notify Appointment Received both on, Appointment Required off, and Reminder Days set to -1 (reminders off). Tune these to your room before going live.
Removing a policy
To drop a status-specific policy, click the trash icon in the top-right corner of its card, then Save. You can remove any status-specific policy, but not the Default — the trash icon is disabled whenever only one policy remains, so the room always keeps its catch-all rule.
Saving
The Policies tab shares the reading room editor's toolbar. Click Save (or press Cmd/Ctrl+S) to write your changes. If a required field is empty or invalid, Aeon jumps you to the tab holding the problem so you can fix it. Cancel discards unsaved edits and reverts the room to its last saved state.
Configuring reading-room policies — like all reading-room configuration — requires the Operations configuration capability. Without it, Reading Rooms doesn't appear in the Customization Manager, and opening the page directly shows "You don't have permission to access this customization section." — there's no view-only mode. Saves are also enforced on the server against the same capability. See User Permissions and Role-Based Access for how roles and configuration capabilities work.