Print Designer: Invoice Statement
An invoice statement is a single printable page that pulls together a researcher's billing across several requests at once — every charge, every payment made, and what's still owed — rather than billing one request at a time. Think of it as the account summary you hand or mail to a frequent researcher.
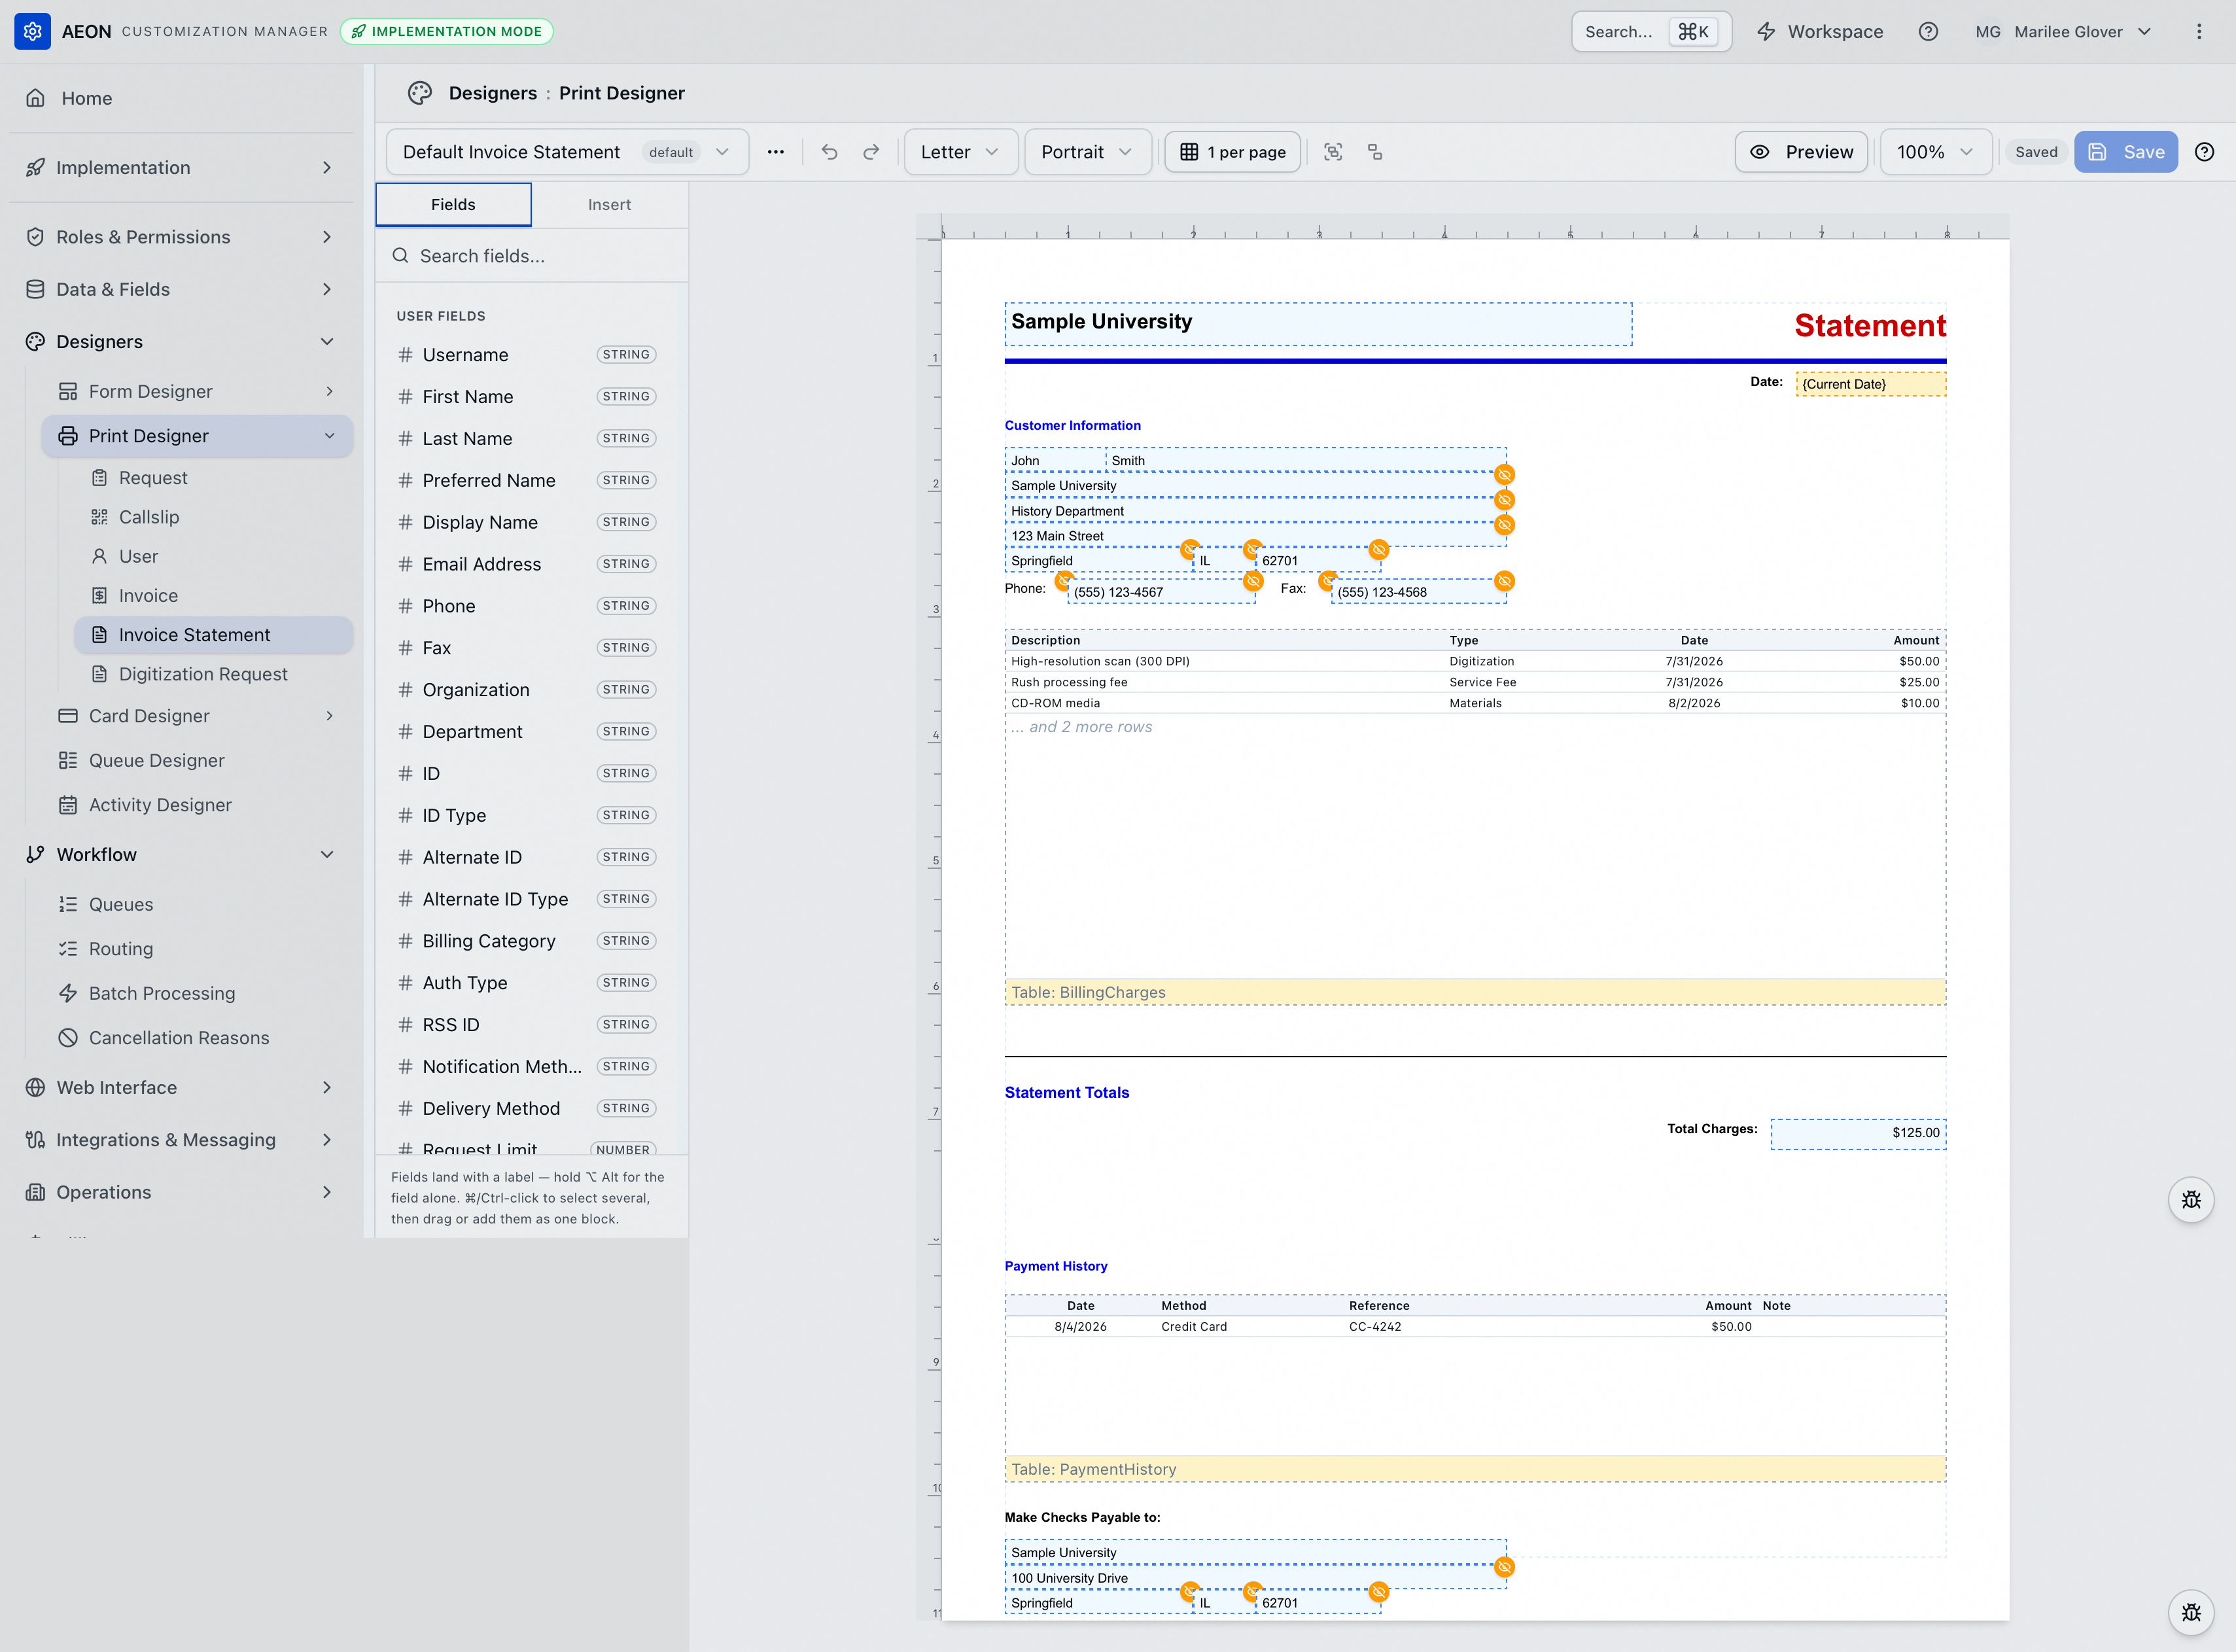
The Print Designer is where you decide what that statement looks like: the heading, the researcher's name and address, the table of charges, the totals, the payment history, and any fine print. You lay it out once on a visual canvas, and from then on every statement Aeon prints uses your design with real data dropped in.
When a statement gets printed
Knowing where the document comes from tells you what to design for. A statement isn't generated on a schedule and it isn't produced per request — staff choose what goes on it, one researcher at a time:
- Open the researcher's user record and go to the Billing tab. It opens with a Balance Summary card — Invoice Total, Payment Total, and Balance Remaining — above an Outstanding Invoices table.
- Select the requests to bill, or use the header checkbox to select all of them. Print Statement stays disabled until at least one row is selected, and it shows a count badge of how many are.
- Click Print Statement. The print dialog renders your Invoice Statement template as a PDF, with Download and Print.
So a statement covers exactly the requests that were selected, and the table it's chosen from lists only requests with an outstanding balance.
For the day-to-day side of this, see Invoices and outstanding balances.
Aeon builds the statement from the selected transactions and takes the name and address from the first one's user. That's the right answer when every request in the selection belongs to the same researcher, which is how the Billing tab presents them. It's worth knowing if you ever produce a statement from a mixed selection: the customer block will name only one of them.
An Invoice bills one request — one transaction's charges and one balance. An Invoice Statement covers several requests at once: it brings their charges and the payment history together on one document and shows a single amount due across all of them. If you bill request by request, you want the Invoice template. If staff settle several outstanding requests together from the Billing tab, you want this one. The designer works the same way for both; the data behind it is what differs.
- You're setting up billing for a new Aeon site and need a statement that matches your institution's letterhead and finance conventions.
- Staff settle several outstanding requests together from a researcher's Billing tab, and the default statement doesn't show the columns or totals your office needs.
- Your finance office needs the invoice to show specific line items, a tax line, or a remittance address.
- You want your library's logo or a "Please pay within 30 days" note on every statement.
Where to find it
Open the Customization Manager, then in the Designers group expand Print Designer. Each print type is its own entry in that sub-menu — Request, Callslip, User, Invoice, Invoice Statement, and Digitization Request. Click Invoice Statement.
The print type is fixed by the page you land on; there is no type switcher inside the designer. To work on a different print type, go back to the sub-menu and pick that entry.
The Print Designer, like every tool in the Designers group, requires the Designers configuration capability on your role. Without it, the Designers section doesn't appear in the Customization Manager at all.
Generating a Preview is more permissive: it's allowed for anyone with the Designers capability, and also for staff who only have View access to Requests, since statement data is request-based. Creating, editing, duplicating, and deleting templates always require the Designers capability.
The designer at a glance
The screen has three working areas, plus a toolbar across the top.
Toolbar. On the left, the template selector names the template you're editing and carries a default badge when it's the site default; the ⋯ button beside it holds the template actions. Then undo and redo, the page size and orientation menus, and the records-per-page control (1 per page unless you change it). Next come Group (⌘G) and Ungroup (⌘⇧G) — these stay grayed out until you select two or more elements, or select an existing group, so most of the time they look inactive. On the right sit Preview, the zoom menu, a status word that reads Saved while your work is committed, and the Save button.
The panel on the left has two tabs:
- Fields — every field you can put on a statement, grouped and searchable, each tagged with its data type (
STRING,NUMBER, and so on). A hint at the bottom of the panel explains the shortcuts: "Fields land with a label — hold ⌥ Alt for the field alone. ⌘/Ctrl-click to select several, then drag or add them as one block." - Insert — everything that isn't a data field: text, shapes, images, the two statement tables, and the auto fields. Covered in step 4 below.
The canvas in the middle is the page itself. Elements show dashed outlines, and the two table blocks show a colored bar naming their data source.
The floating toolbar appears above whatever you select. There is no separate properties panel — everything you can change about an element lives on that toolbar.
Building or editing a statement template
1. Pick a template, or start a new one
The template selector lists every Invoice Statement template you have. Pick one to edit it.
To create one, open the ⋯ menu and choose New Template. To start from something that already works, select it and choose Duplicate — you get a full copy to edit freely, leaving the original untouched. That's the safe way to experiment on a template that's already in use.
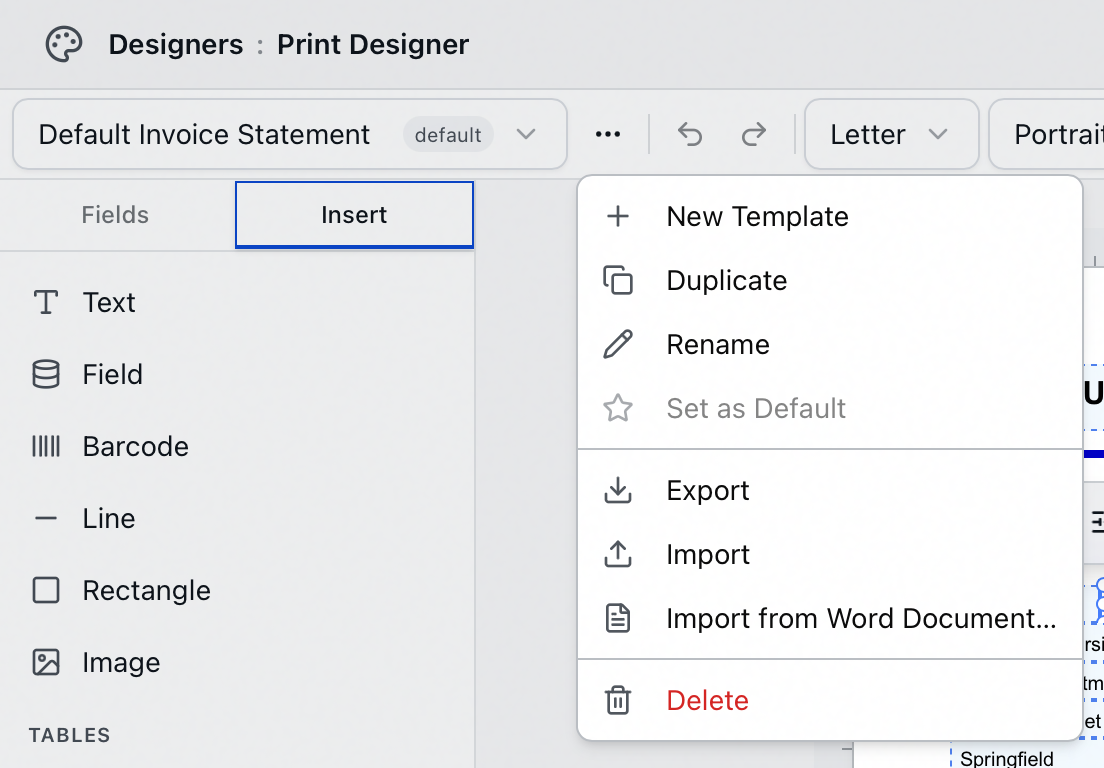
The rest of the ⋯ menu covers Rename, Set as Default (grayed out when the template already is the default), Export and Import for moving a design between sites, Import from Word Document…, and Delete.
2. Set the page up
Choose the page size — Letter, Legal, A4, or A5 — and the orientation, Portrait or Landscape. Statements are normally a full Letter or A4 portrait page.
The records-per-page control sets a print grid for fitting several records on one sheet. It's described as "Configure grid layout for printing multiple records per page." Statements are usually one per page, so you can leave it alone.
3. Add fields
On the Fields tab, search for the field you want and drag it onto the canvas. By default a field arrives with its label attached. Hold ⌥ Alt while you drag to place the value on its own — useful when you've already drawn your own label as text, or when the field sits inside a line you've laid out by hand.
To move several fields as a unit, ⌘/Ctrl-click each one, then drag or add them together.
4. Adding elements that aren't fields
The Insert tab holds everything else:
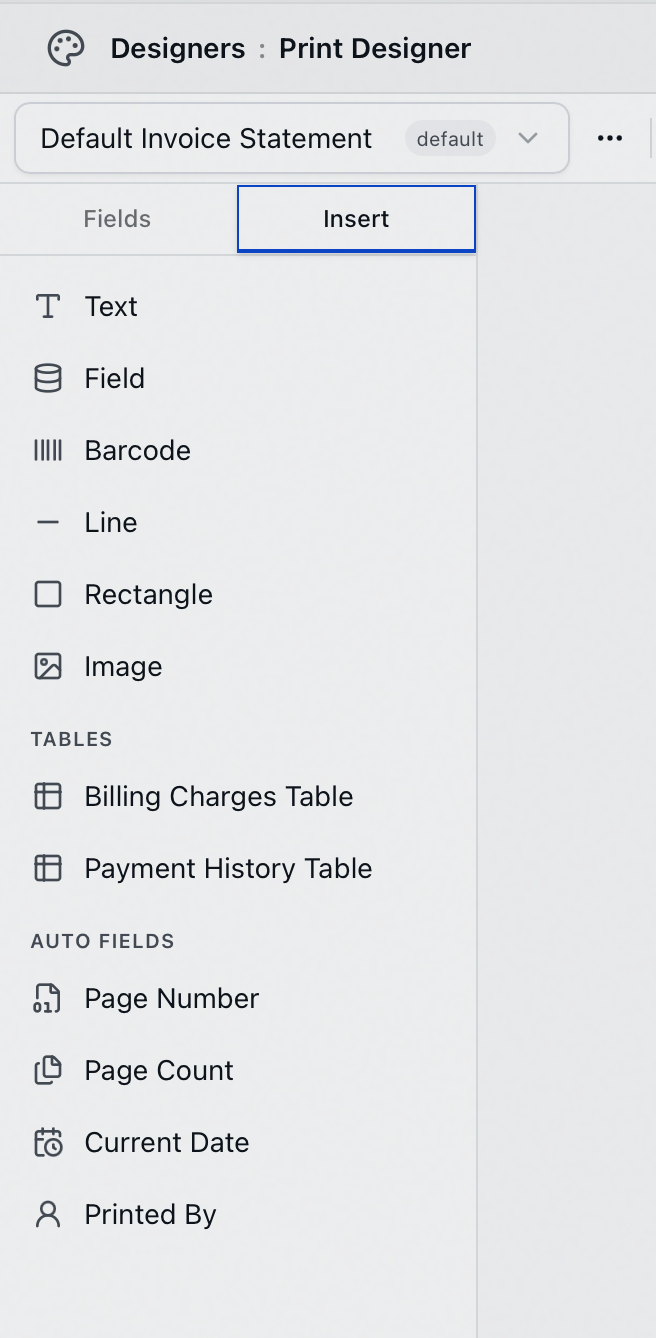
- Text, Field, Barcode, Line, Rectangle, and Image — the general building blocks. Text is how you add headings, your remittance address, and fine print. Image is how you add a logo.
- Tables — Billing Charges Table and Payment History Table. These are the heart of a statement; see below.
- Auto Fields — Page Number, Page Count, Current Date, and Printed By. These fill themselves in at print time.
5. The two tables
A statement is built around two repeating tables, and they behave differently from ordinary fields: you place one block and it grows to as many rows as the data needs.
- Billing Charges Table lists the individual charges — description, type, date, and amount.
- Payment History Table lists what the researcher has already paid — date, method, reference, amount, and note.
On the canvas each table shows the first three rows of sample data followed by "... and 2 more rows", with a colored bar underneath naming its source: Table: BillingCharges or Table: PaymentHistory. That bar is a design-time marker, not something that prints. If a table has no sample data to show, it reads "No sample data for …" instead.
6. Format a field
Select a field and click the Format button on the floating toolbar.
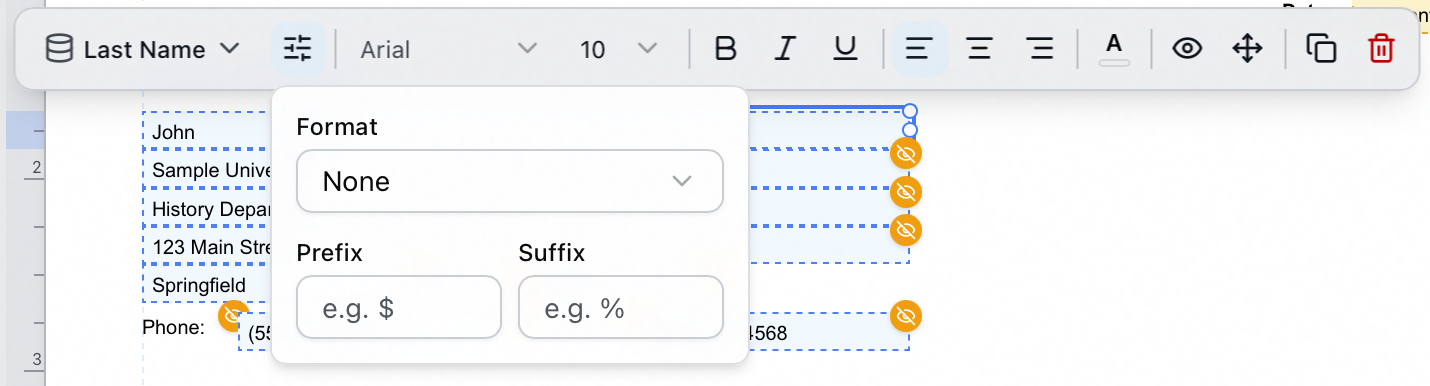
The Format menu offers None, Currency, Number, Short Date, Long Date, and Date & Time. Prefix and Suffix add fixed text on either side of the value — the boxes suggest $ and % as examples.
When you bind an element to a field, Aeon applies a format that matches the field's data type: a currency field gets Currency with a $ prefix, a date field gets Short Date, and a numeric field gets Number. Everything else gets None. Change it only when your institution needs something different — for example a non-dollar currency symbol in the Prefix box.
7. Change which field an element shows
The leftmost button on the floating toolbar names the field the element is bound to. Click it to swap the binding.
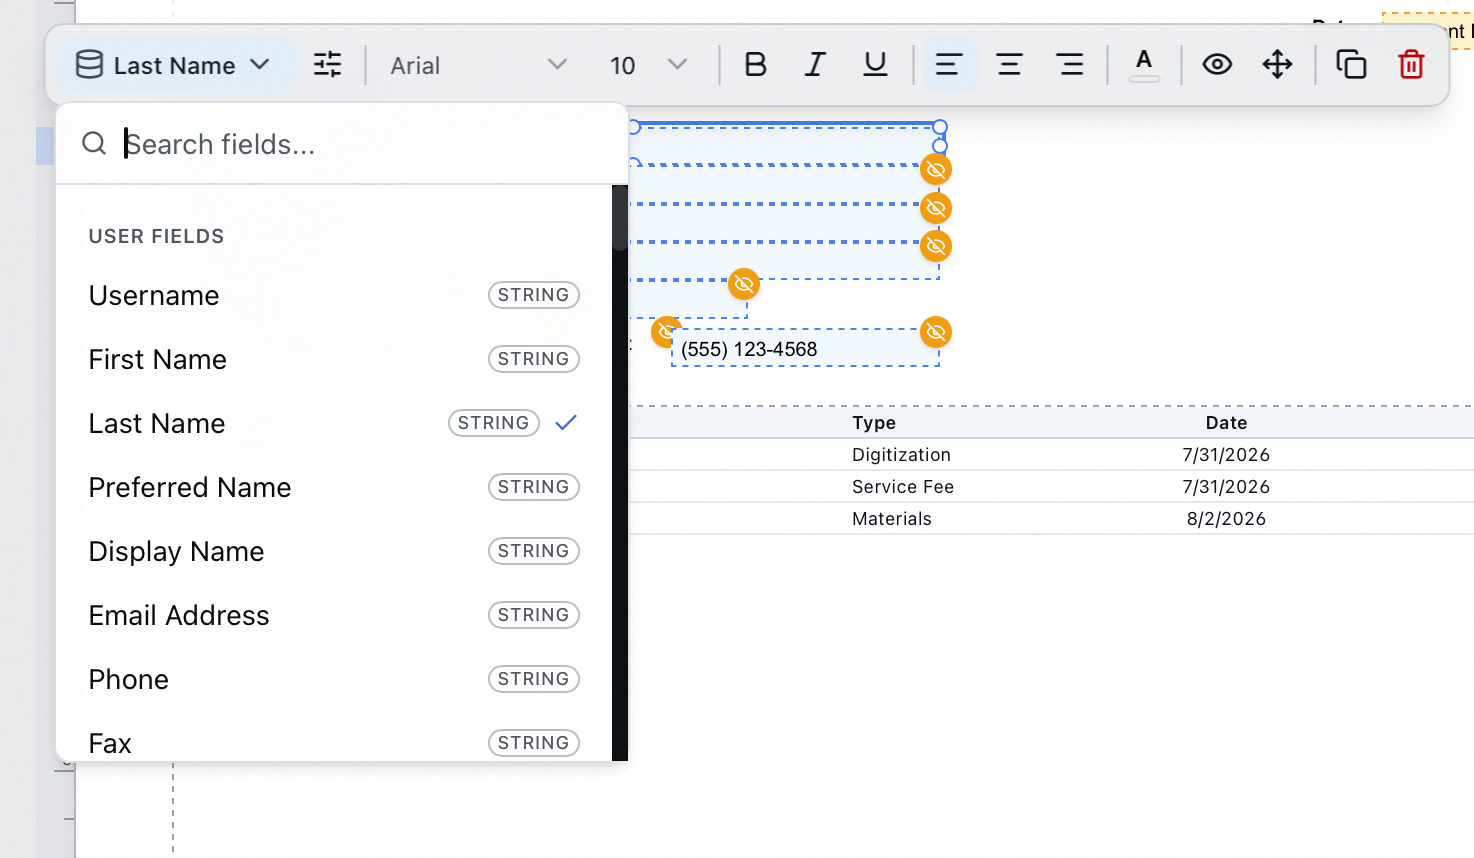
Search or scroll, and a check mark marks the field currently in use. Remember that swapping the field also re-applies the suggested format for the new field's data type.
8. Style, position, and arrange

The rest of the toolbar covers font family and size, Bold, Italic, Underline, the three alignment buttons, Colors, then Visibility conditions, Position & size, Duplicate (⌘D), and Delete (⌫). Select more than one element and you also get Group (⌘G), Ungroup (⌘⇧G), and the distribute controls.
For exact placement, use Position & size rather than dragging:
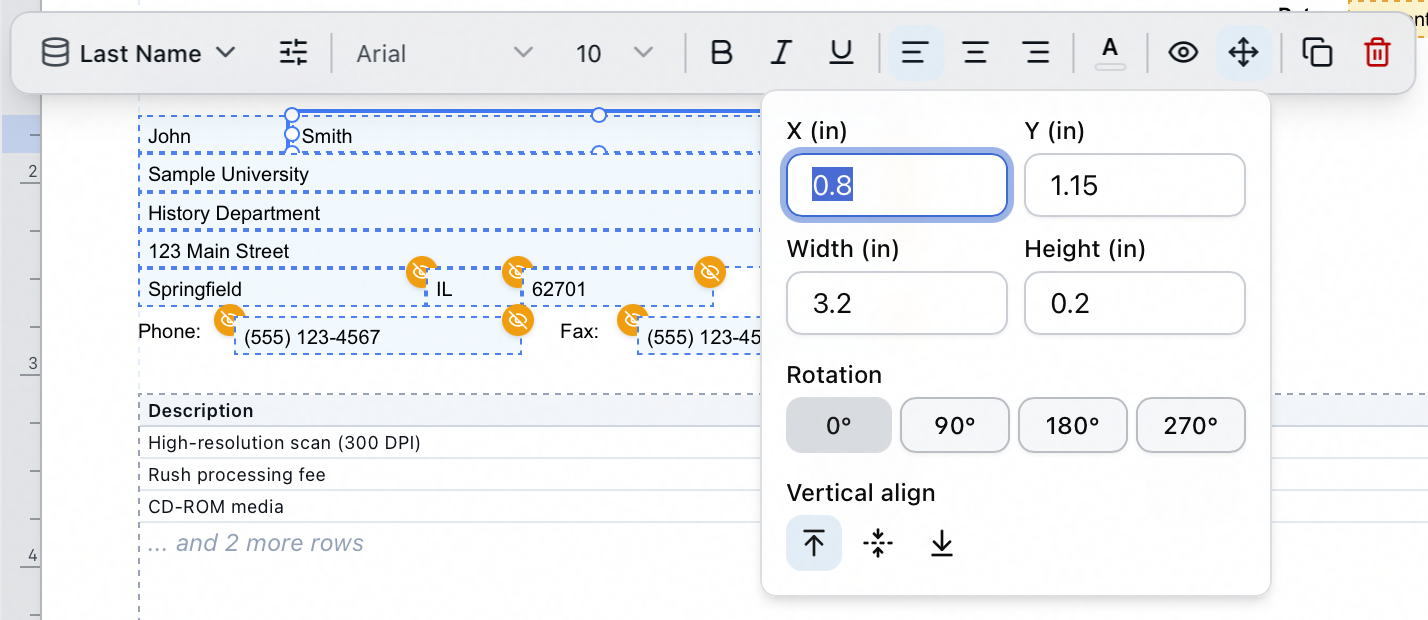
X, Y, Width, and Height are in inches. Rotation offers 0°, 90°, 180°, and 270°. Vertical align sets the value to the top, middle, or bottom of its box. Typing numbers here is the reliable way to line a column of fields up exactly.
9. Hide an element when it has nothing to show
Click the eye button — Visibility conditions — on the floating toolbar.
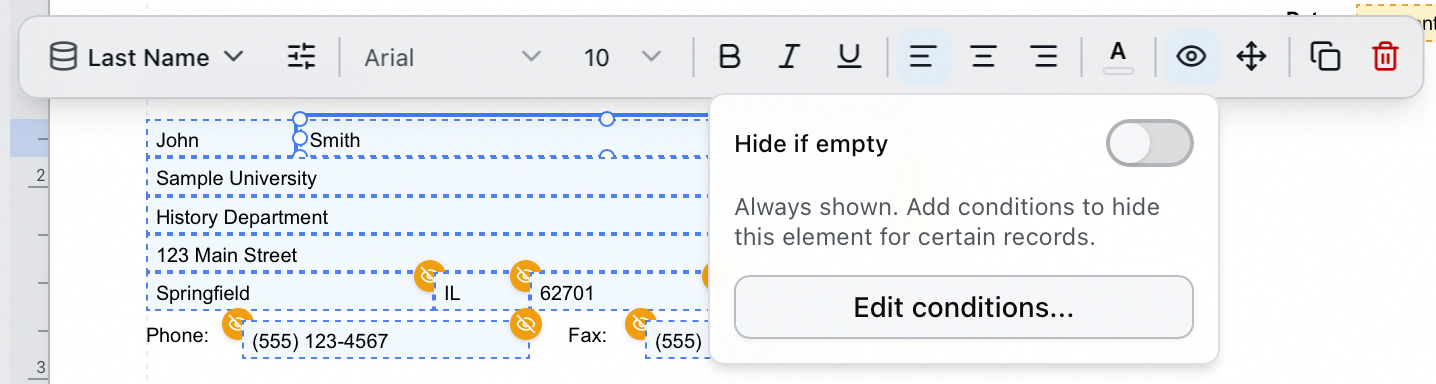
Hide if empty drops the element from the printed page whenever its own value is blank. When nothing is set, the popover reads "Always shown. Add conditions to hide this element for certain records."
For anything more specific, click Edit conditions…:
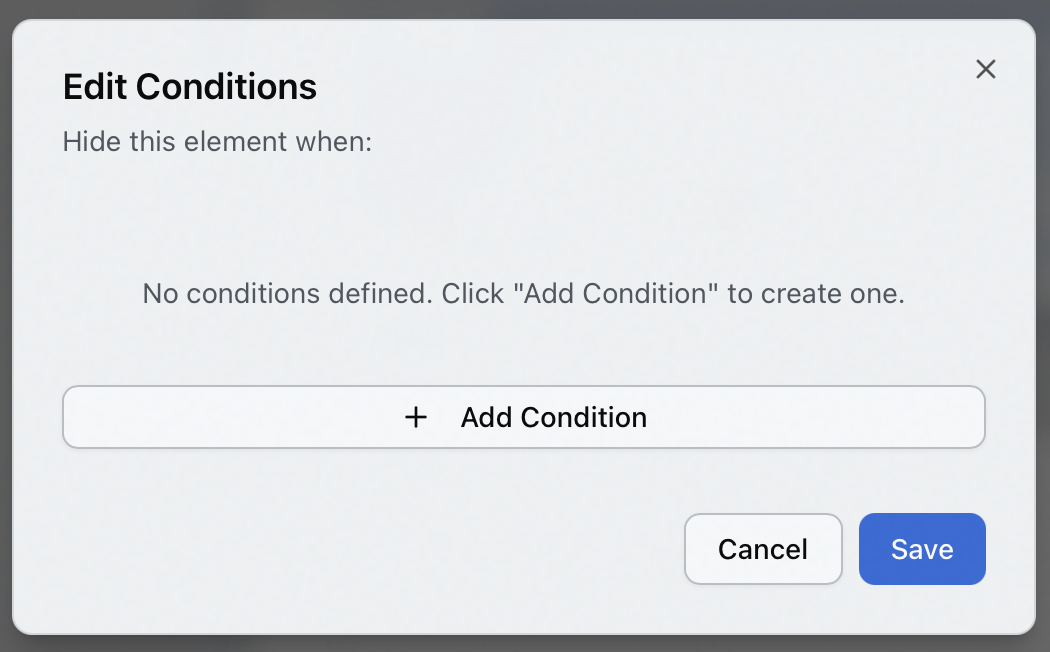
The dialog is headed Hide this element when:, so every condition you add is a reason to hide. An untouched element shows "No conditions defined. Click "Add Condition" to create one." Build the rule, then Save.
An element with a visibility condition carries a small amber badge with a crossed-out eye. That's a design-time marker showing the element won't always print — it isn't an error, and it doesn't appear on the printed page.
The supplied default statement uses this heavily: 14 of its elements are set to hide when their own field is empty — Organization, Department, Address, City, State, Zip, Phone, Fax, and the four "Make Checks Payable to" address lines. The Phone: and Fax: labels are conditioned on their partner fields too, so a label never prints stranded above a blank. That's a good pattern to copy for any optional line you add.
10. Save
Click Save. The status word beside the button tracks where you stand, reading Saved once your work is committed.
Statement totals
Three fields carry the arithmetic, and they're what make a statement a statement rather than a list:
| Field | What it shows |
|---|---|
| Total Charges | The sum of everything in the Billing Charges table |
| Total Payments | The sum of everything in the Payment History table |
| Amount Due | Total Charges minus Total Payments |
Place them as ordinary fields, format them as Currency, and Aeon fills in the arithmetic at print time. The supplied default groups all three under a Statement Totals heading in the lower half of the page, with Amount Due set in bold as the figure the researcher should act on.
Check it with Preview
Preview renders the template to a real PDF with sample data, so you see what will actually come off the printer rather than what the canvas approximates.
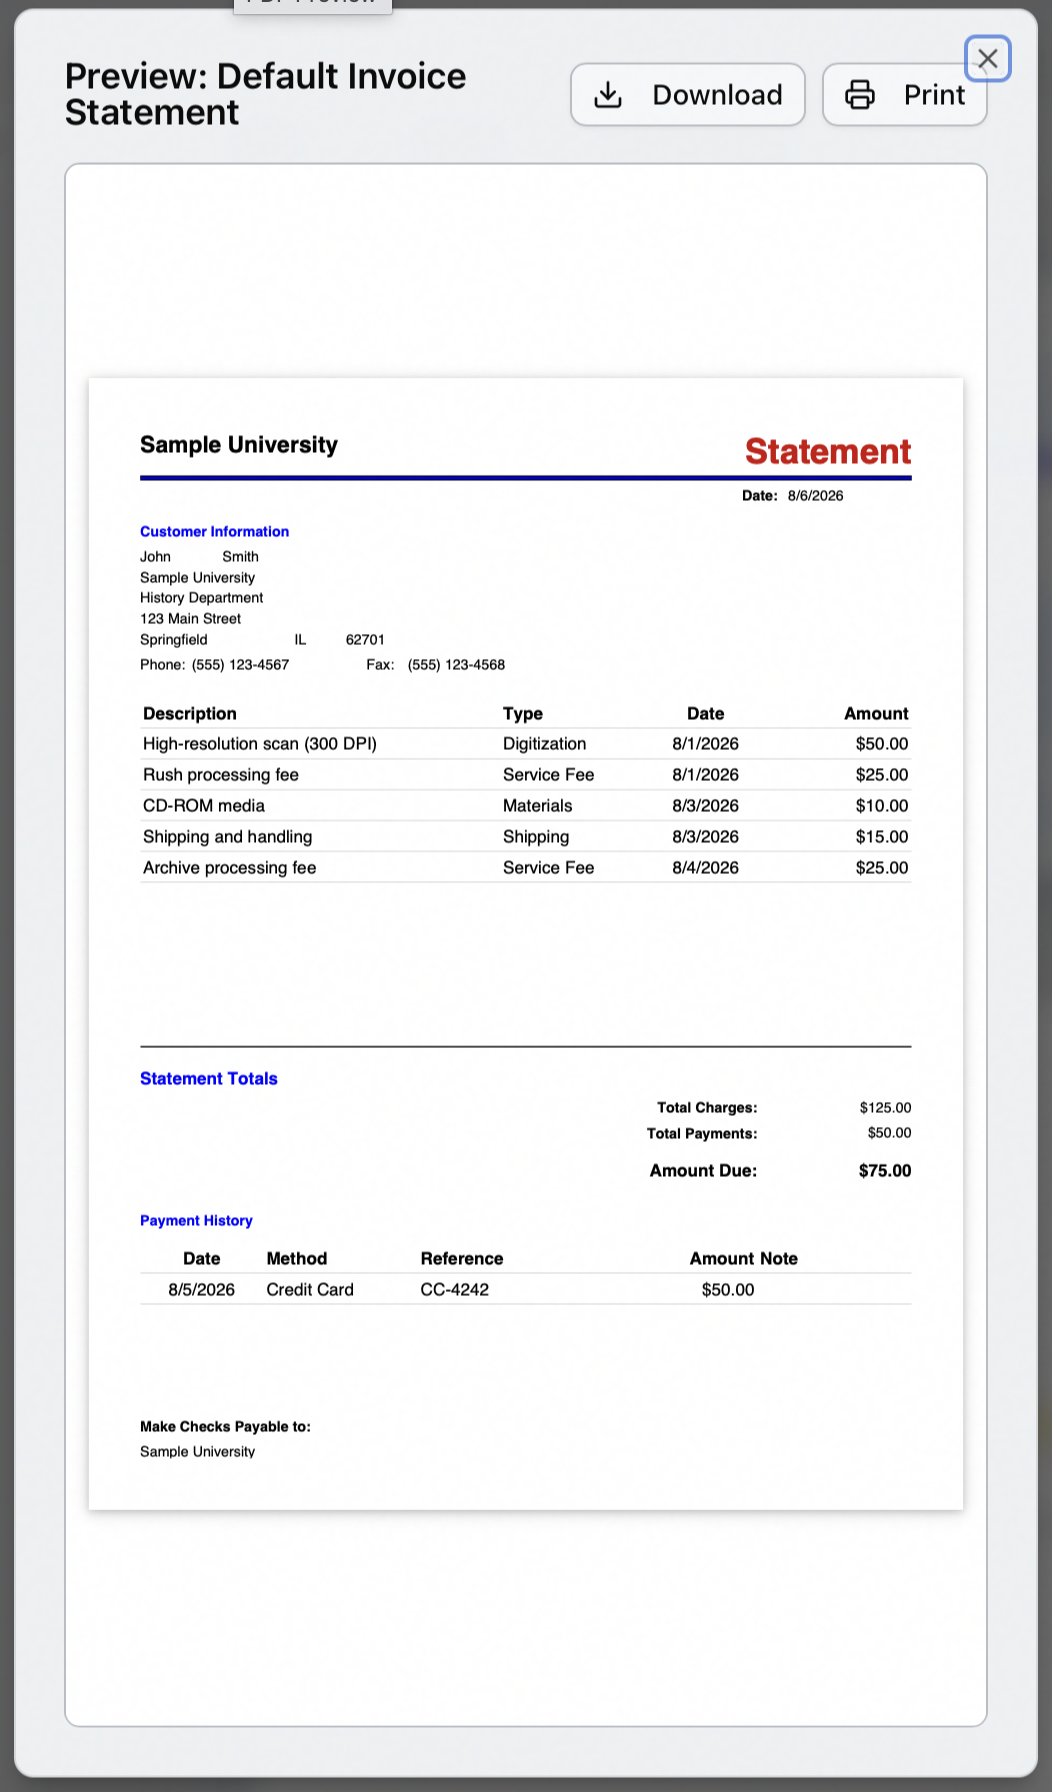
The preview window is titled after the template and offers Download and Print. The sample data is deliberately consistent, so you can check the arithmetic at a glance: five charges totaling $125.00, one payment of $50.00, and $75.00 due.
The canvas shows placement; the PDF shows the result. Always preview before you rely on a statement — particularly after changing a currency format, a prefix, or anything in the totals block, since those are the parts a researcher will check.
What the supplied default includes
The default statement is a reasonable starting point, and it's worth knowing what's on it before you rebuild it:
- A heading block — institution name, a rule, a Statement title, and the current date.
- Customer Information — first and last name, organization, department, street address, city, state, ZIP, phone, and fax, with the optional lines conditioned as described above.
- The Billing Charges table — description, type, date, and amount.
- Statement Totals — the three totals fields.
- The Payment History table — date, method, reference, amount, and note.
- Make Checks Payable to — the institution name and its general address.