Print Designer: Flow Layout
Every print template is laid out one of two ways. Absolute is the fixed canvas described on the individual template pages: you place an element at a spot on the page and it prints at that spot, every time. Flow is the alternative — the template becomes a vertical stack of bands, each band grows to fit whatever it actually contains, and everything below it shifts down.
That difference matters whenever you can't know in advance how tall something will be. An invoice with four charges and an invoice with forty are the same template; in Absolute the long one overflows the space you drew, and in Flow the charges table grows, the totals move down with it, and the document continues onto a second page with the header repeated. It's also what makes receipt printing possible: on continuous roll paper there is no page height to lay out against, so the printed strip is exactly as tall as its content.
- A template with a table on it — billing charges, payments, notes — where the number of rows varies by request.
- An invoice or statement that has to continue onto a second page without losing its header.
- Printing to a receipt printer or any continuous roll stock.
- Any template where text wraps to an unpredictable number of lines and the content below it keeps colliding.
A new template is in Absolute mode, and a slip that always prints the same handful of fields on one sheet should stay there. Flow is for documents whose height you can't predict. Pull slips and callslips rarely need it.
Switching a template to Flow
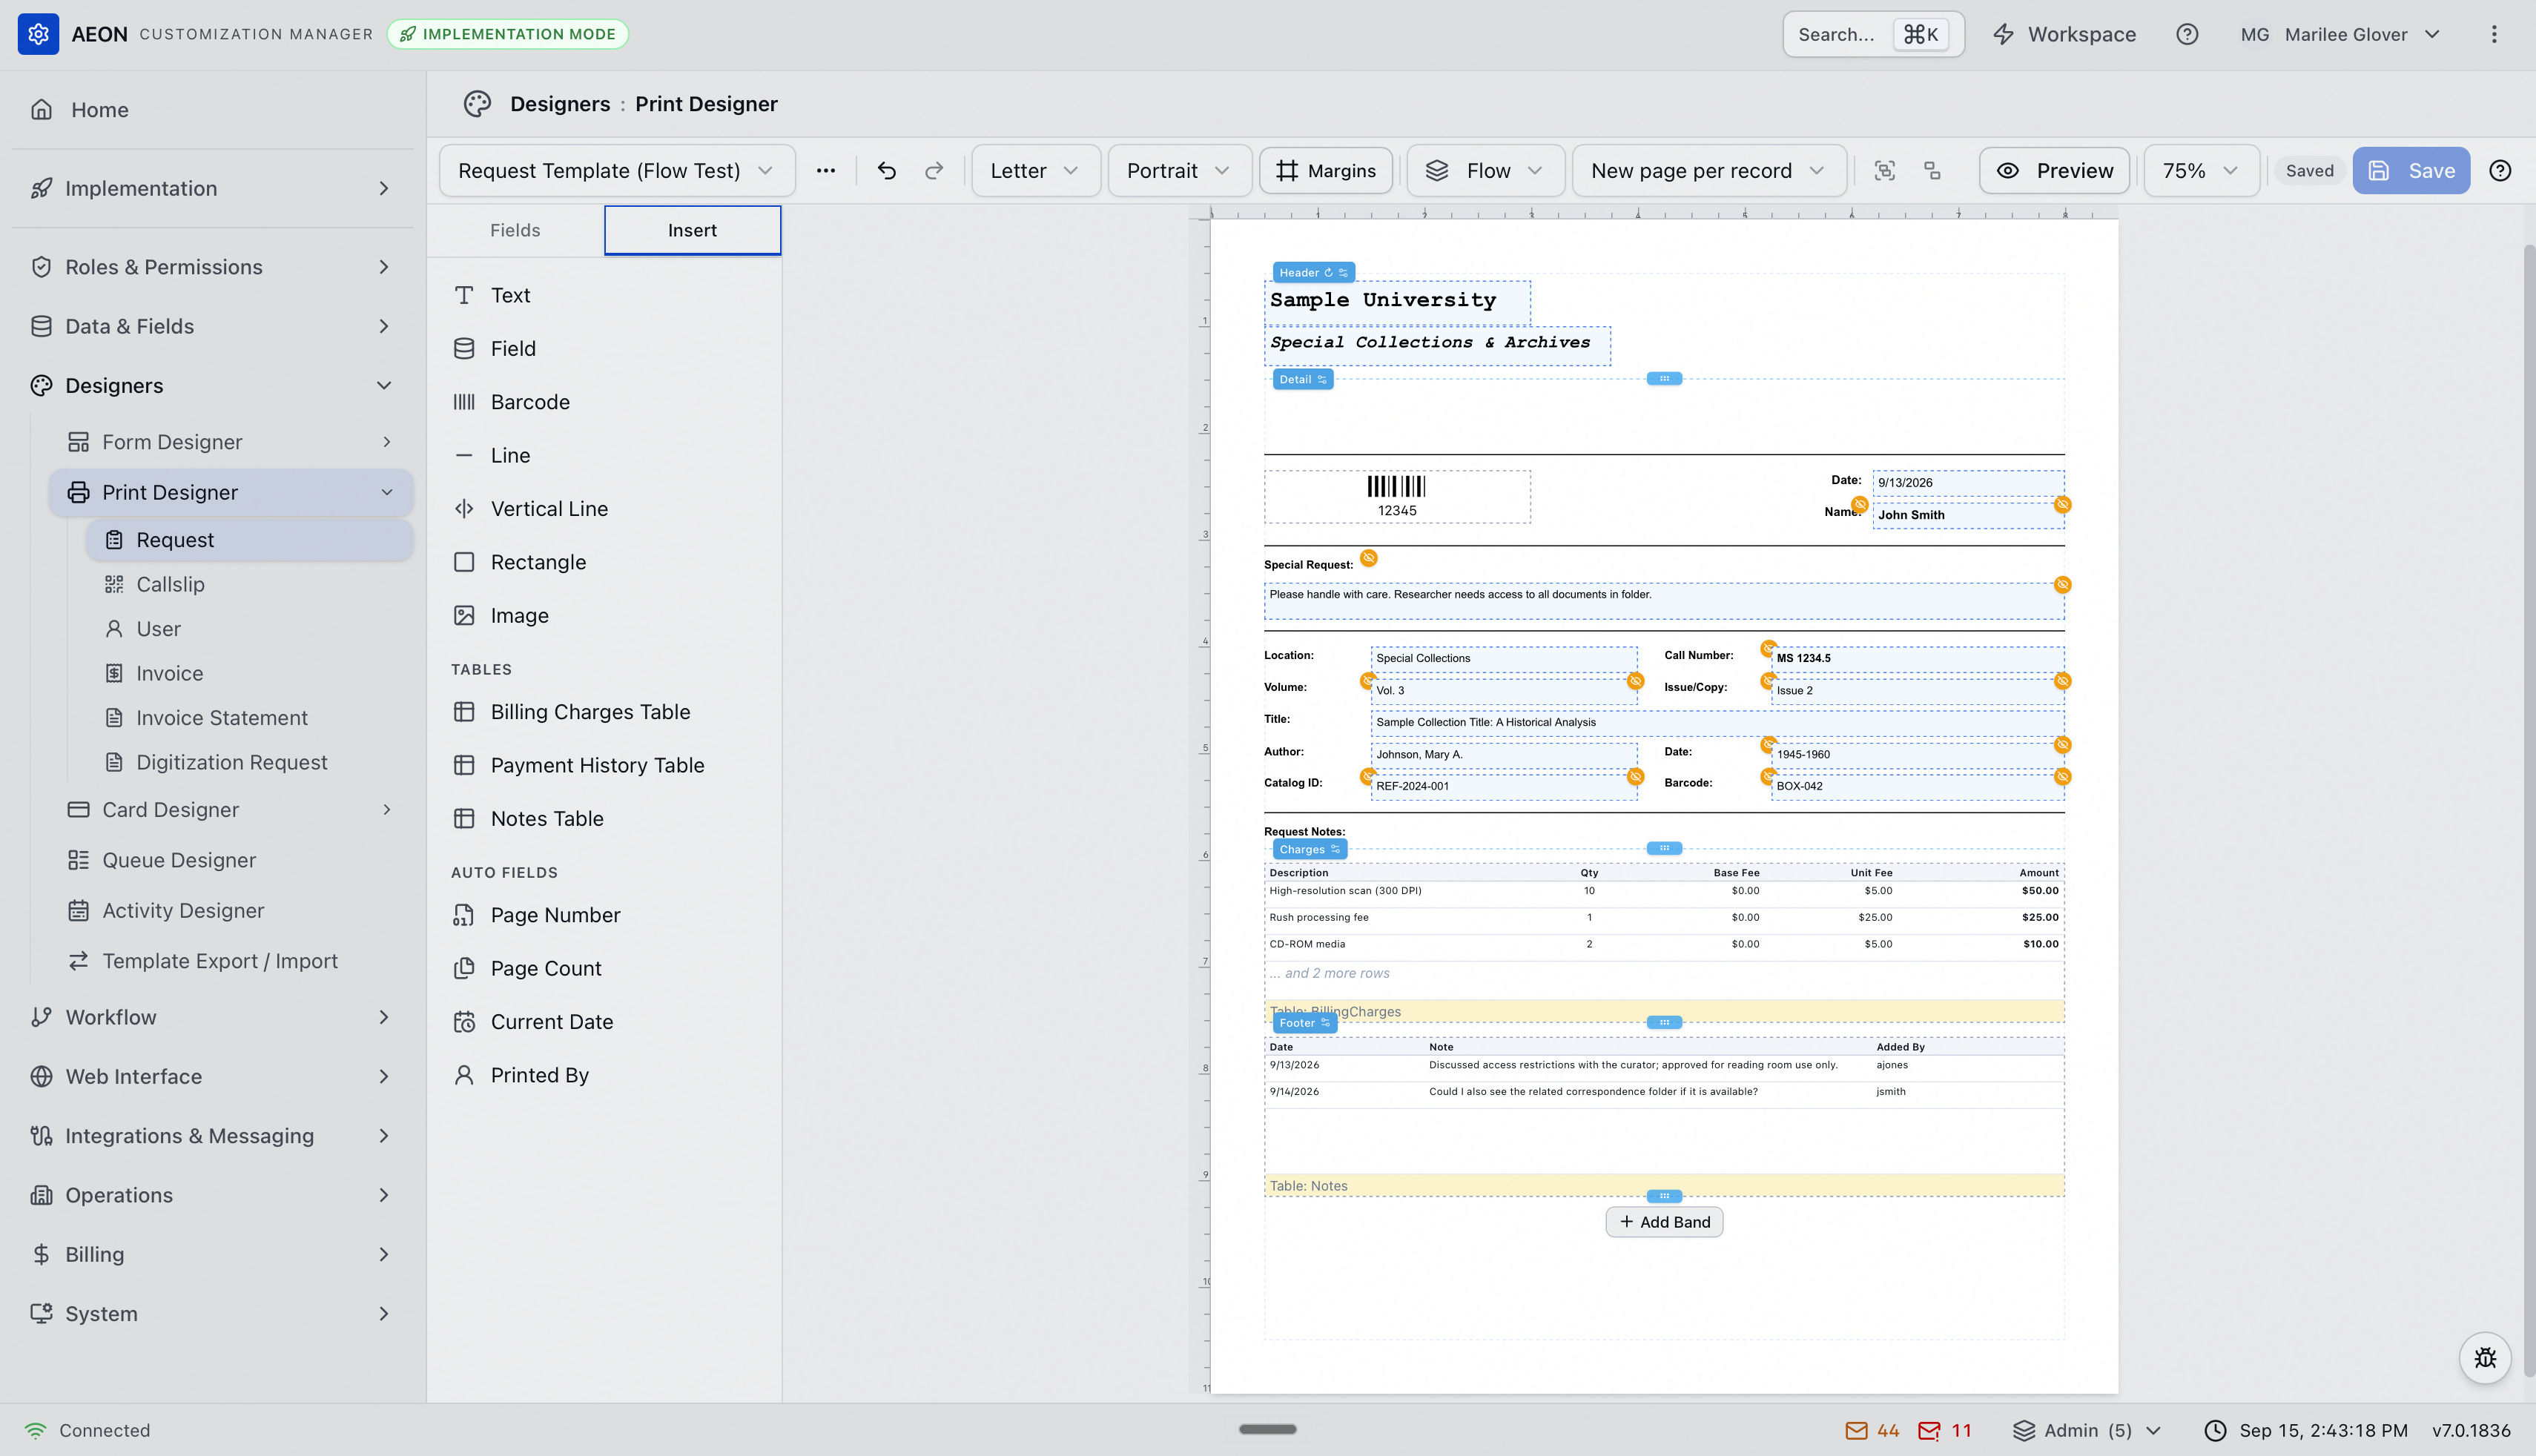
The layout mode control sits in the toolbar, between the margins button and the records-per-page button. It has two settings: Absolute and Flow.
Switching to Flow converts the template you already have. Every element moves into a single detail band named Detail, sized to your current content, and nothing changes position — the template looks exactly as it did until you start splitting it into more bands. Nothing is lost and the switch is a single undo step, so you can flip to Flow, look at it, and press ⌘Z.
Switching back to Absolute converts the other way, moving elements from band-relative coordinates back to page coordinates.
Flow-only settings are parked rather than discarded when you switch to Absolute, and restored if you switch back — a continuous page size and your record-separation choice both survive. Likewise, a multi-record grid set up in Absolute is kept (though ignored) while you're in Flow. You can move a template between the two modes to compare them without losing work.
Bands
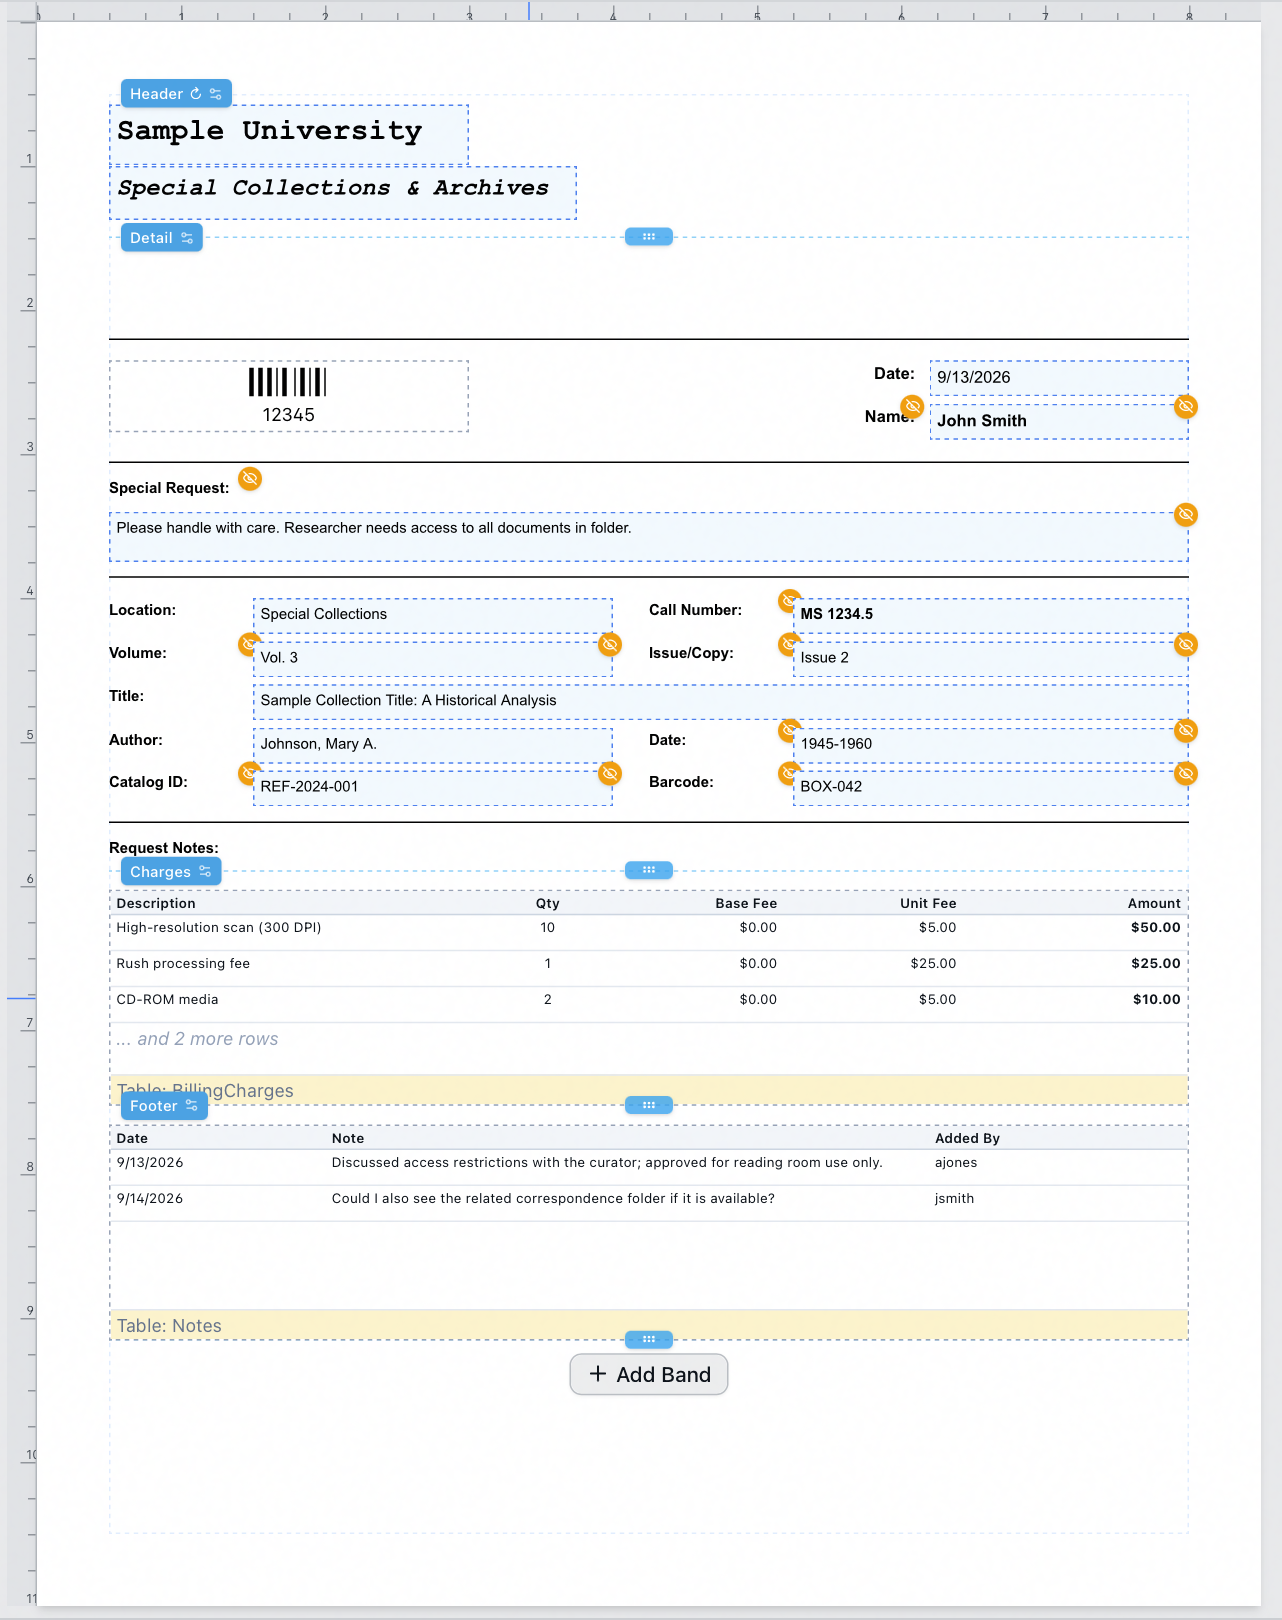
A band is a horizontal slice of the template, and in Flow mode everything lives in one. Bands stack top to bottom in the order shown on the canvas, and that order is the print order. Inside a band you position elements exactly as you would in Absolute — the band is its own small canvas.
The height you give a band is its design height, which acts as a minimum. At print time a band grows to fit content that wraps or a table that gained rows, and every band below it moves down.
Working with bands on the canvas
Each band carries a small colored chip in its top-left corner showing its name. Click the chip to open the band's settings:
| Setting | What it does |
|---|---|
| Band name | A label for your own use — name them Header, Charges, Totals so the stack is readable. |
| Role | Detail (renders per record) or Separator (between records) — see below. |
| Keep together (never split across pages) | The band moves to the next page whole rather than breaking across the page boundary. Use it for a block that would read badly split — a signature line, an address, a totals box. |
| Repeat at top of continuation pages | The band prints again at the top of every page the document continues onto. This is how a table header survives a page break. |
The same popover has arrows to move the band up or down in the stack, and a Delete button.
To change a band's height, drag the handle at its bottom edge. To add one, click Add Band below the bottom of the stack; a new detail band is 1 inch tall.
A band's contents go with it. Move anything you want to keep into another band first.
You can't delete the last one — a flow template needs at least one band, and the Delete button is unavailable when only one remains.
A band set to repeat on continuation pages shows a ↻ next to its name on the chip, so you can see at a glance which parts of the template come back at the top of page two.
Keep together is a promise not to split, so a band that grows taller than a whole page has nowhere to go: it prints whole on a fresh page and whatever runs past the bottom is cut off. Without the setting, the same band would have split at a table-row boundary and continued.
Use Keep together on blocks that stay short. Leave it off on anything holding a table that could grow.
Detail bands and separator bands
Most bands are detail bands: they print once for each record. A separator band is different — it prints between records, and only when you're printing several records continuously (see below). Use one for a cut line, a rule, or a gap between consecutive receipts on the same strip.
Separator bands are drawn in a different color on the canvas so you can tell them apart from detail bands, and a new one starts shorter than a detail band, at a quarter inch.
Printing several records at once
In Absolute mode, printing several records to a page is the records-per-page grid: you set rows and columns and Aeon tiles the records into cells. That control doesn't apply in Flow mode, because a flow template has no fixed cell to tile into. The toolbar swaps it for a record separation control with two settings:
- New page per record — each record starts a fresh page. On continuous stock, a fresh cut.
- Continuous (separator band between) — records follow one another down the same page or strip, with any separator band printed between them.
New page per record is the default, and it matches how Absolute mode behaves.
Receipt and roll printing
Continuous stock — receipt rolls, label strips, anything without a fixed sheet height — needs Flow mode, because the whole point is that the printed length is determined by the content rather than by a page size.
To set it up:
- Switch the template's layout mode to Flow.
- Open the page size list in the toolbar and choose Custom....
- In the Custom Page Size dialog, set the Width to your stock's width and pick in or mm.
- Check Continuous height (receipt roll). The Height box is disabled once you do — there is no height to set.
- Click Apply.
The canvas then shows a Continuous roll badge in the corner of the page, with the note "Continuous stock: the printed page is exactly as tall as its content."
The Continuous height (receipt roll) checkbox is unavailable while the template is in Absolute mode, and a site-defined page size that has no height is listed but grayed out, labeled — needs Flow layout. This isn't only an interface restriction: the combination is rejected when the template is saved, so switching the mode first is the only route.
Orientation is also unavailable on continuous stock — portrait and landscape have no meaning on a roll.
If more than one template prints to the same roll, define the size once through Manage page sizes... in the page size list rather than setting custom dimensions on each template. The Custom Page Size dialog says as much: a size used on more than one template is better defined once as a site page size.
What else changes in Flow mode
| Absolute | Flow | |
|---|---|---|
| Element positions | Fixed on the page | Relative to the band they're in |
| Several records per page | Records per page grid — rows, columns, gaps | Record separation — new page, or continuous with a separator band |
| Page continuation | The page is the page | The document continues, and bands marked to repeat come back at the top |
| Continuous stock | Not available | Available |
| Page orientation | Portrait or landscape | Portrait or landscape, unless the stock is continuous |
Everything else works the way the individual template pages describe. The Fields and Insert tabs, the floating toolbar, visibility conditions, format options and preview are all unchanged — an element behaves the same inside a band as it does on a fixed page.
This is the one habit worth forming with flow templates. The canvas draws your bands at their design heights and never paginates — it can't, because where a page ends depends on how much data each record turns out to have. So the canvas will look correct even when the printed output breaks somewhere awkward.
Click Preview to see the real thing. Aeon renders the template with sample data, so a table with several rows shows you how far the bands actually grow, where the page breaks fall, and whether the bands you marked Repeat at top of continuation pages come back where you expected.
Preview after any change that affects height — adding a table, resizing a band, switching a band's Keep together setting. On continuous stock there are no page breaks to check, but preview still shows you how long the finished strip is.
Which templates can use it
Flow layout is a property of an individual template, not of a template type, so any of the six print template types can use it: Request, Callslip, User, Invoice, Invoice Statement, and Digitization Request. In practice it earns its place on the ones that carry tables or vary in length — invoices and statements above all — and on anything printing to a roll.